Foto Fridays: Tips for Photographing Disney at Christmas
The Holidays are undoubtedly one of the most magical times of the year at Walt Disney World. The festive sounds of the seasons, the snow falling over Main Street, and hot cocoa at Mickey’s Very Merry Christmas party. Least of all, the beautiful lights and decorations all around the parks and resorts. The foregoing, plus the light crowds and nice weather, make an extremely compelling argument to visit Walt Disney World during the Holidays. Christmas is easily my favorite time of the year to visit the ‘World.
Unfortunately, it’s not always so easy to capture the essence of those Christmas decorations in photos. Since I know so many of us struggle with those difficult photography situations, and since we so desperately want to capture the spirit of the season, I have decided to assemble some tips for making the most of your Holiday pictures at Walt Disney World. By following these mostly simple tips, anyone with any camera will be able to take beautiful pictures of Walt Disney World at Christmas! Trust me, if I can do it, anyone can do it.
The first and only requirement to take great Holiday pictures at Walt Disney World is that you have a camera. That’s it. Nothing special is required—although you’ll look a lot cooler if you take your photos with a Nikon. After all, Ashton Kutcher uses a Nikon, and a lot of people follow him on Twitter, so he is like the king of cool. In the quest to capture good pictures, knowledge is the other key. Knowledge is actually extremely important; both knowledge of basic photography principles and your camera are key to success. To that end, I would highly recommend having your camera in hand as you read this, testing settings to help supplement my explanations.
My first bit of advice like I mentioned in the Halloween article, and this mirrors my general advice for photography at the parks, is not to overlook the details. If you can manage to visualize cool photos that others wouldn’t think of, you have an instant—and substantial—leg up on everyone else. I recommend doing a self-guided tour of the resorts (we often do our tour on the morning that we attend Mickey’s Very Merry Christmas Party so we don’t waste any park tickets for that day), during which you will encounter absolutely gorgeous Christmas décor befitting of the resort themes. Typically, the Deluxe resorts will have a display centerpiece with smaller decorations throughout the resort. These displays follow the four basic food groups set forth by the profound thinker, Buddy the Elf: candy, candy canes, candy corn, and syrup. Well, maybe not candy corn or syrup, but they are certainly made of a lot of sugar-based food products. While it’s fun to photograph the centerpiece, challenge your photographic eye by looking for compelling photographic subjects in the smaller details.
 The Polynesian has small displays throughout the resort. Watch your background when taking pictures of these displays. If you line it up just right, you may be able to get a festive wreath or large tree in the background.
On the topic of details, is the decorations and ornaments you’ll find within the trees around the parks and resorts. These can make for great objects to photograph, but there are two pitfalls you should avoid. First, don’t zoom with your feet to take close-up shots. Lenses can only focus when a certain distance from the subject, which is why so many close-up shots taken with point and shoot cameras look bad—the photographer moved the camera close, rather than using the optical zoom of the lens to get close. Another reason why this is important is because the bulbs on those trees are like mirrors. Unless you want a creative self-portrait, moving back and zooming in will minimize your presence in these shots. Second, don’t use your flash for these shots. At close distances, the flash will just wash out the lights and really take away from the beauty of the displays. Below, I will discuss when it may be pragmatic to use flash, but that’s not the case here. Another related tip is to watch your angles to create well “layered” shots. This means that your foreground will have one Christmas subject in it, and your background will have another Christmas subject in it. Since Christmas decorations are nearly everywhere at Walt Disney World, this shouldn’t be too difficult. I have found one of the best ways to do this is to look for interesting angles that place the smaller detail, or a portion of the smaller detail, in the foreground, while having a larger subject in the background. If you’re having trouble finding good photo options for this in the parks and resorts, head into a gift shop. There are plenty of Christmas souvenirs in there, and you can line them up yourself to “cheat” a bit! Watching how your angles line up can result in unique shots that show a little more of that Holiday Spirit for which Walt Disney World is so famous!
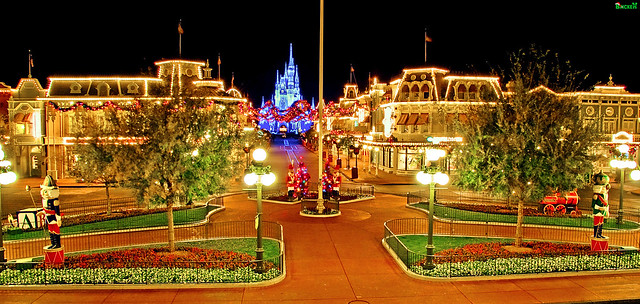
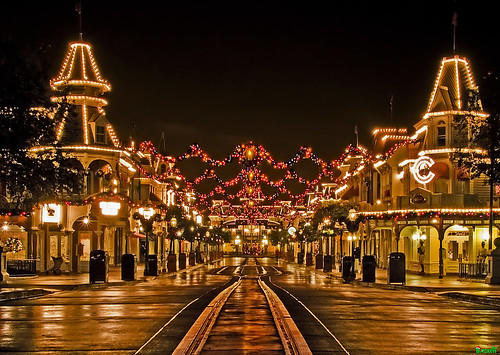
 It may seem difficult to line up these beautiful wreaths with anything since they are overhead, but if you go to the train station and use your zoom, you’ll be able to compose a neat shot with wreath-repetition!
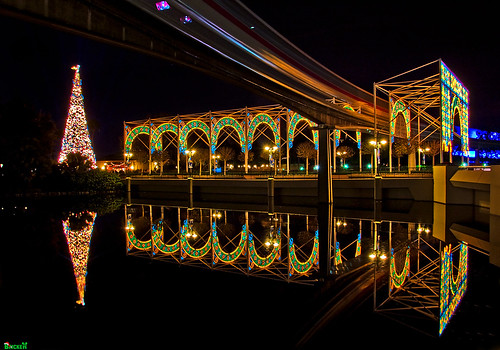 RIP – Lights of Winter. You were so obsolete that Disney couldn’t make a trip to Wal-Mart to update you with LED “technology”…even though Disney has managed to miraculously update that “little” light display at the Studios with LED lights.
One of the most common questions I am asked about photographing the Holidays centers around photographing light displays. Before I offer my advice, I preface it with this: most people will tell you to photograph outdoor Christmas lights before it’s totally dark. In the context of Walt Disney World, I disagree with this advice.

Additionally, this is the only area of this article where a little technical knowledge is going to be helpful. Now, before I scare anyone away, let me tell you that not much technical knowledge is needed here at all. If you’re familiar with the “scene” or preset modes on your camera (the name may differ depending on your camera manufacturer), you have the requisite knowledge. This is also the only area where I will recommend buying something. Relax, it’s not a new camera or some other expensive gadget, it’s a travel tripod. If that’s too much, it’s a $10 or less Gorilla pod (if you have one, a beanbag also works well) that can fit in the pocket of cargo shorts. If you don’t want to use a Gorilla pod, you may be able to hand-hold the camera and successfully capture the lights in some brighter areas (Osborne Family Spectacle of Dancing Lights is the first thing that comes to mind), but the Gorilla pod or beanbag is definitely the preferable way to go. For a more detailed discussion of camera stabilizing devices, see my Halloween photo tips.
 While you may not notice them when the parks are busy during the day, there are garbage cans all over the place. These garbage cans will help you extend the height of your Gorilla pod, making shots like this easy.
With all of these disclaimers and caveats out of the way, let’s get to the substance. I mostly prefer photographs of the lights at Walt Disney World when night has fallen, as I think the contrast created between the black of the sky and the color of the lights looks better than a dusk sky against lights. The lights are also more dominant in the shots after night has fallen. I suppose reasonable minds could differ on whether the pictures look better at night or dusk, though. If you shoot the lights around dusk before the sky is totally black, you will get a pleasant looking, almost ethereal, blue sky. Sometimes, this looks really cool, much cooler than the contrast between the jet black night sky and the lights, sometimes it doesn’t. Photographing the lights at the dusk hour will also give you the benefit of more light in your shot, decreasing the likelihood that you’ll need to use that Gorillapod or beanbag. So, if you’re traveling without a camera stabilizing device, you should be photographing the lights at dusk, by default.

It might be difficult to find a spot to set your Gorillapod in the crowds that gather to watch Osborne Lights, but if you travel in early-to-mid December, or wait until the park is almost closed, you will have success in finding lighter crowds.
To capture the lights when night has fallen, set up your Gorillapod or position your camera on your beanbag and set it on top of a trashcan, ledge, or some elevated area near the subject of which you want to take a picture. Find and choose the preset mode on your camera (it will likely be called something like “night scene”), set the camera to self-timer mode (your camera should have an option to take a picture approximately 2 seconds after you press the shutter button; you do this because pressing the shutter button moves the camera a bit, which in turn causes a slight blur to shots like this), and wait for the results.
For those of you with cameras that allow you to manually change settings on your camera, and if you feel comfortable possibly giving that a try, I suggest you alter three settings: shutter speed, aperture, and ISO. If you’re unfamiliar with the meanings of these terms, I suggest learning a bit more about them via Google or in a photography book, but since I could probably delve into long articles on each, I think that detailed of an explanation is beyond the scope of this article. Here, essentially, is what you’ll want to try if you have a Gorilla pod or beanbag set-up to stabilize the camera: use a long shutter speed (ranging from 5 seconds to 10 seconds), moderate aperture (f/8 to f/13), and low ISO (ISO 50 to ISO 400). If you’re holding your camera by hand, I would recommend trying to brace the camera as best as possible (resting your elbows on a trash can works well), and using a moderate shutter speed (1/30th to 1/10th of a second), wide open aperture (the lowest number your camera has; it should be around f/2.8), and high ISO (ISO 800 to ISO 1600). Keep in mind that the precise settings will be contingent upon the light present in a given situation and what your camera and lens is capable of.
 I used manual settings for this shot of EPCOT’s tree, but this is not required to get good pictures. When set on the right preset mode, any digital camera can take good pictures if properly stabilized. You may have a bit more success with manual settings as you can fine-tune the settings yourself, but this is not necessary. Don’t give up just because you are intimidated by manual settings. If you don’t want to learn them, don’t worry!
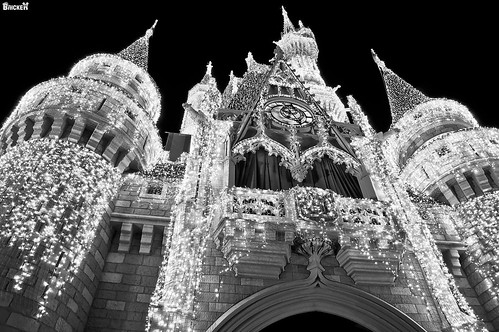
The last tip concerns the camera’s flash. Unless you are taking a picture of one of the aforementioned “Disney Details” up close outside at night or people, turn off the flash. Even if you are taking a picture of a display, I would consider not using the flash. The problem with using a flash to take pictures of Christmas lights is that a flash can wash out the lights making them appear as if they are not illuminated. The converse to this is that you may not be able to see the details of the subject if you don’t use the flash. For this reason, you’ll almost always want to use flash when taking a picture of people, unless you want them to be illuminated by ambient light from the display (in the scene modes on your camera, look for “night portrait” or something similar). I recommend taking two pictures of the Disney Details subjects, one with flash and one without, and determining which you prefer when you go home. Remember, you can always delete a bad picture later; however, you cannot go back in time and re-capture a moment that you didn’t successfully photograph the first time.
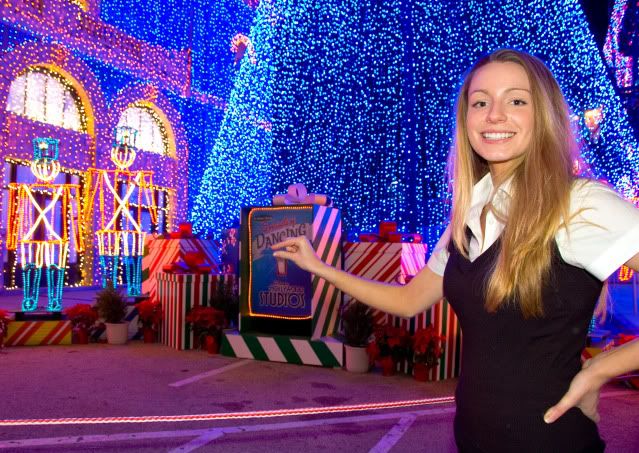 For this picture of Sarah, I fired my camera’s flash to ‘fill’ the foreground of the image with light, knowing that she would appear as a silhouette without the flash. As a general rule, you should be using the flash for fill purposes on images of people. You will still need to stabilize the camera and use a slightly long shutter speed (but not too long, since people move, and that movement will cause blur in the shot!), but not as long as you would for a night shot of a landscape. If you have a ‘night portrait’ mode on your camera, try using that with a Gorillapod.
 Whether you use your flash on a shot such as this is more of a judgment call, or a matter of taking two shots, one with the flash and one without, and seeing which you prefer. For this shot, I did not use my flash. If you are shooting this without something to stabilize your shot, you probably will want to use the flash.
This may all be a lot to digest right now, but with a little practice, you’ll learn these tips in no time. I know this is a lot of information, and if you’re unfamiliar with the settings on your camera, it may seem intimidating. However, I can assure you that the payoff of learning a few of these tricks is high. Finally, and maybe not everyone is as big of a geek as me, but I’ve found that the best way to test what will work with your camera is to practice before leaving for Walt Disney World. You won’t be able to replicate the circumstances exactly (unless your last name is “Osborne”), but you’ll get a rough idea, and more importantly, you won’t waste any valuable time while on vacation!
Many of these tips are intermediate-to-advanced level, so don’t fret if you can’t utilize them all. If you’re ho-ho-hoping to learn more about photography before your Christmas trip to WDW, check your local library for books on photography, or search Google for other photography tips. One site that I highly recommend, WDWPhotography.com, posts multiple articles per week written by Walt Disney World photography enthusiasts. Even if you’re not interested in learning advanced techniques, it’s fun to see shots from some of the incredibly talented photographers there, and read posts that site describe their creative process.
Hope you enjoyed this article! My wife and I will be traveling to Walt Disney World for 2010 Reunion; we hope to see many of you there, and hope you are able to put these tips to good use this Christmas, wherever it may find you. Have a Merry Christmas!
Have any questions, inquiries, or tips of your own? Share in the comments!
You May Also Like...
-

Now that it's the second half of the year, it's beginning to look a lot like Christmas. Well, not really, but…
-

You've made the decision to head to Walt Disney World during the week of Christmas, or the week after. Although this…
-

If you are looking for a fun and free way to celebrate the holidays while visiting the Walt Disney World Resort,…
-

The Disney Skyliner is a high-in-the-sky transportation system that has caught the attention of Disney fans and visitors. Its colorful gondolas,…
Beautiful shots. How were you able take so many great photos of the park empty at night?