
How To Plan Your Disney World Day With My Disney Experience
If you’re visiting Disney World, you’ll find your dining, resort, and Lightning Lane reservations as soon as you open the My Plans area of the My Disney Experience app. But did you know that My Plans can make it faster to check wait times and book Lightning Lanes? For convenience and speed, it’s worth taking a few minutes to customize your park touring with Disney Genie. Then you can spend more park time on those core memories and less time on your phone. I’ll show you how!
For information about how to use Lightning Lanes or make dining reservations, see our separate walkthroughs. (Lightning Lane walkthrough | Dining reservation walkthrough). This article is only about how to set up Genie in My Disney Experience so you can use it like a pro while you’re touring. The Disney Genie feature is free, and anyone can use it, although it does have some gaps that I’ll discuss after the how-to. Tap any link below to jump ahead:
Getting Started with Genie | Viewing Wait Times and Showtimes | Adding Favorites to Your Genie Touring Plan | Other Useful Genie Features | Planning the Future in My Plans | Frequently Asked Questions About Disney Genie
Getting Started with Genie
You’ll need to download the My Disney Experience app, to use Disney Genie. Log in with the My Disney Experience account that you use to buy tickets and make resort or dining reservations. Also make sure you have a ticket before getting started. And if you have a ticket that needs a park reservation, you’ll need one of those too. (Regular date-based tickets do not need park reservations.)
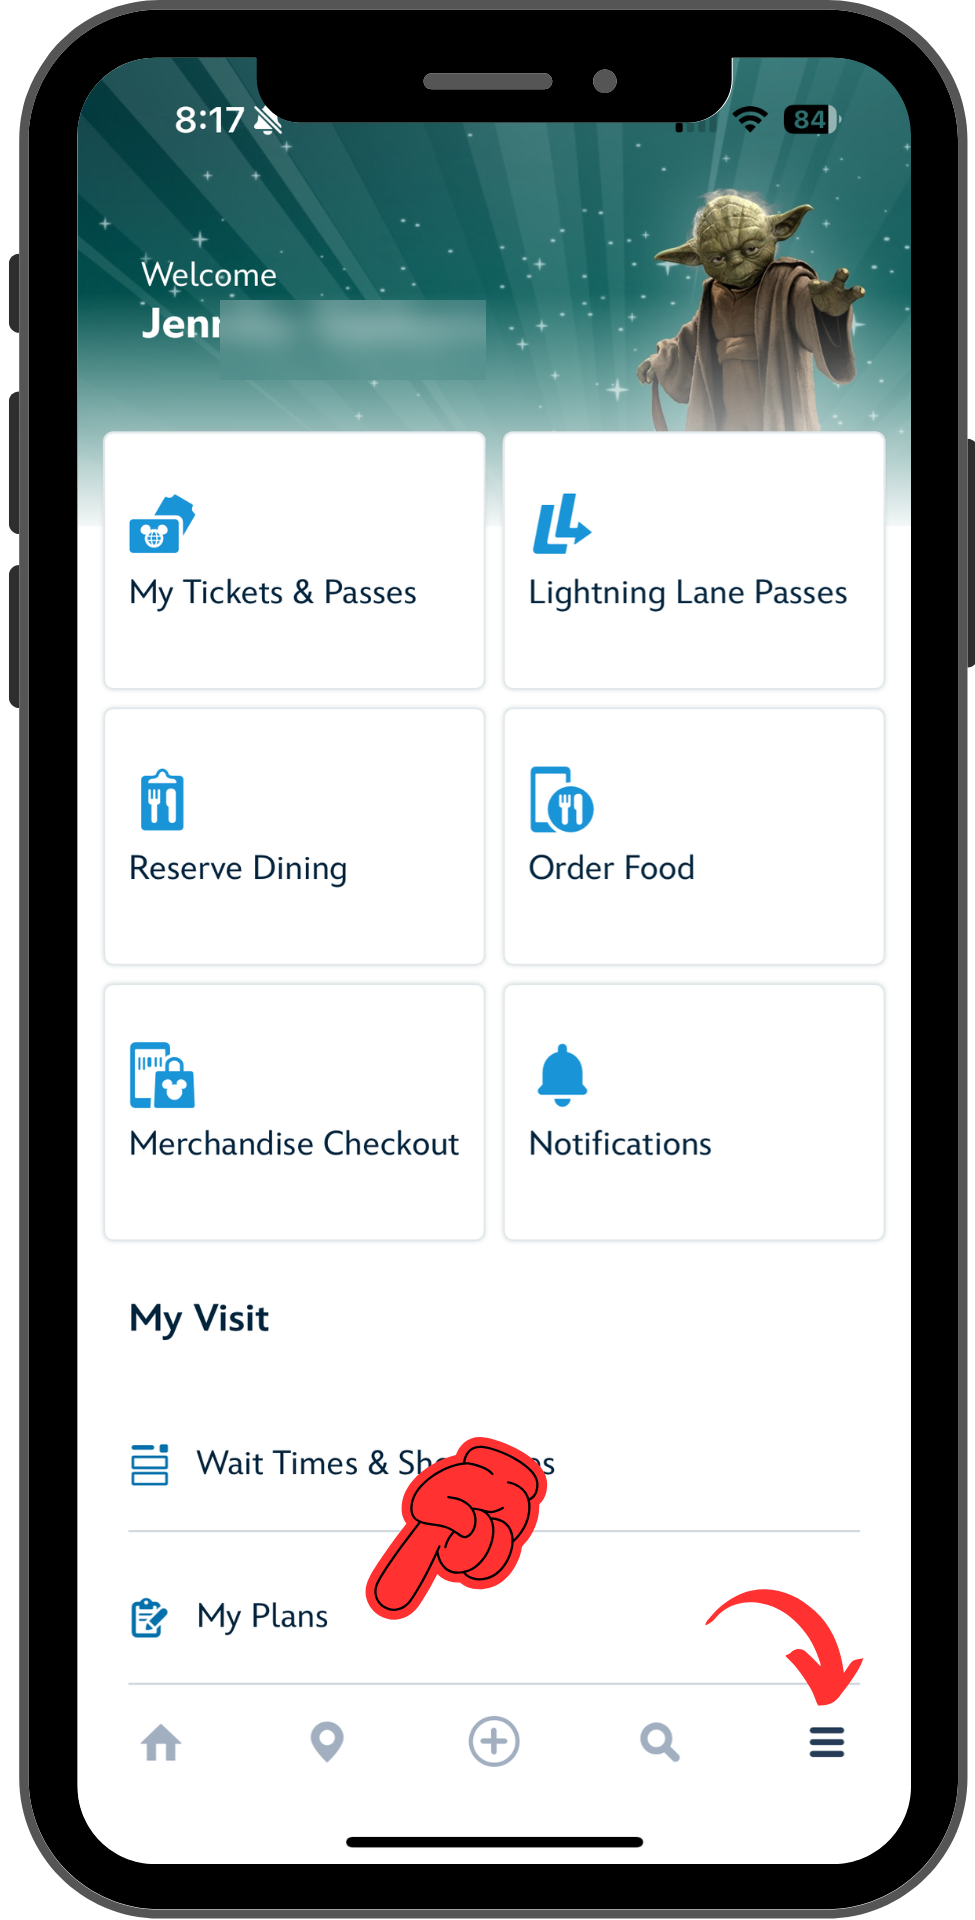
Step 1. Find the Get Started card for Genie, or start from My Plans
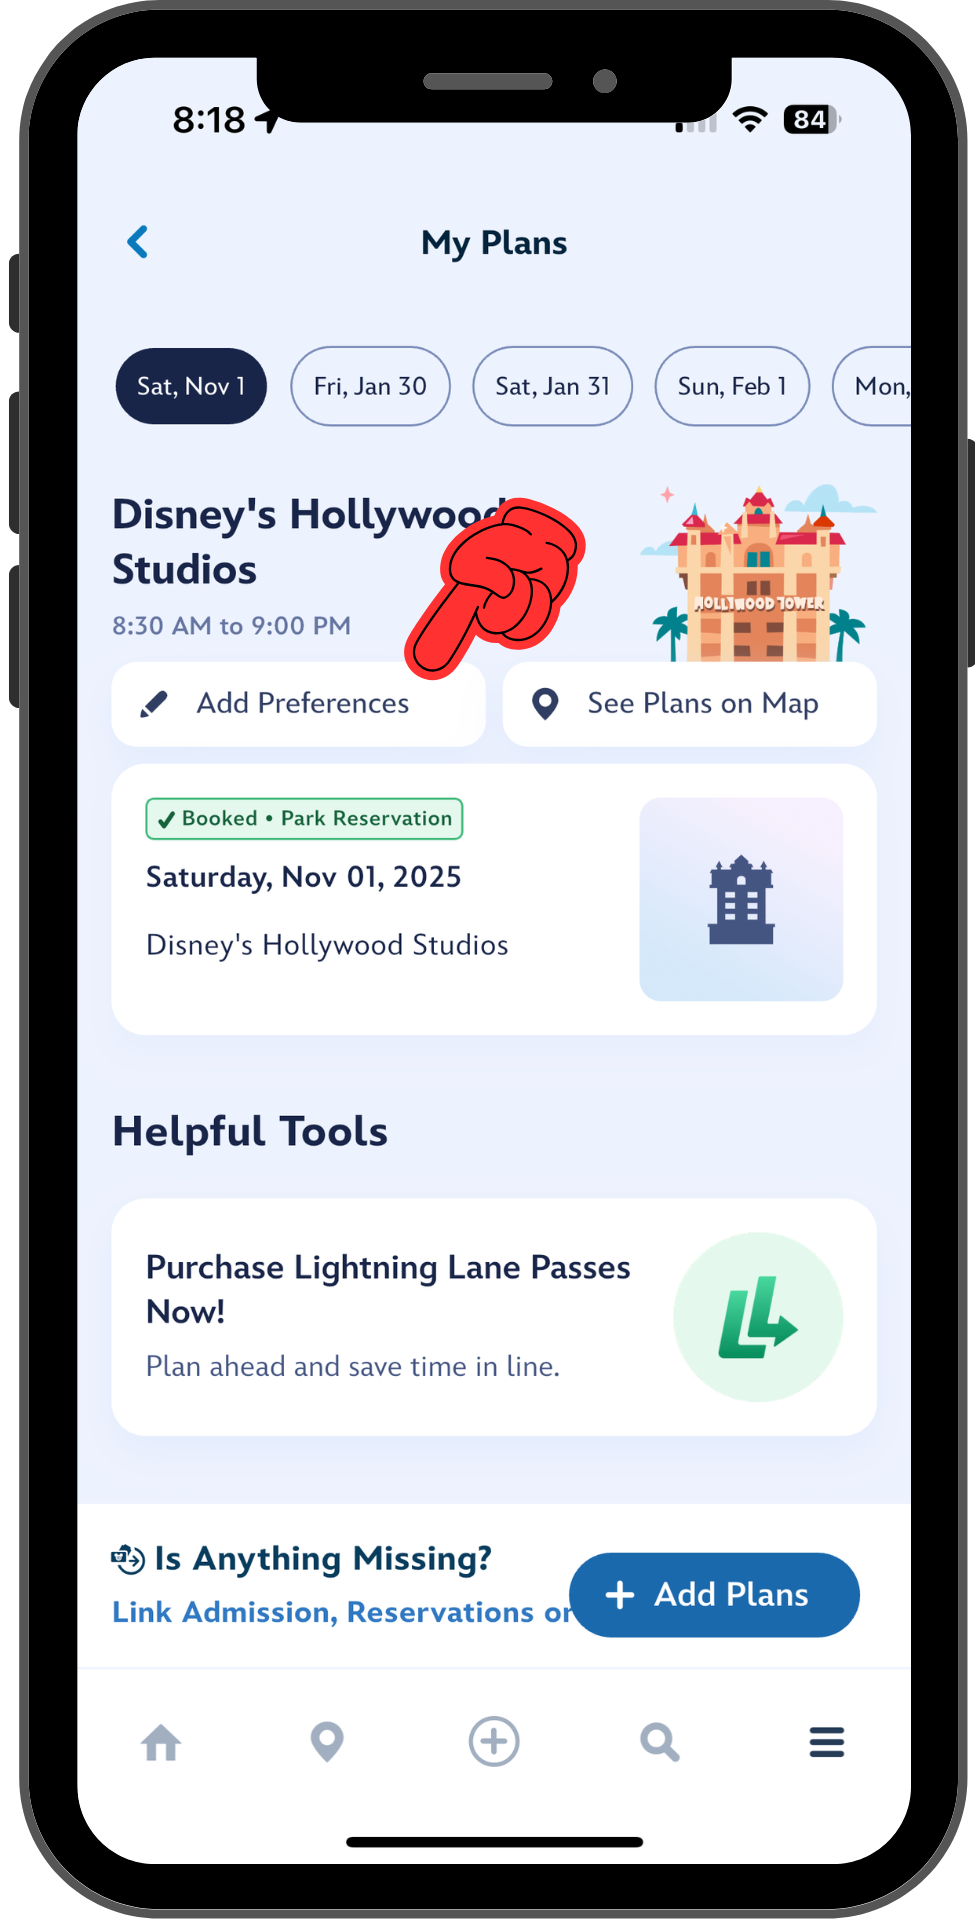
To set up Genie for the current day, tap the “Getting Started” card on the My Disney Experience home screen, or go to My Plans using the hamburger menu on the bottom right. For future dates, start in My Plans – see the future planning section at the end for details on getting started. Once you’ve reached the setup screen for future dates, the steps are the same as below.
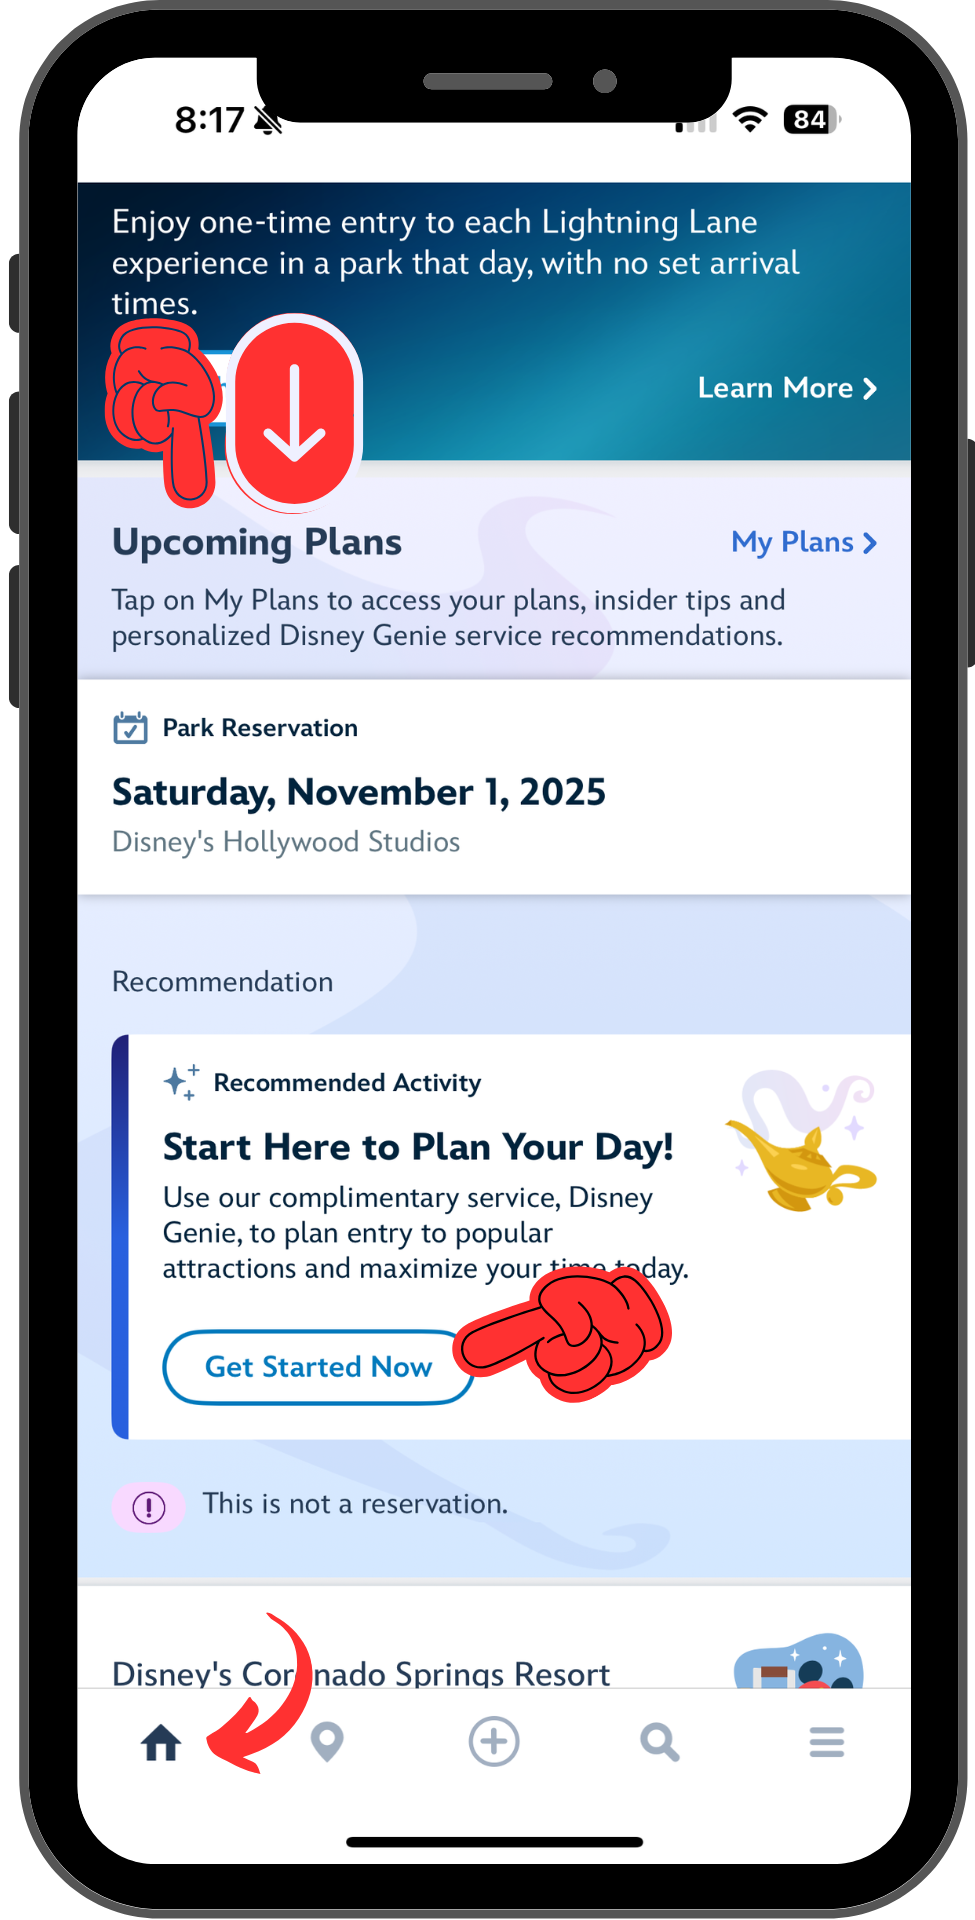
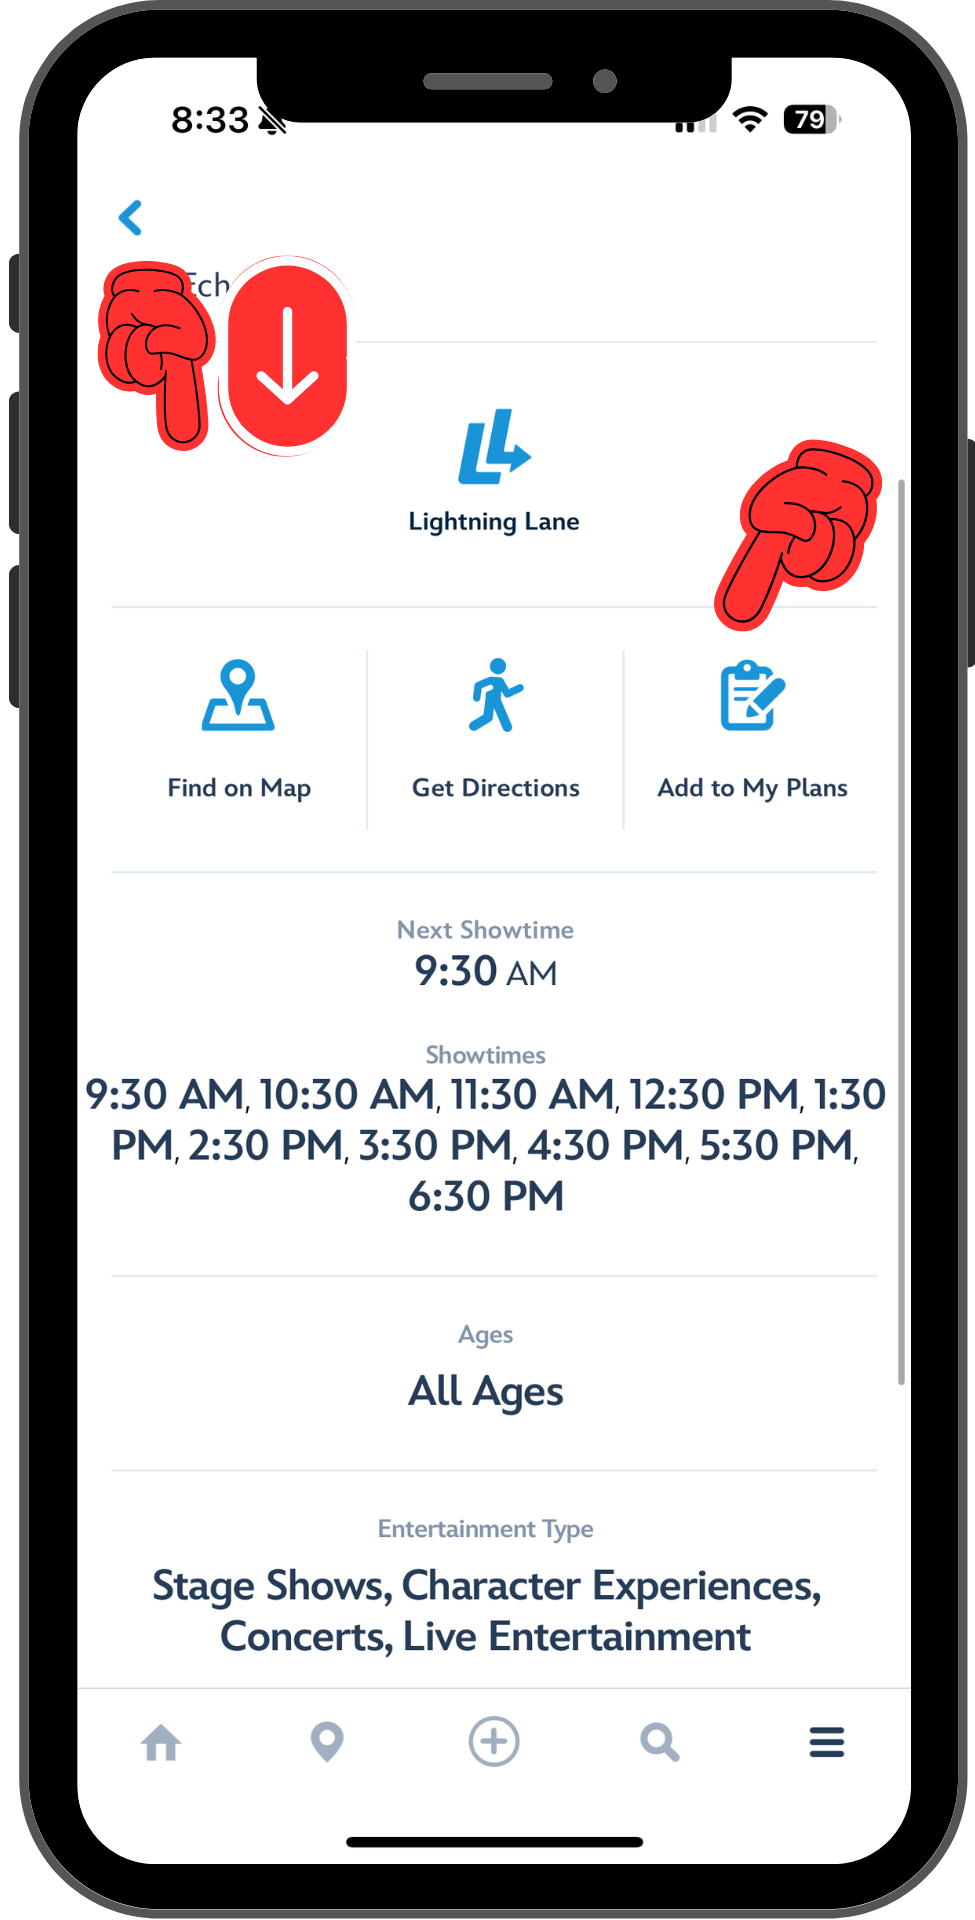
Let’s talk about the icons in the screenshots (tap to expand and swipe through). A pointed finger with an arrow means you’ll need to scroll to get to what you see in the image. A pointed finger alone shows where to tap to continue. A curved arrow means something to notice – sometimes a previous step taken on this screen. You’ll find that My Disney Experience often has two or three different ways to get to the same place; from here on, I’ll only show one for brevity. Have fun discovering more on your own!
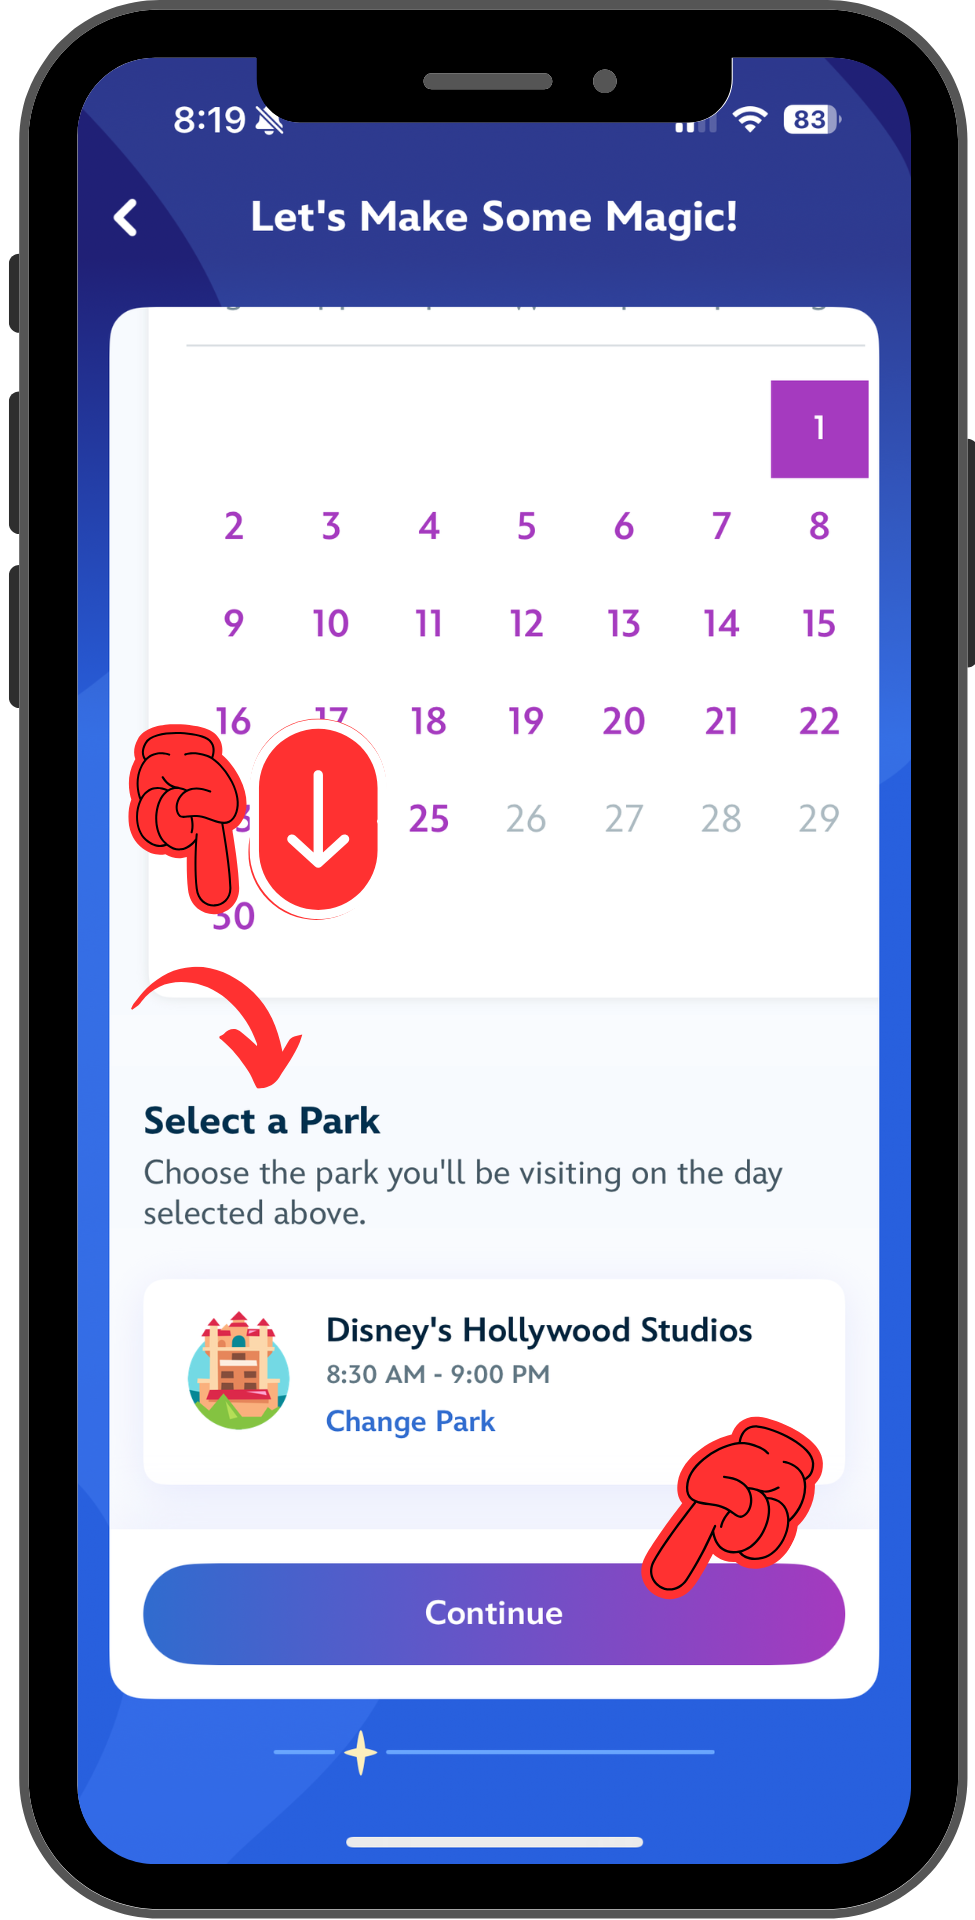
Step 2. Specify when you’ll visit and who will be with you
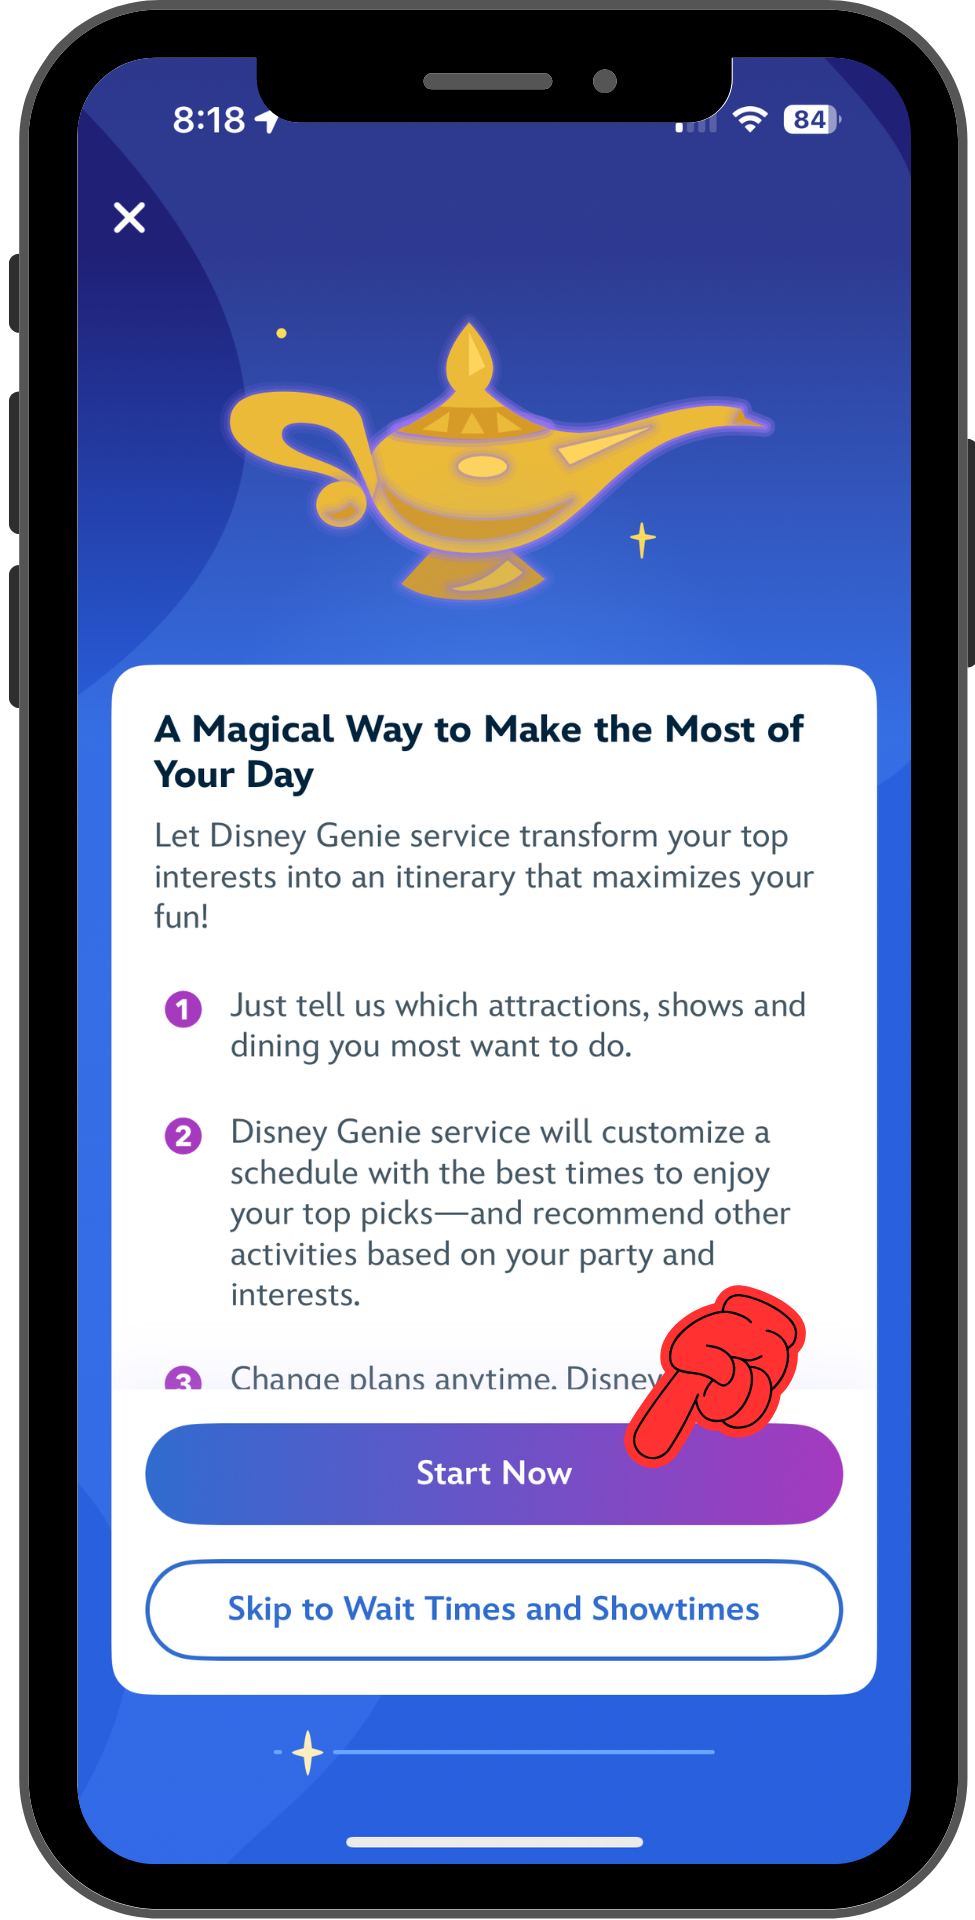
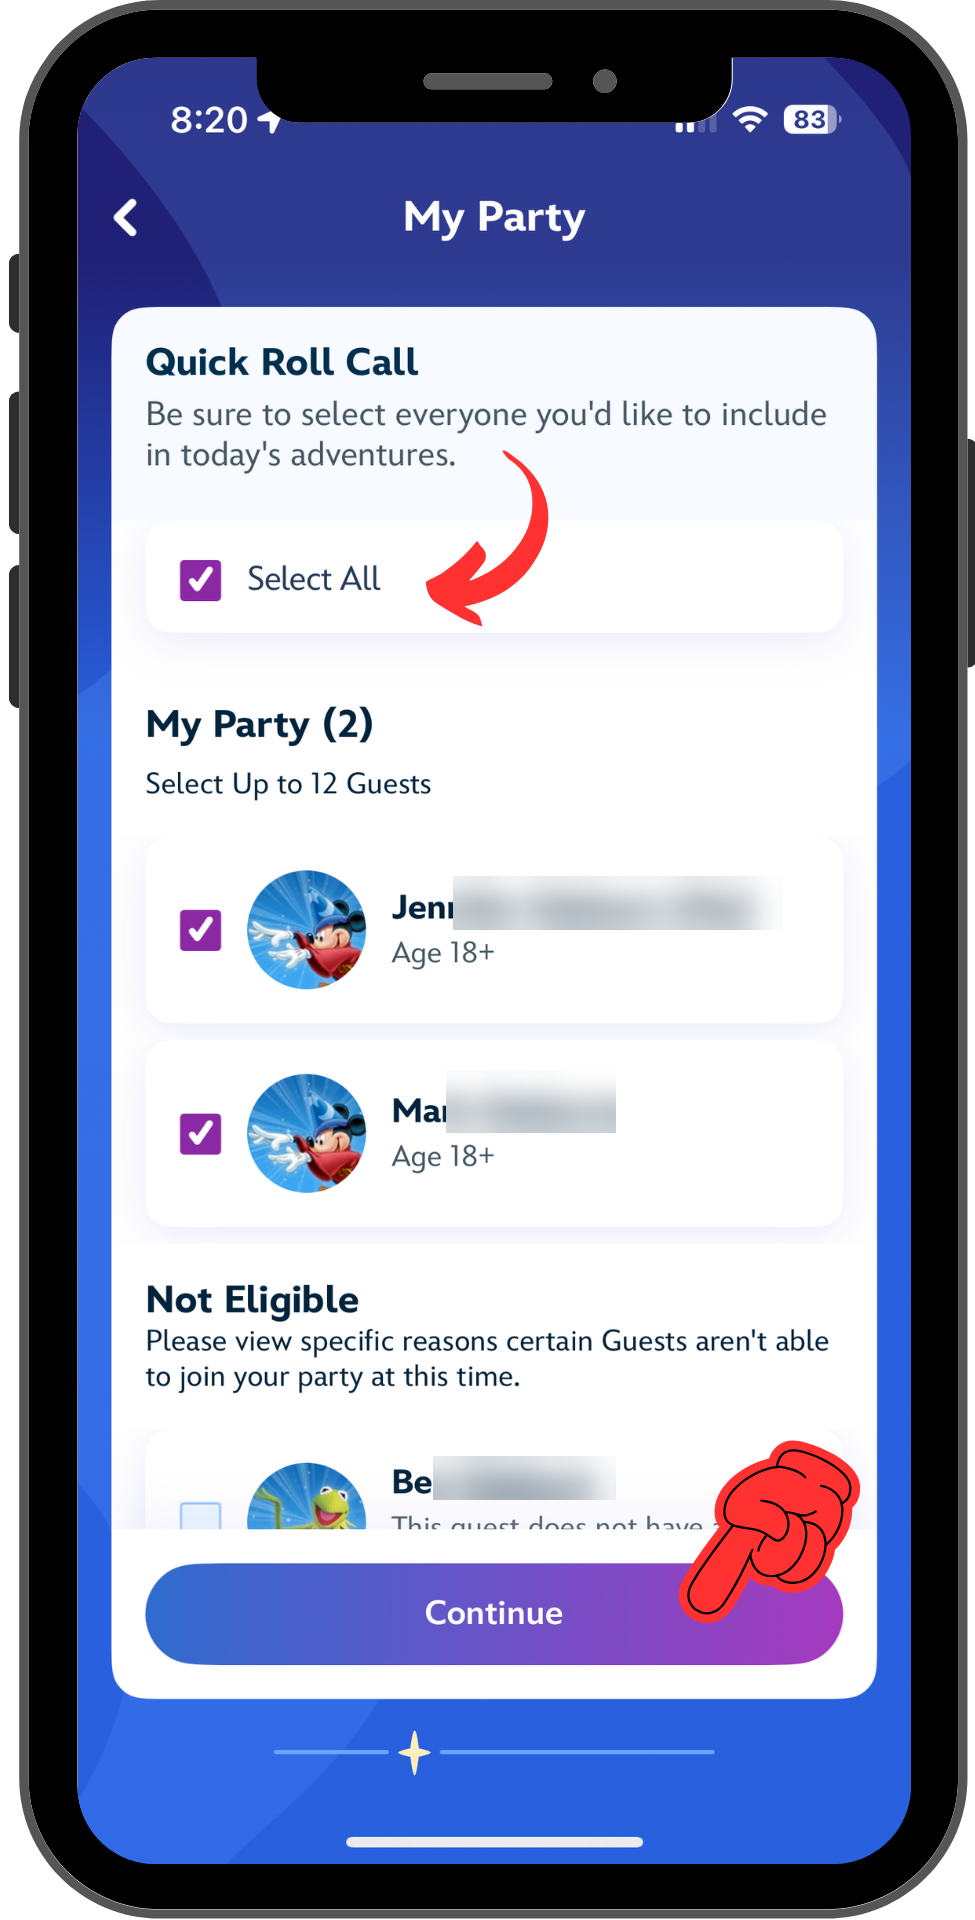
Wherever you started, the first thing you’ll see is the Genie welcome screen, with a button to “Start Now”. Once you press it, choose the date of your visit and the park you’re planning to tour. ⚠️You’ll need to scroll down to select the park. Next, select who will visit the parks with you; you can choose anyone in your Family & Friends list with a valid park ticket on that date.
Step 3. Choose what you’re interested in seeing and doing in the park
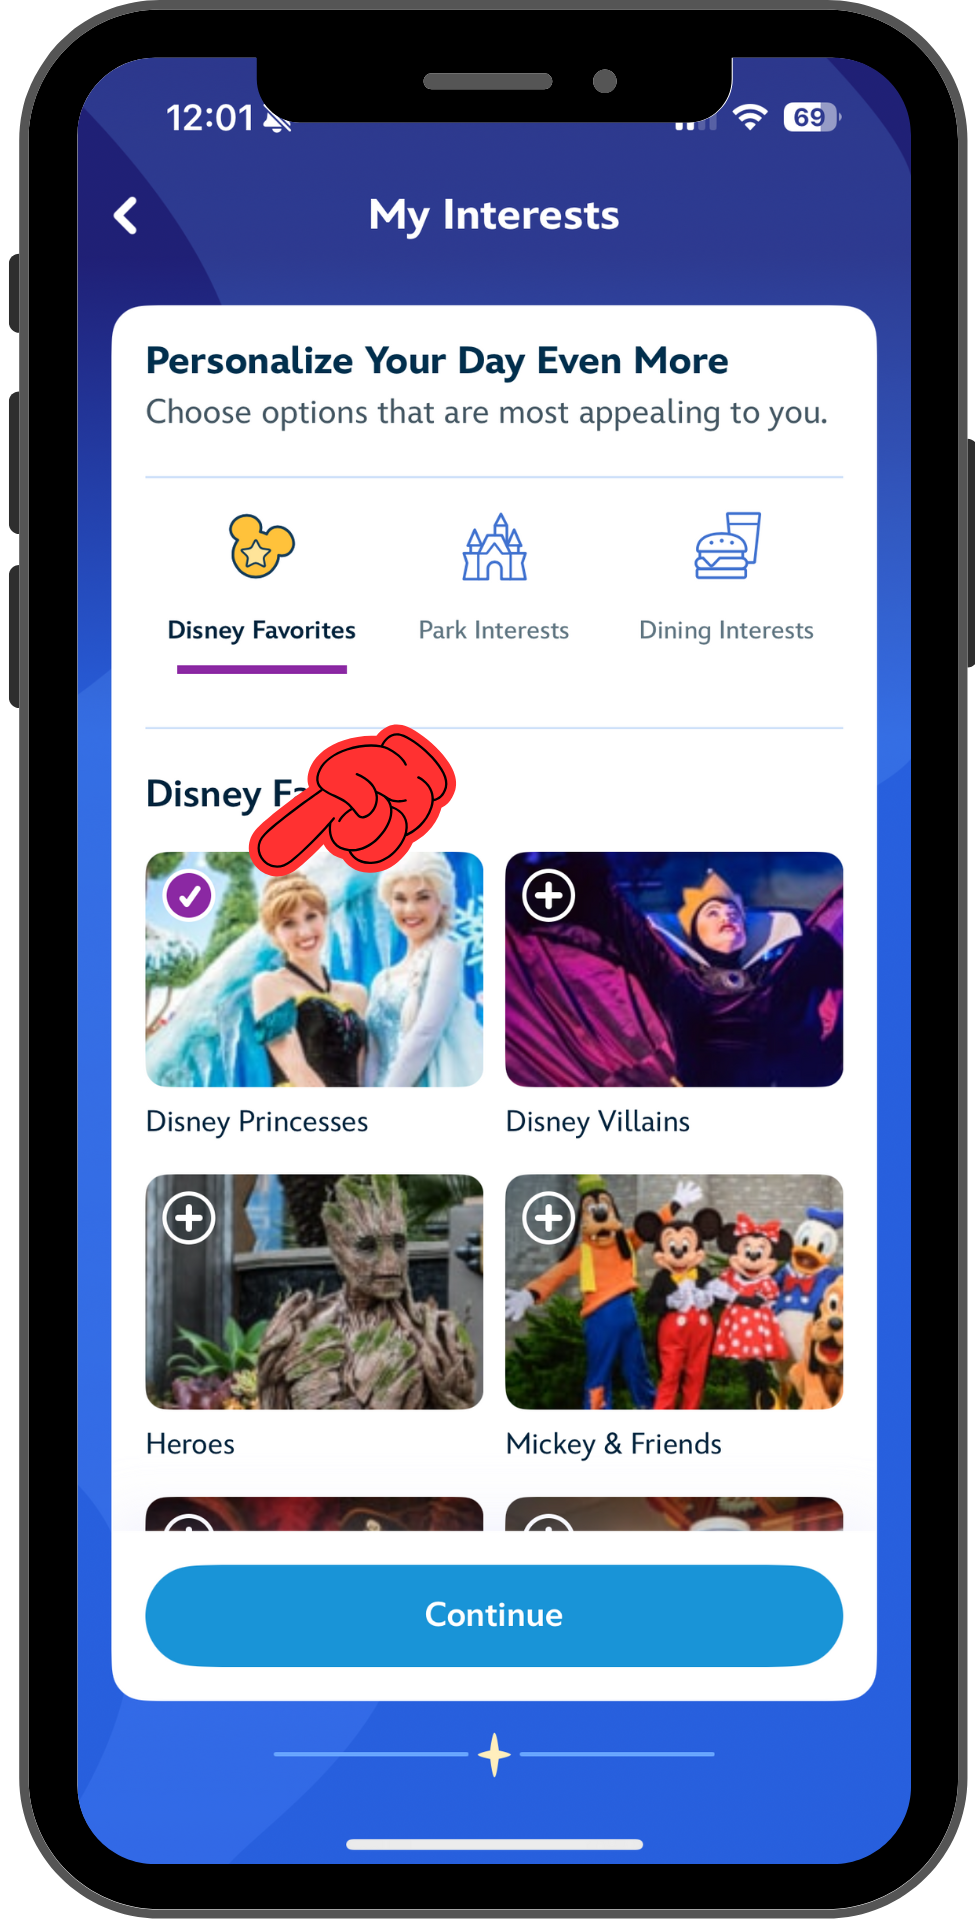
The next two screens ask you to make choices that will affect what Disney Genie shows you in the My Plans area. The Top Picks screen asks you to choose attractions, dining, or activities you’d like to do. The My Interests screen is more general, asking about what kinds of things you want to do instead of specific rides or restaurants. On both screens, you can scroll to see all the options, or use a horizontal menu at the top to jump ahead.
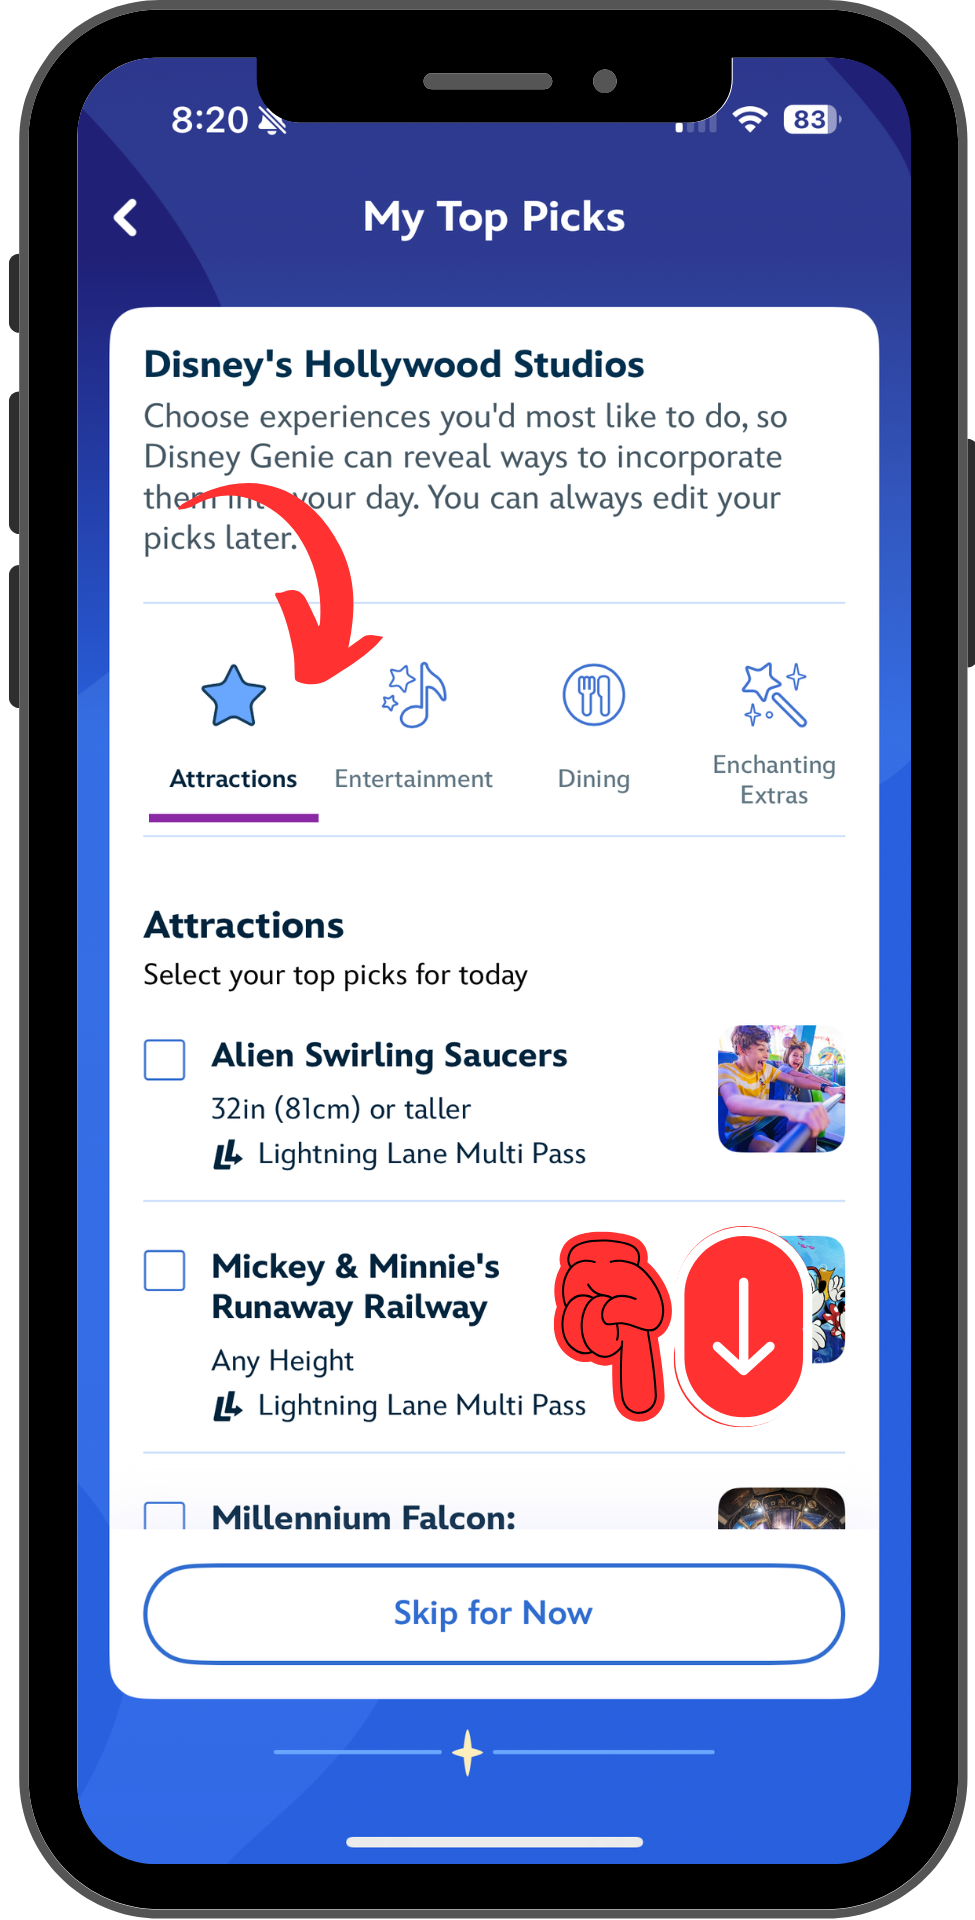
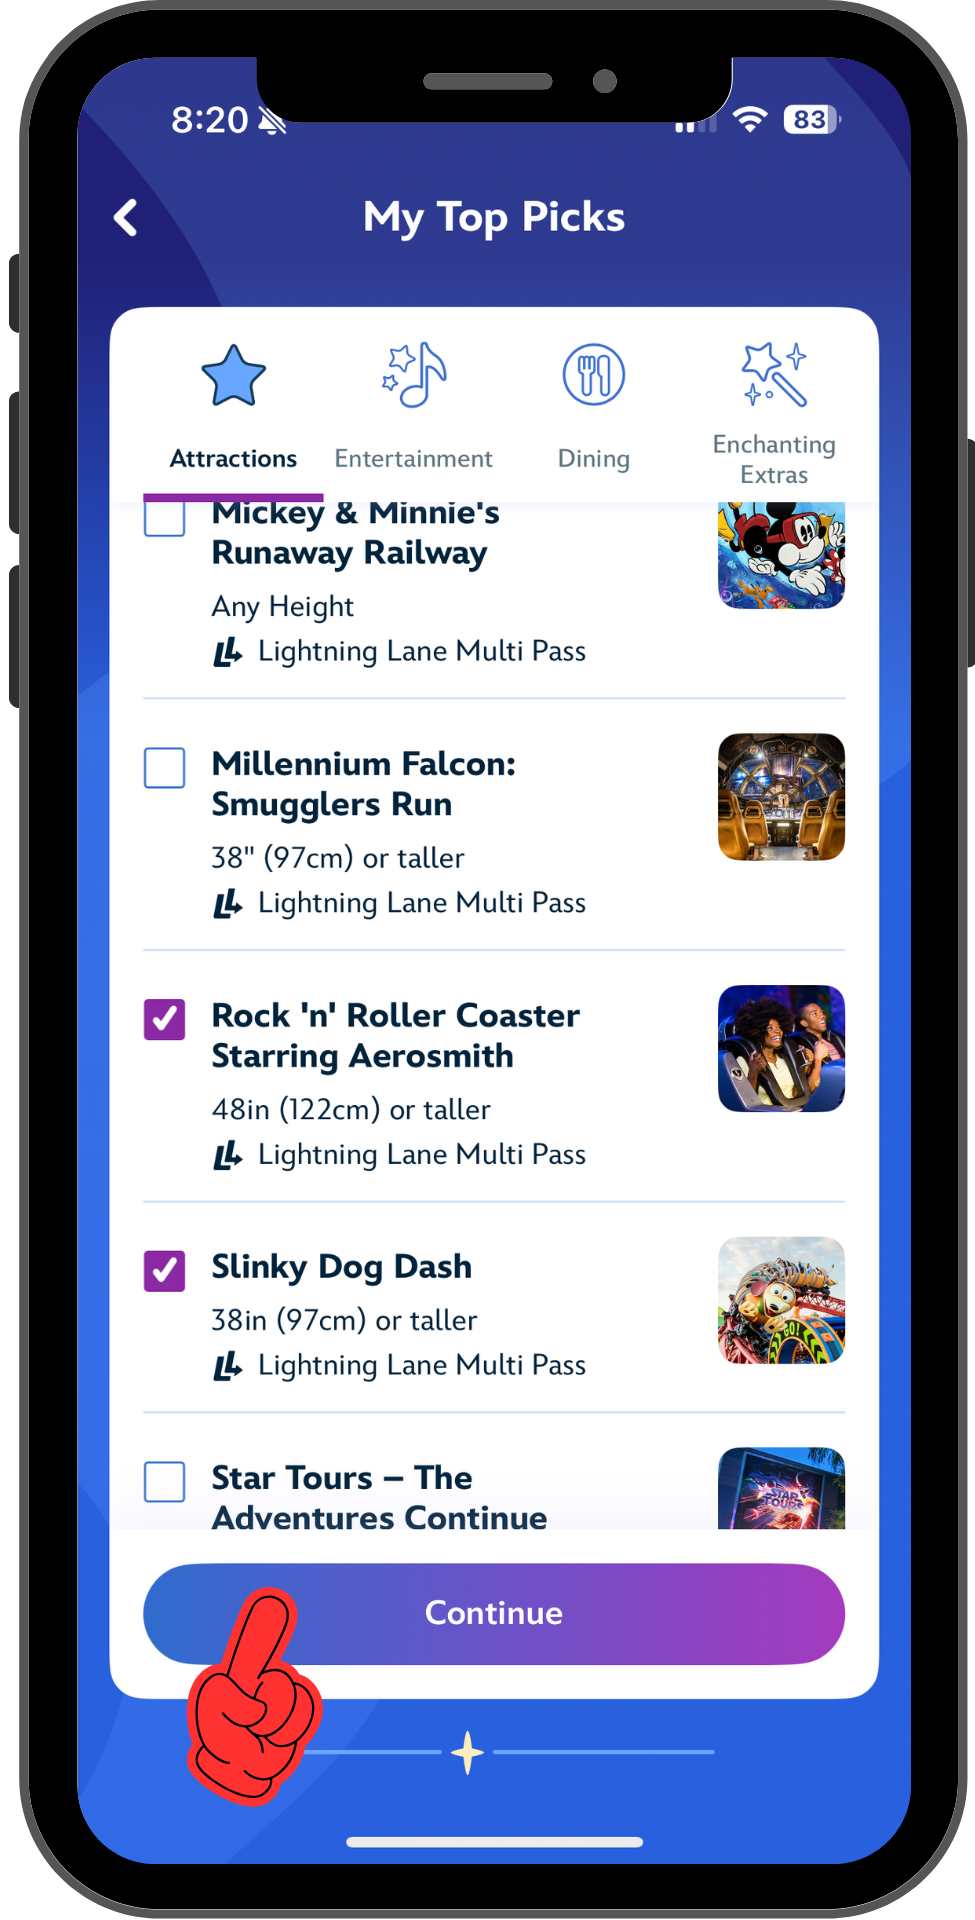
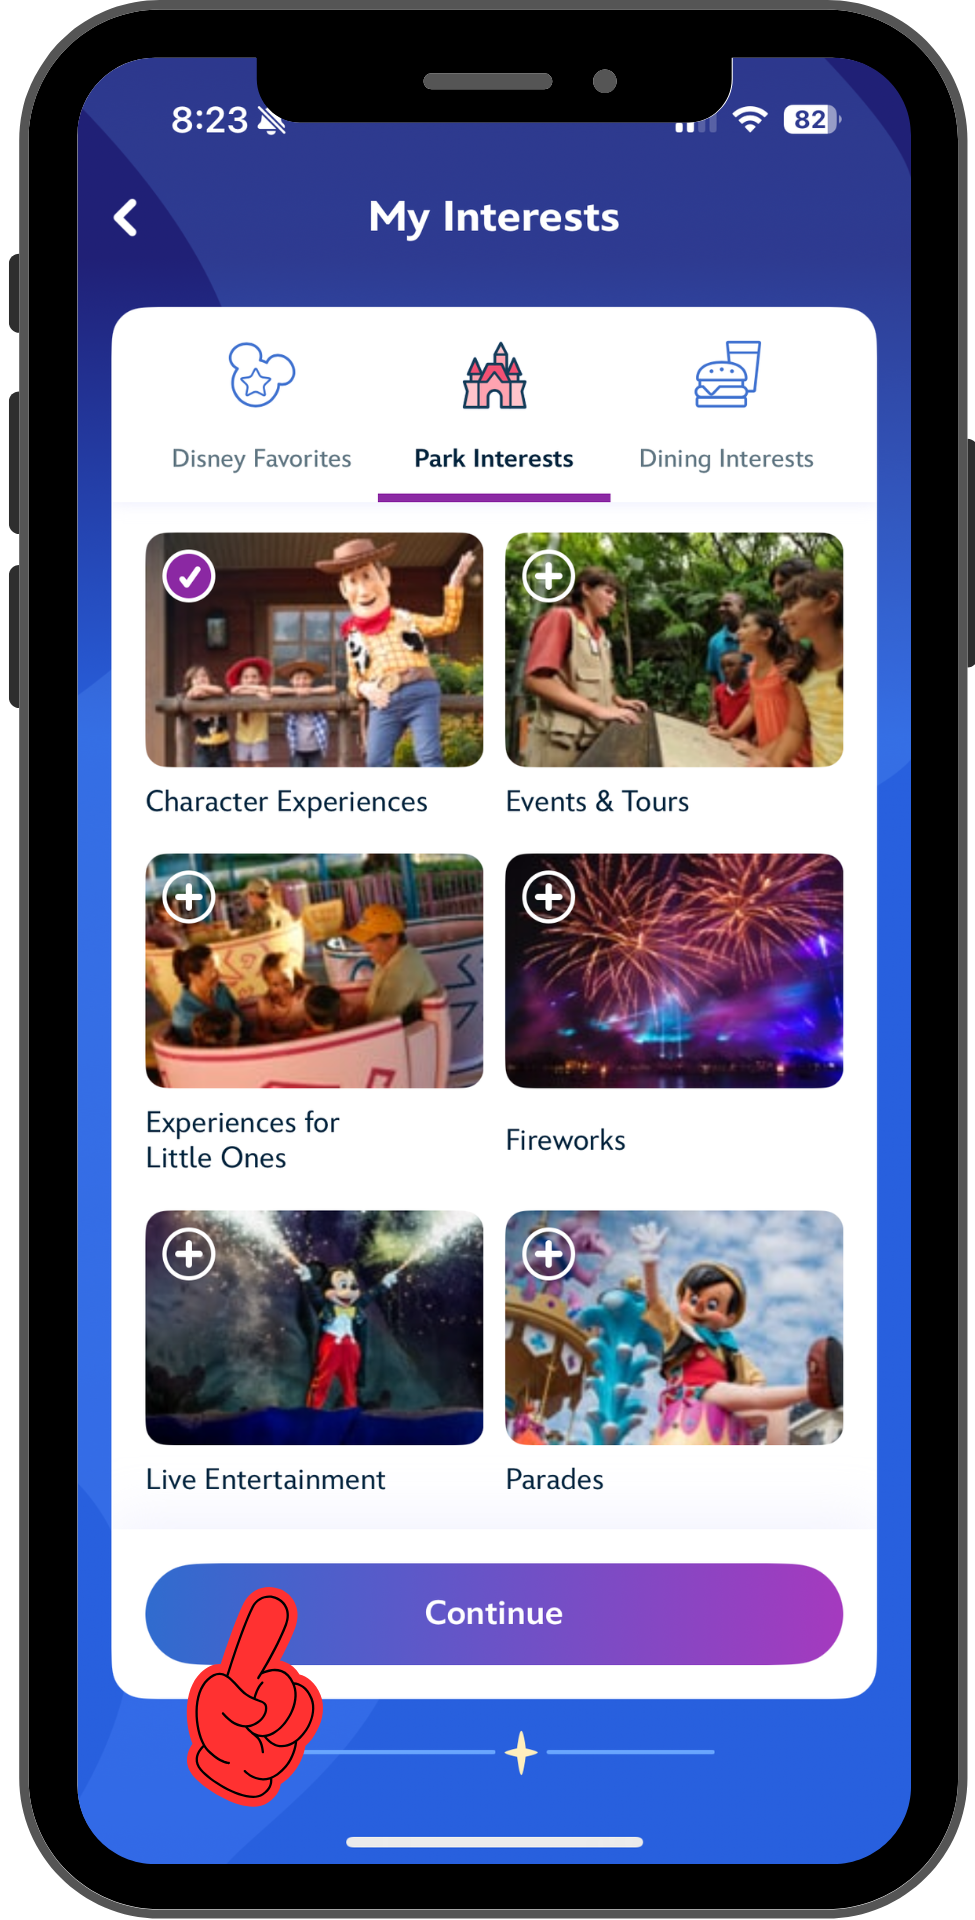
You don’t have to select anything on Top Picks or My Interests, and you can easily come back and change your choices later. On the Top Picks screen, I’ve chosen Rock ‘n’ Roller Coaster and Slinky Dog Dash. It’s not shown, but I’ve also chosen Hollywood & Vine and Ronto Roasters under Dining. And in the My Interests screen, I’ve selected Character Experiences.
Step 4. Configure your accessibility view
The final settings in Disney Genie setup are your display preferences for height requirements and accessibility. On the right, you can see how these settings affect the display in the My Plans screen.
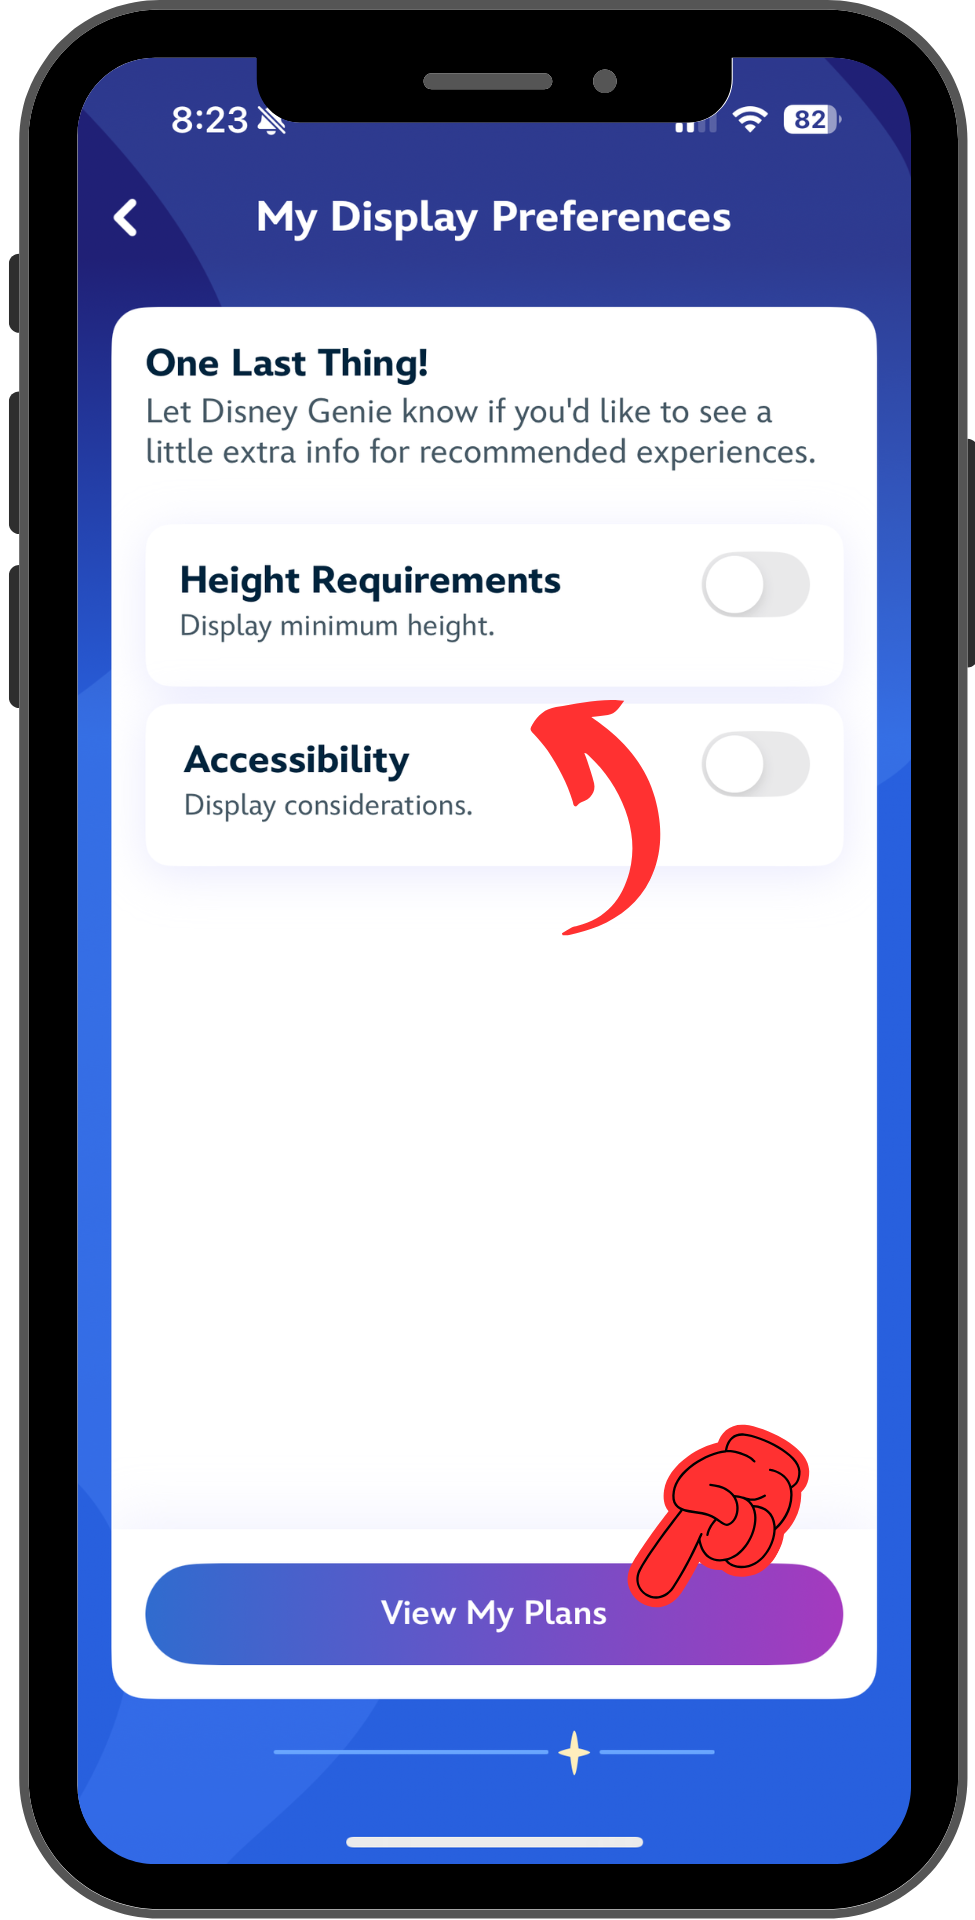

Let’s chat about what else you see – or don’t see – in this screen. You might wonder – didn’t we also select Slinky Dog Dash as a Top Pick? Why isn’t that here?
Well, I’m just going to say it straight out: nobody knows why Genie shows what it shows. It usually makes sense eventually, but sometimes it doesn’t make much sense in the moment. In this case, I discovered a few minutes later when the park opened that Slinky Dog Dash was down, which is probably why it’s missing. But let’s tap that Add Plans button on the bottom left, and see what those Top Picks we made are doing for us.
Viewing Wait Times and Showtimes
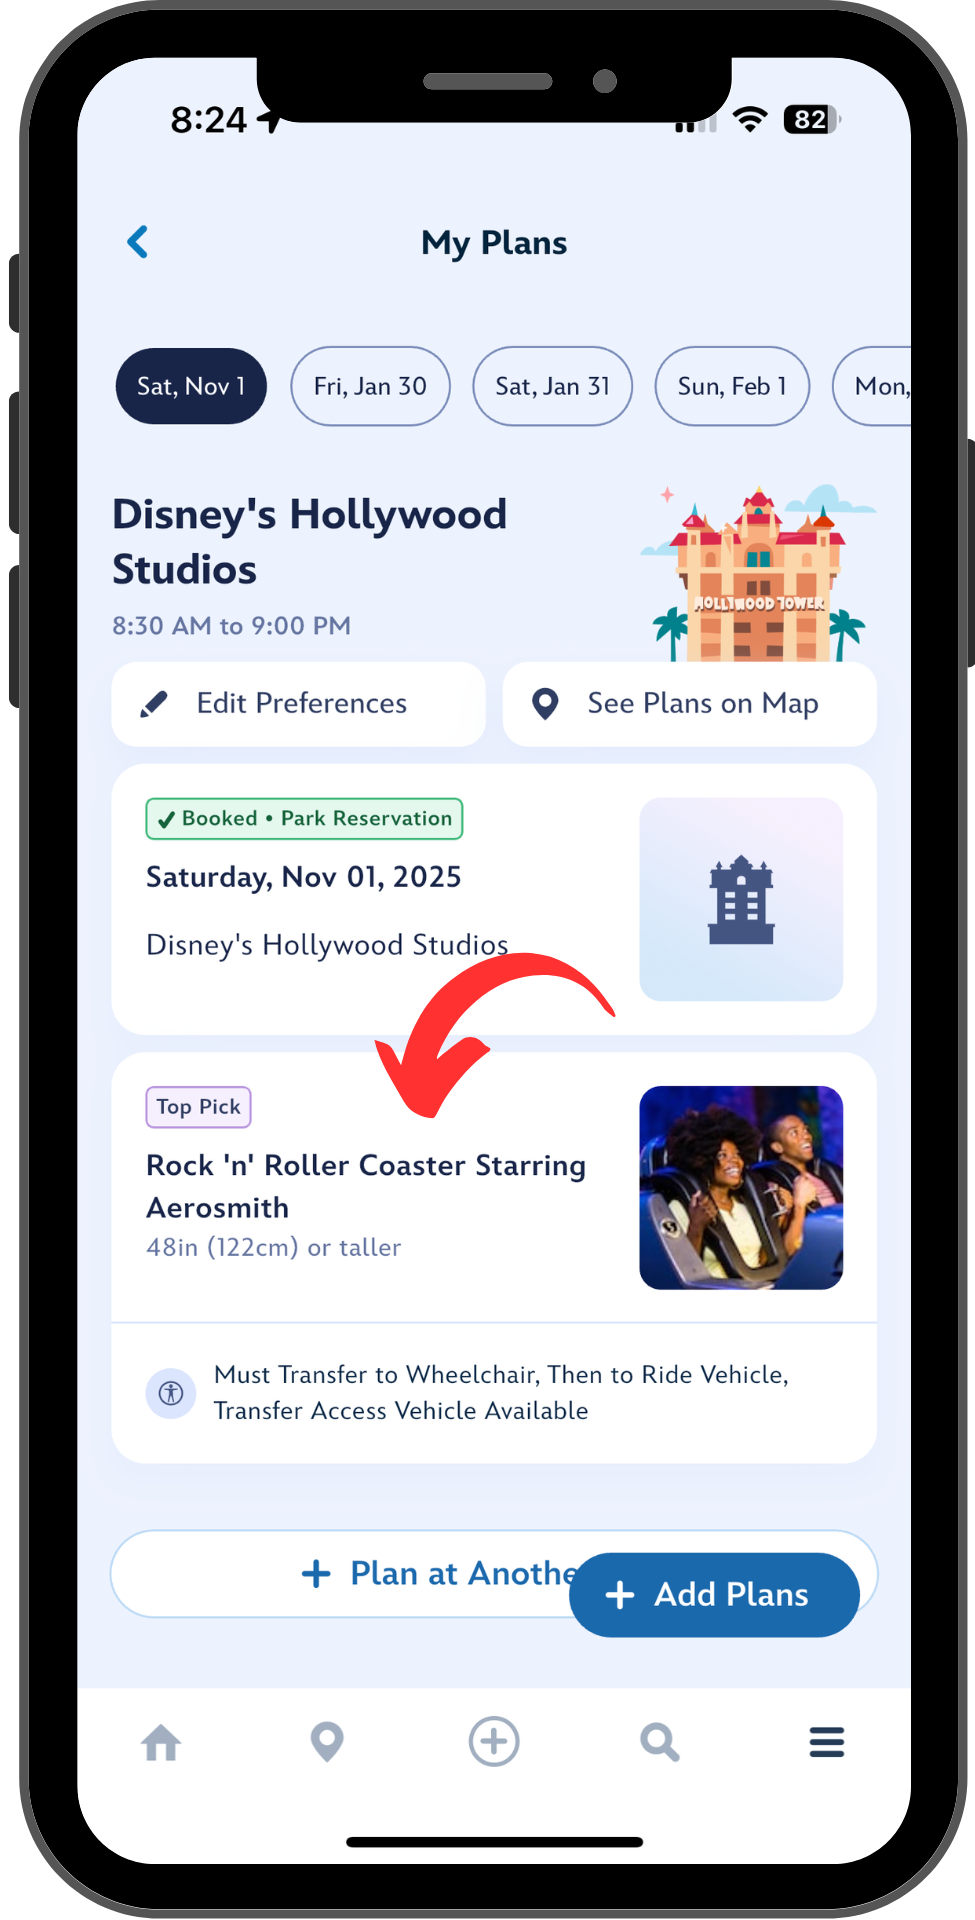
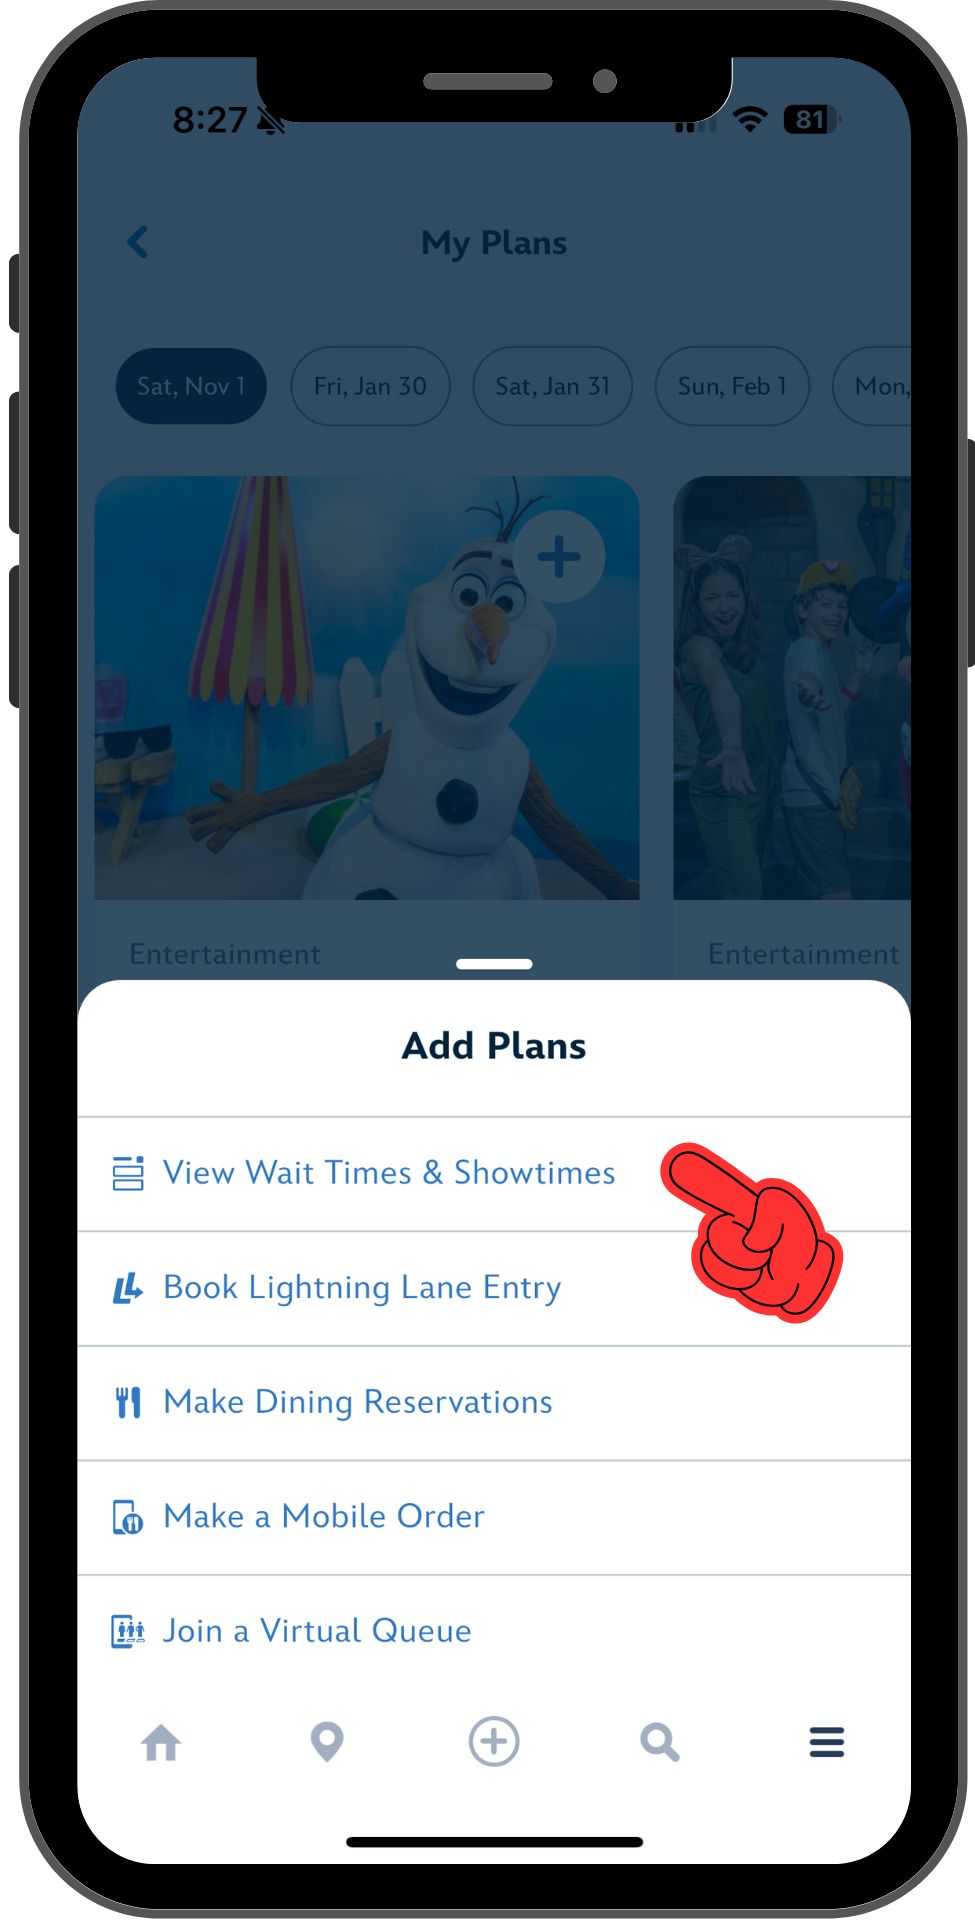
Choosing “View Wait Times & Showtimes” from the pop-up Add Plans menu brings you to the Wait Times & Showtimes board. You’ll see current waits for attractions, shows, and dining options like Mobile Order and Walk-Up Waitlist. Your Top Picks appear pinned at the top of each tab. This prime placement can save you a ton of scrolling if you are, for example, checking frequently to monitor wait times or see Lightning Lane availability.
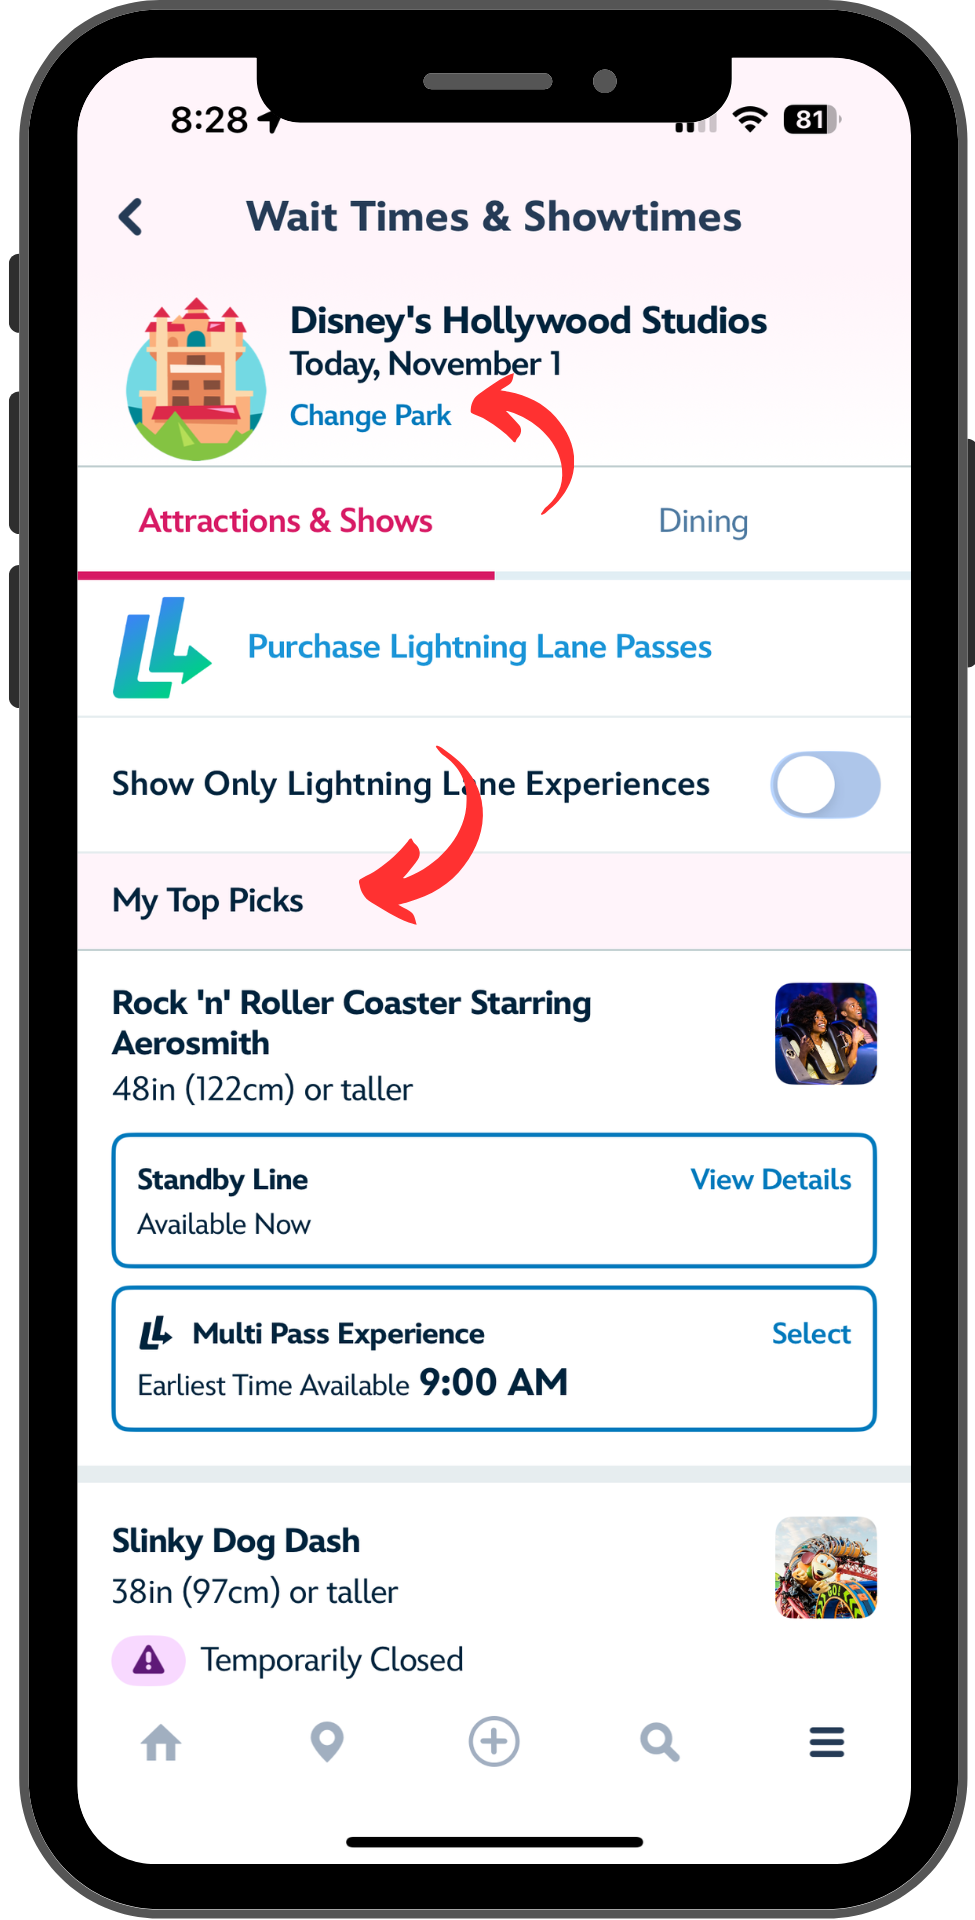
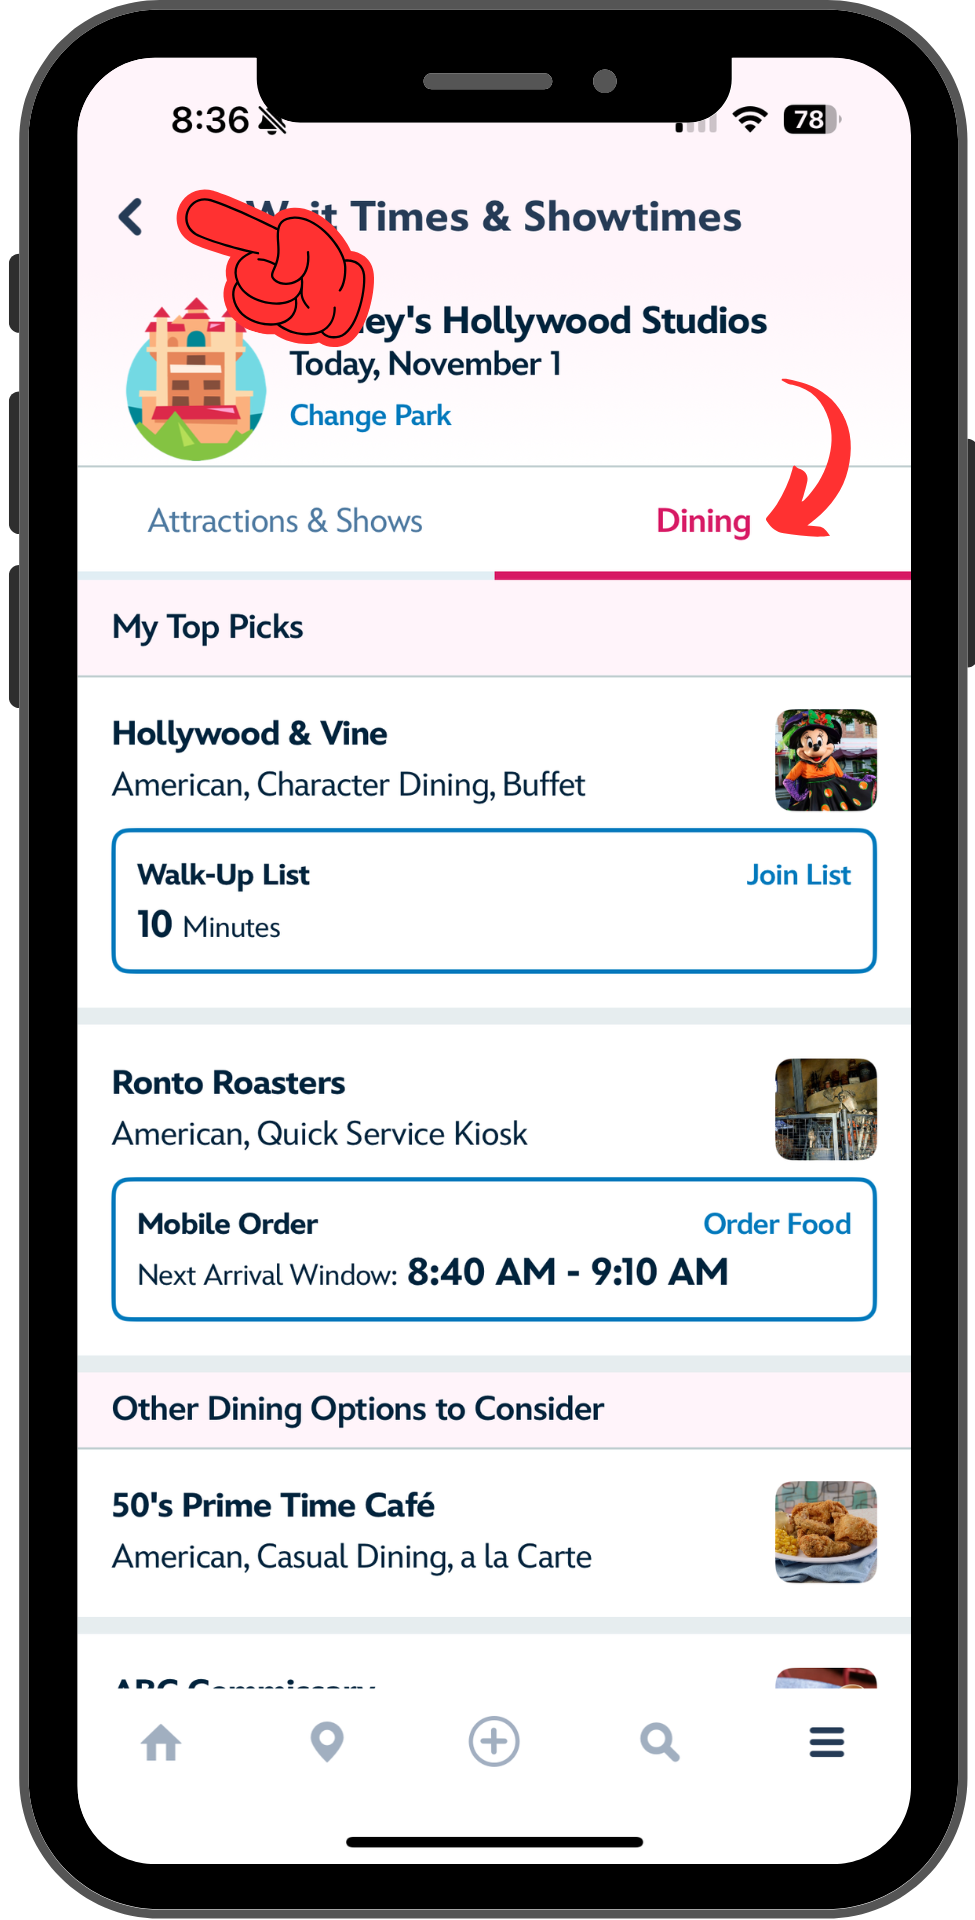
If you’d like to see Wait Times for a different park, tap “Change Park” near the top. But you only see Wait Times & Showtimes for the current date here. If you’re setting up Genie for a future date, you’ll have to wait until it arrives to use the Wait Time board.
Adding Favorites to Your Genie Touring Plan
Here’s the rub: if you add everything to your Top Picks, then you’re still doing a lot of scrolling on the Wait Times board. Let’s come back to My Plans and see how to add things to your plans without adding them to your Top Picks.
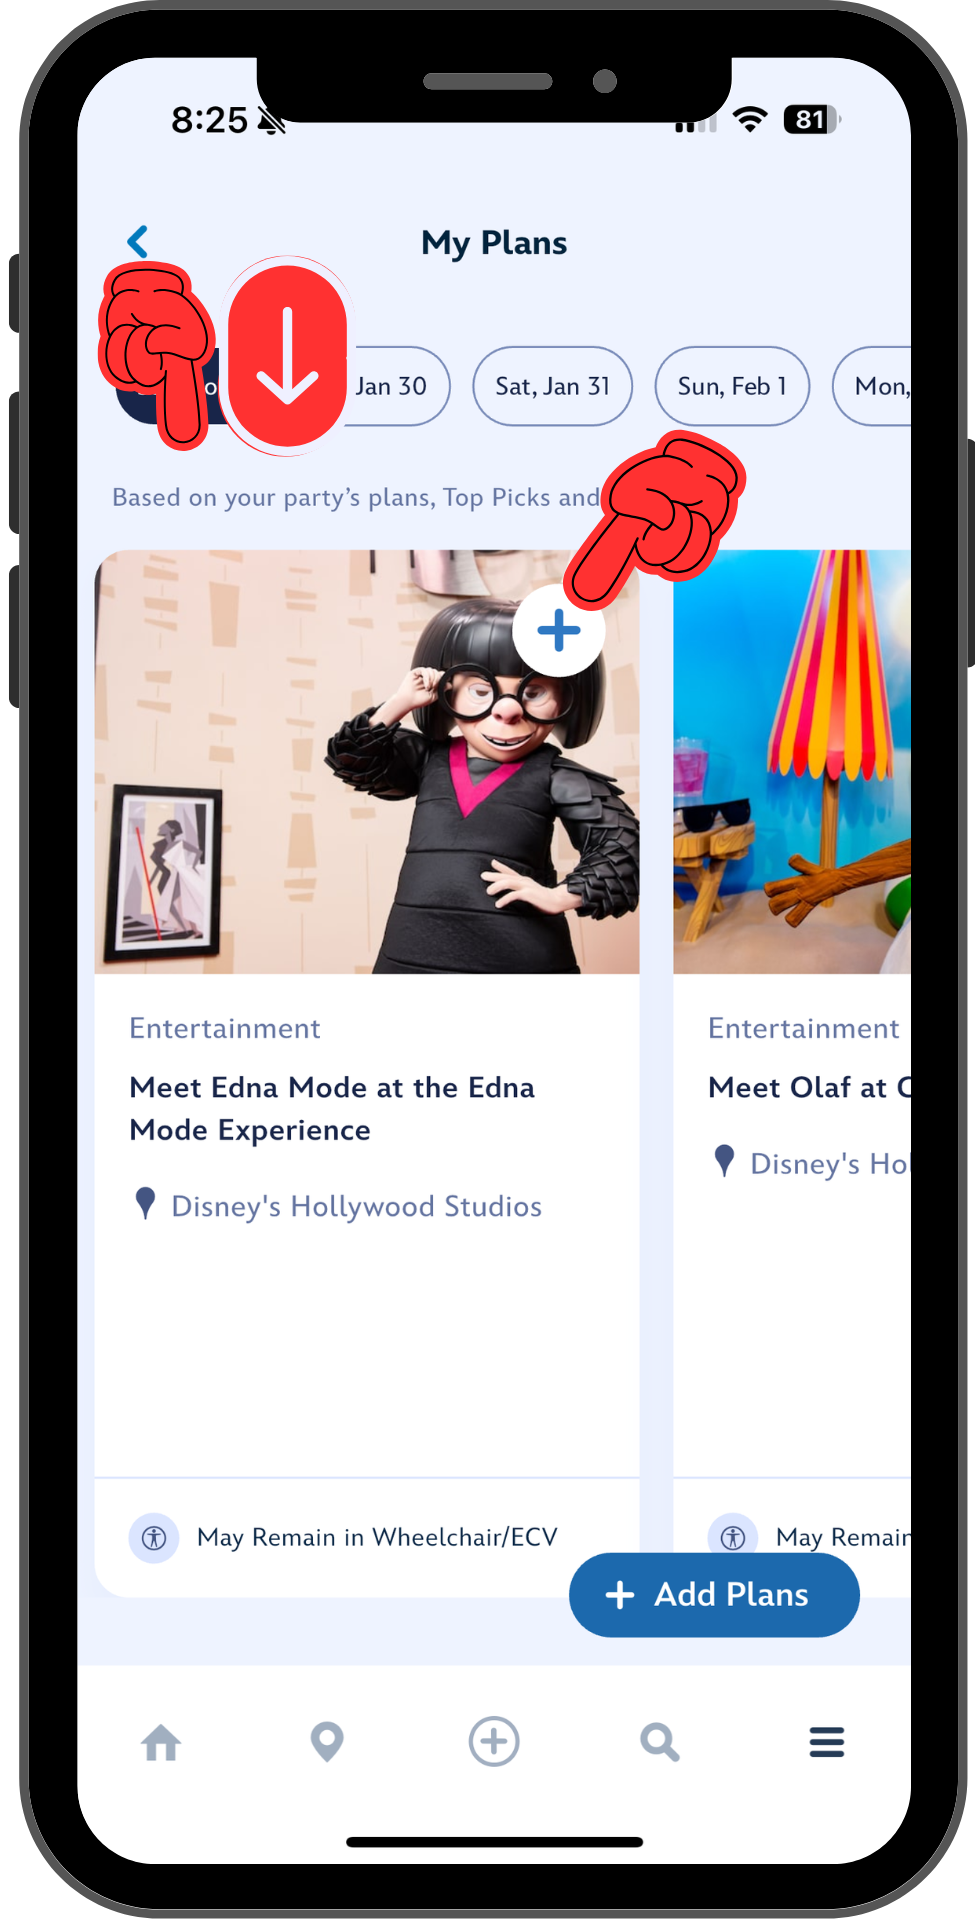
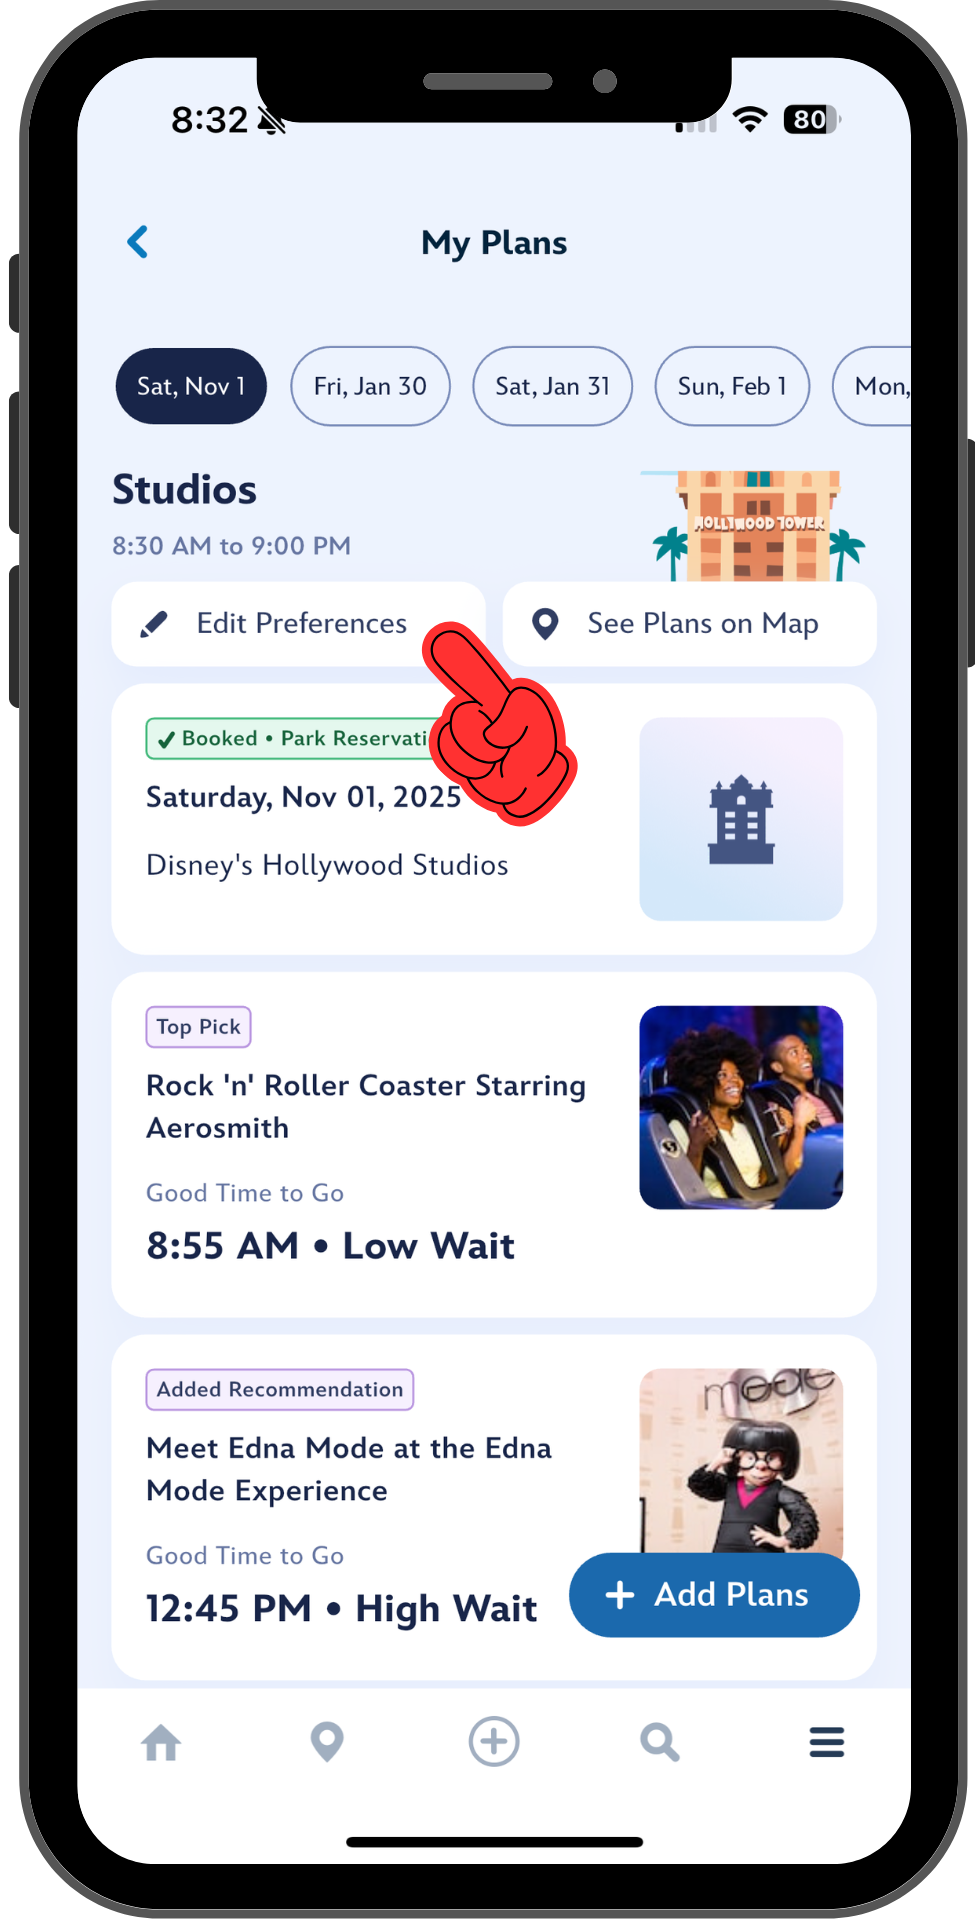
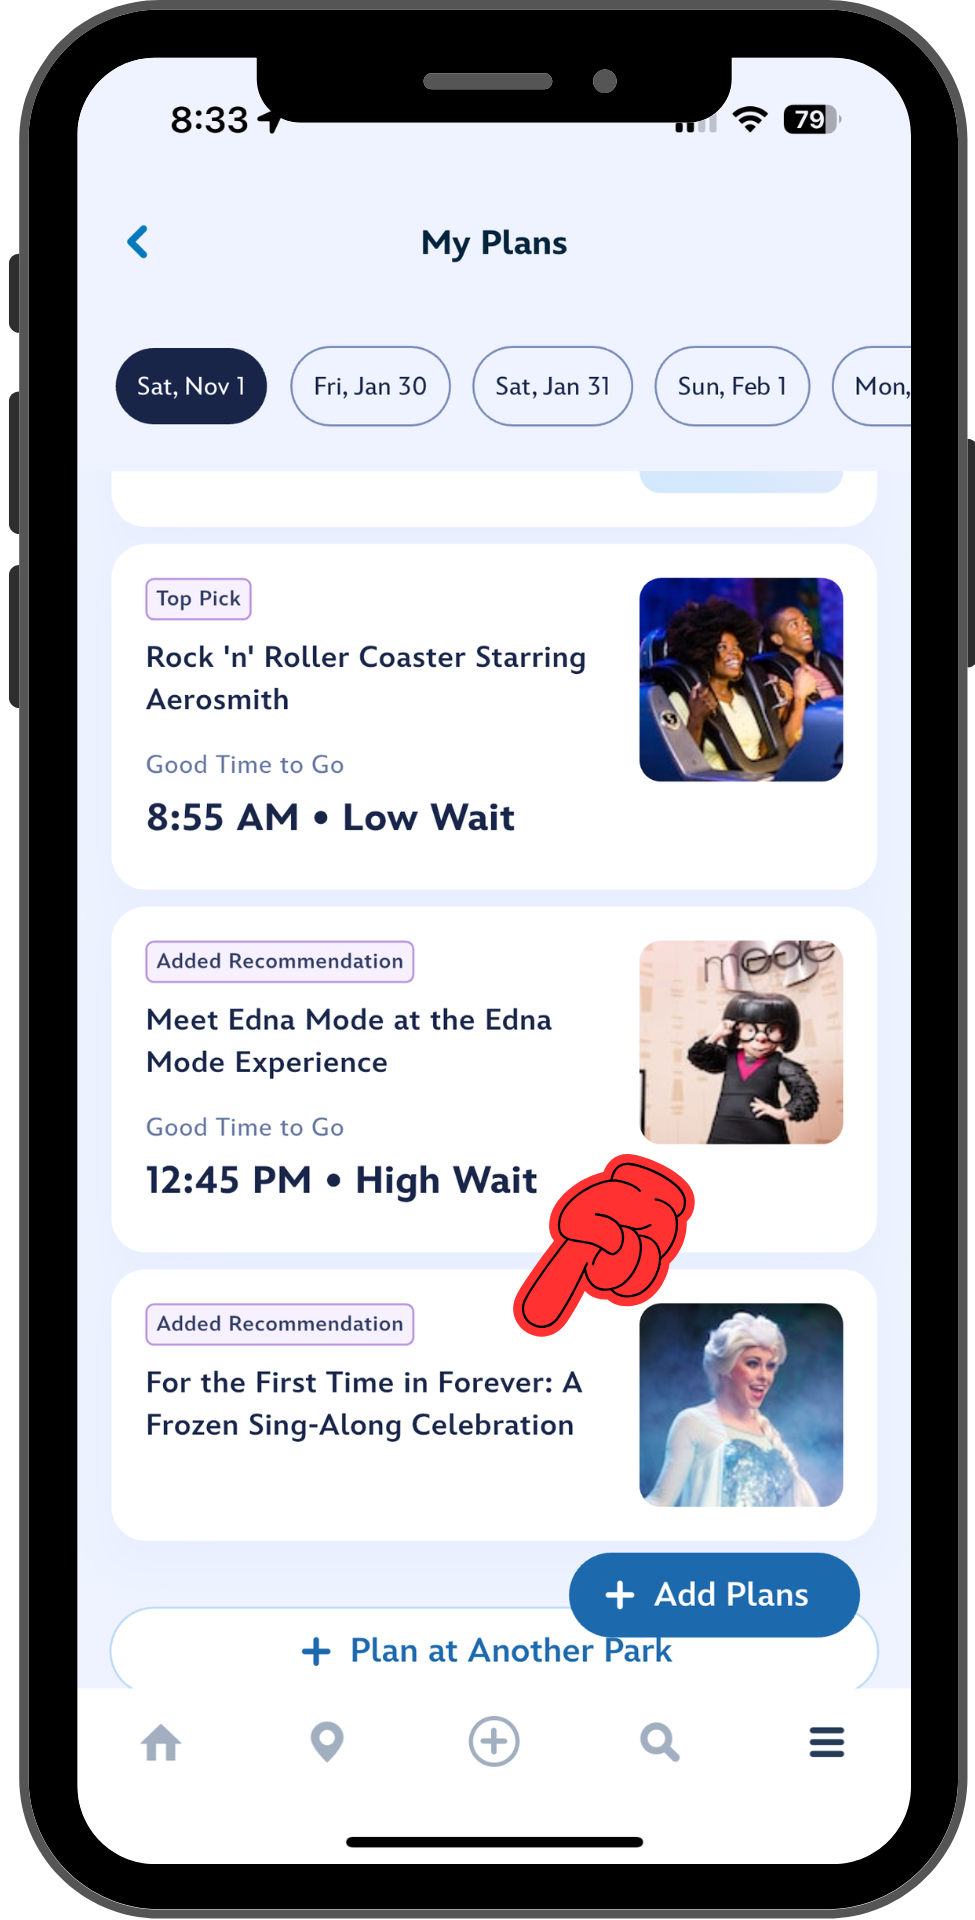
Step 5. Add an experience recommendation to your plans
On the My Plans tab, scroll down and you’ll come to a section that is filled with recommendations. You can scroll left and right in this section to see what Genie thinks you’ll like. Below, you can see that the first two recommendations are to meet Edna Mode and Olaf – that’s most likely because I selected Character Experiences in My Interests when I was setting up. Tap the plus sign to add this activity to your plans. ⚠️You’ll need to refresh the page by dragging down from the top of the screen before you’ll see waits, etc. on the card.
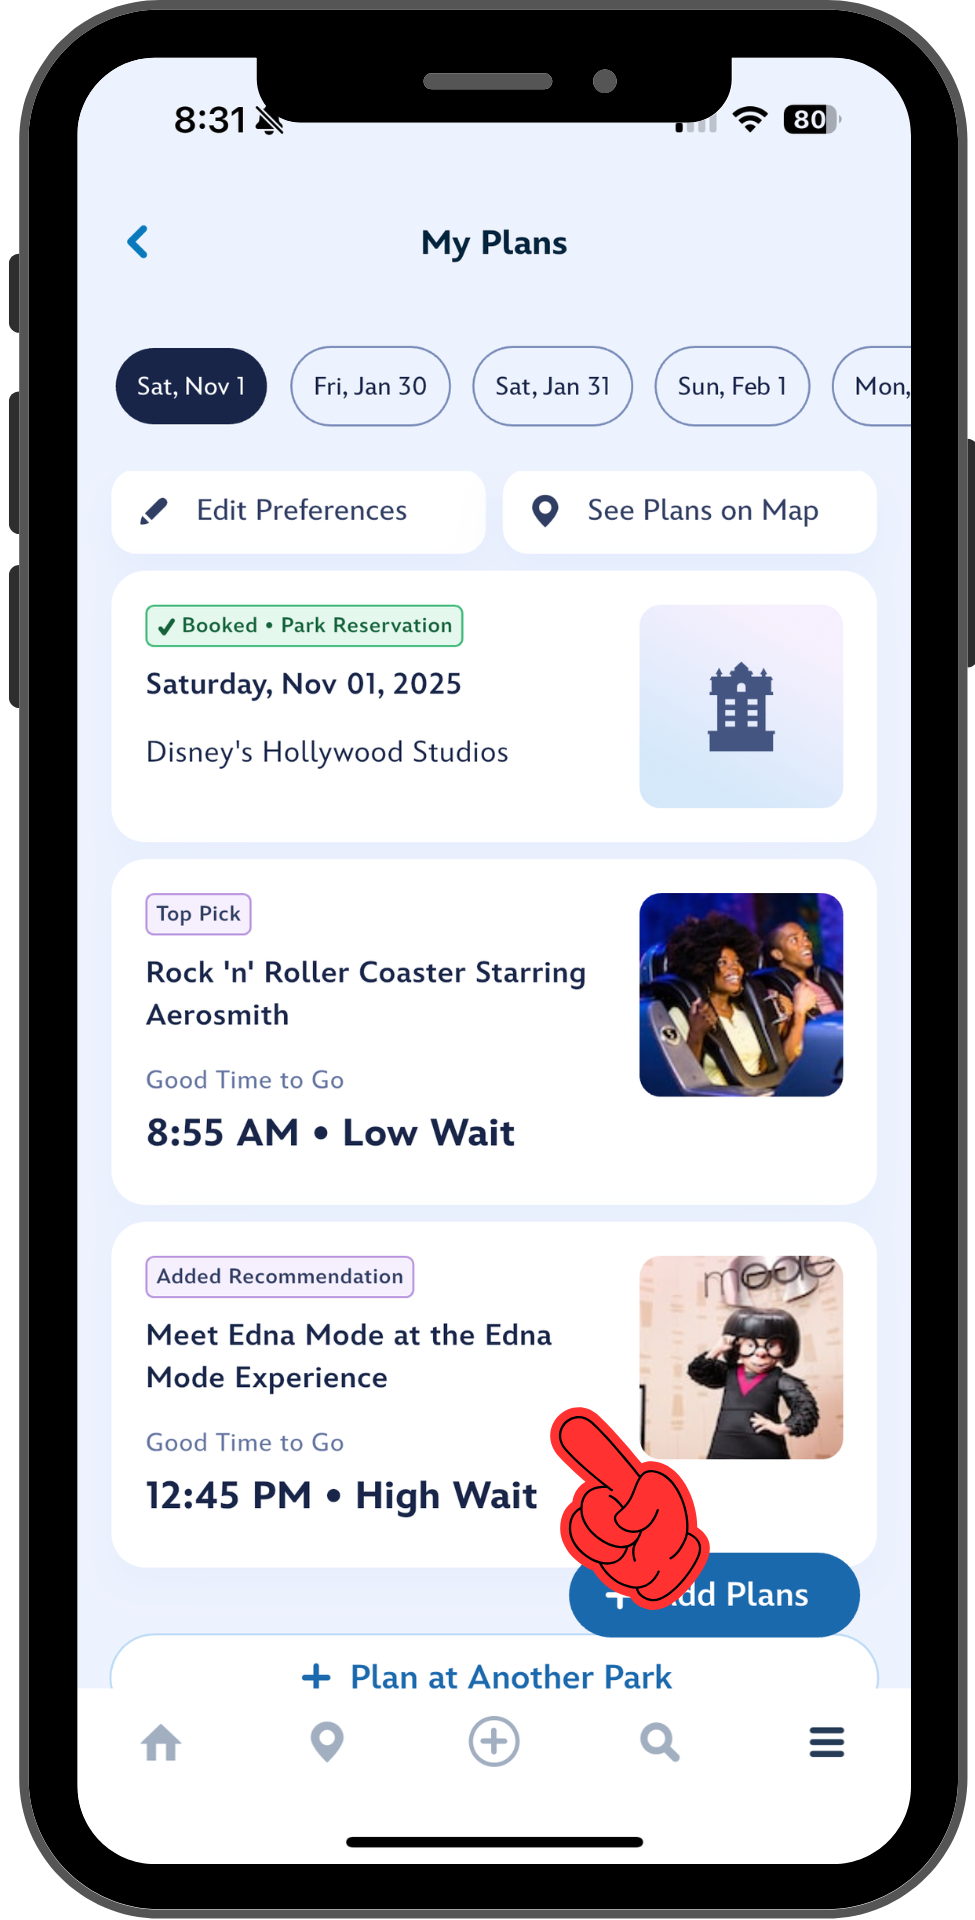
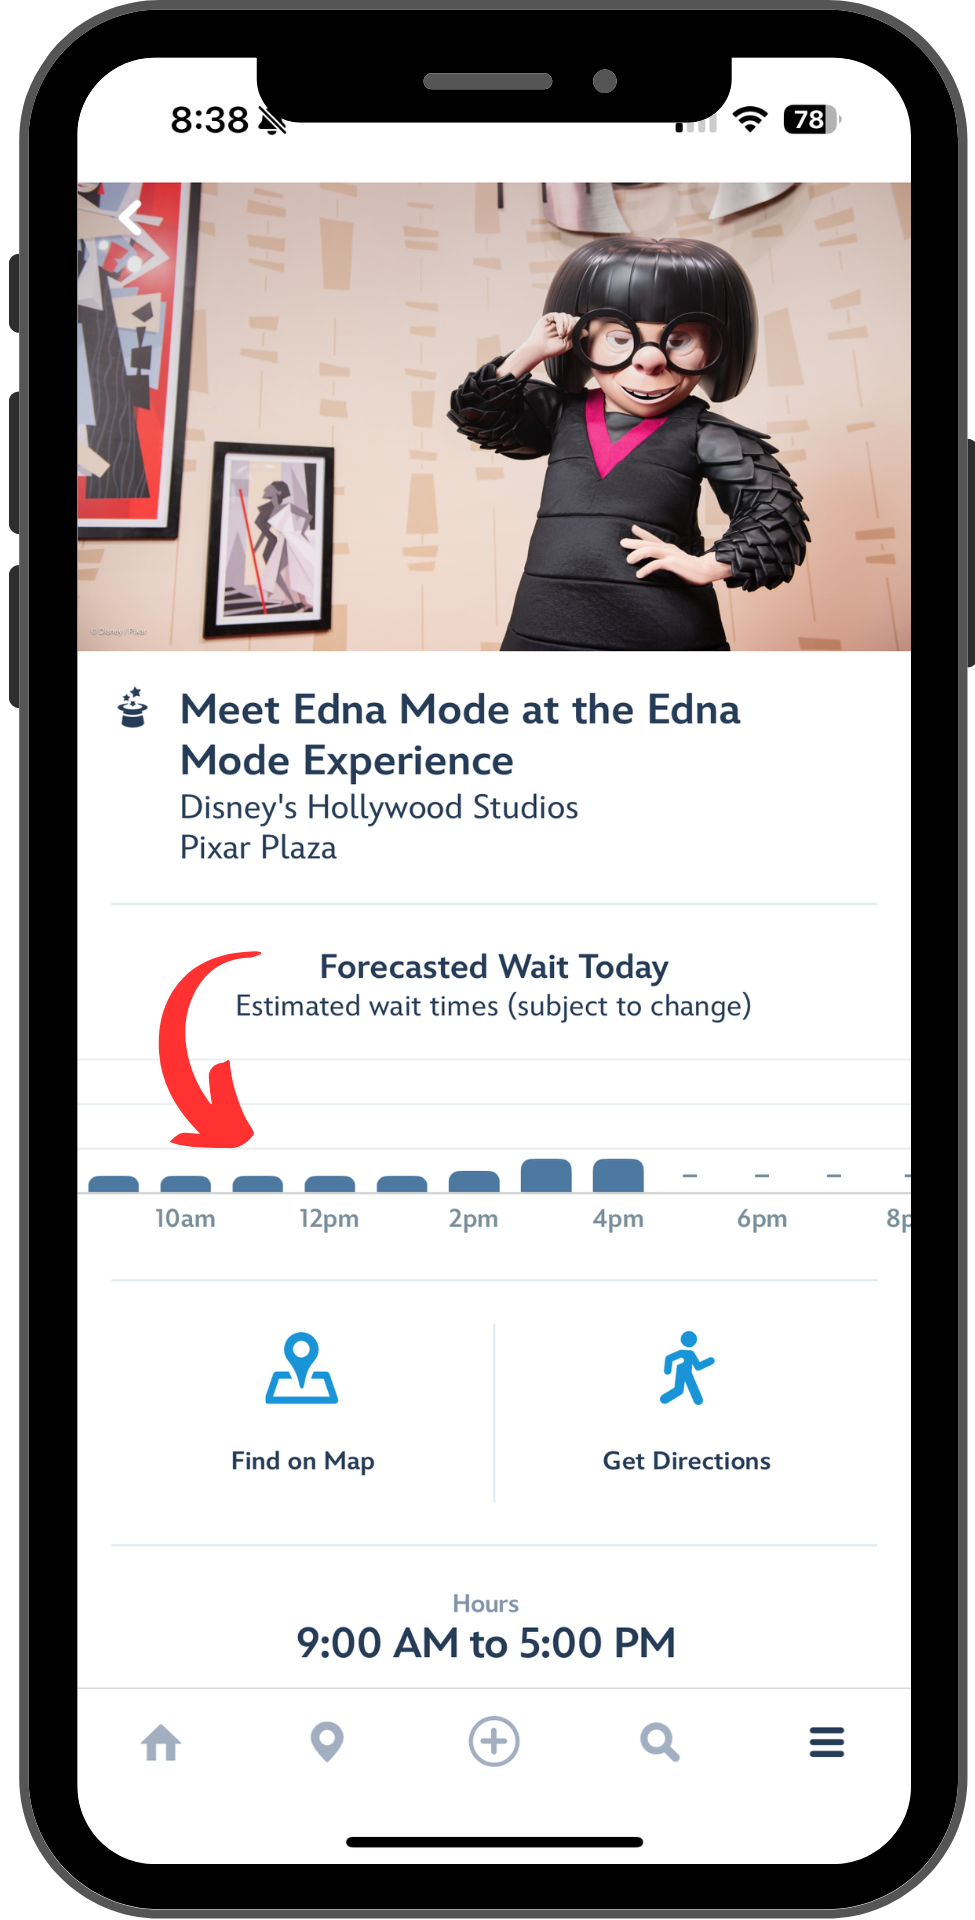
By the way, do you notice something? The cards recommend a time to go, and tell you a bit about what the expected wait is then. Take that wait information with a grain of salt. Or maybe a rock of salt. If you tap the Edna Mode card, you can select “Get Details” to see a bit more information. According to that forecast, waits for Mme. Mode will be steady all day until mid-afternoon.
It is very common to see this kind of mismatch between the forecast and what the card says. And you should know that “Low Wait” is relative. If Rise of the Resistance has forecasted waits between 40 and 80 minutes, then Genie will say that 40 minutes is a Low Wait.
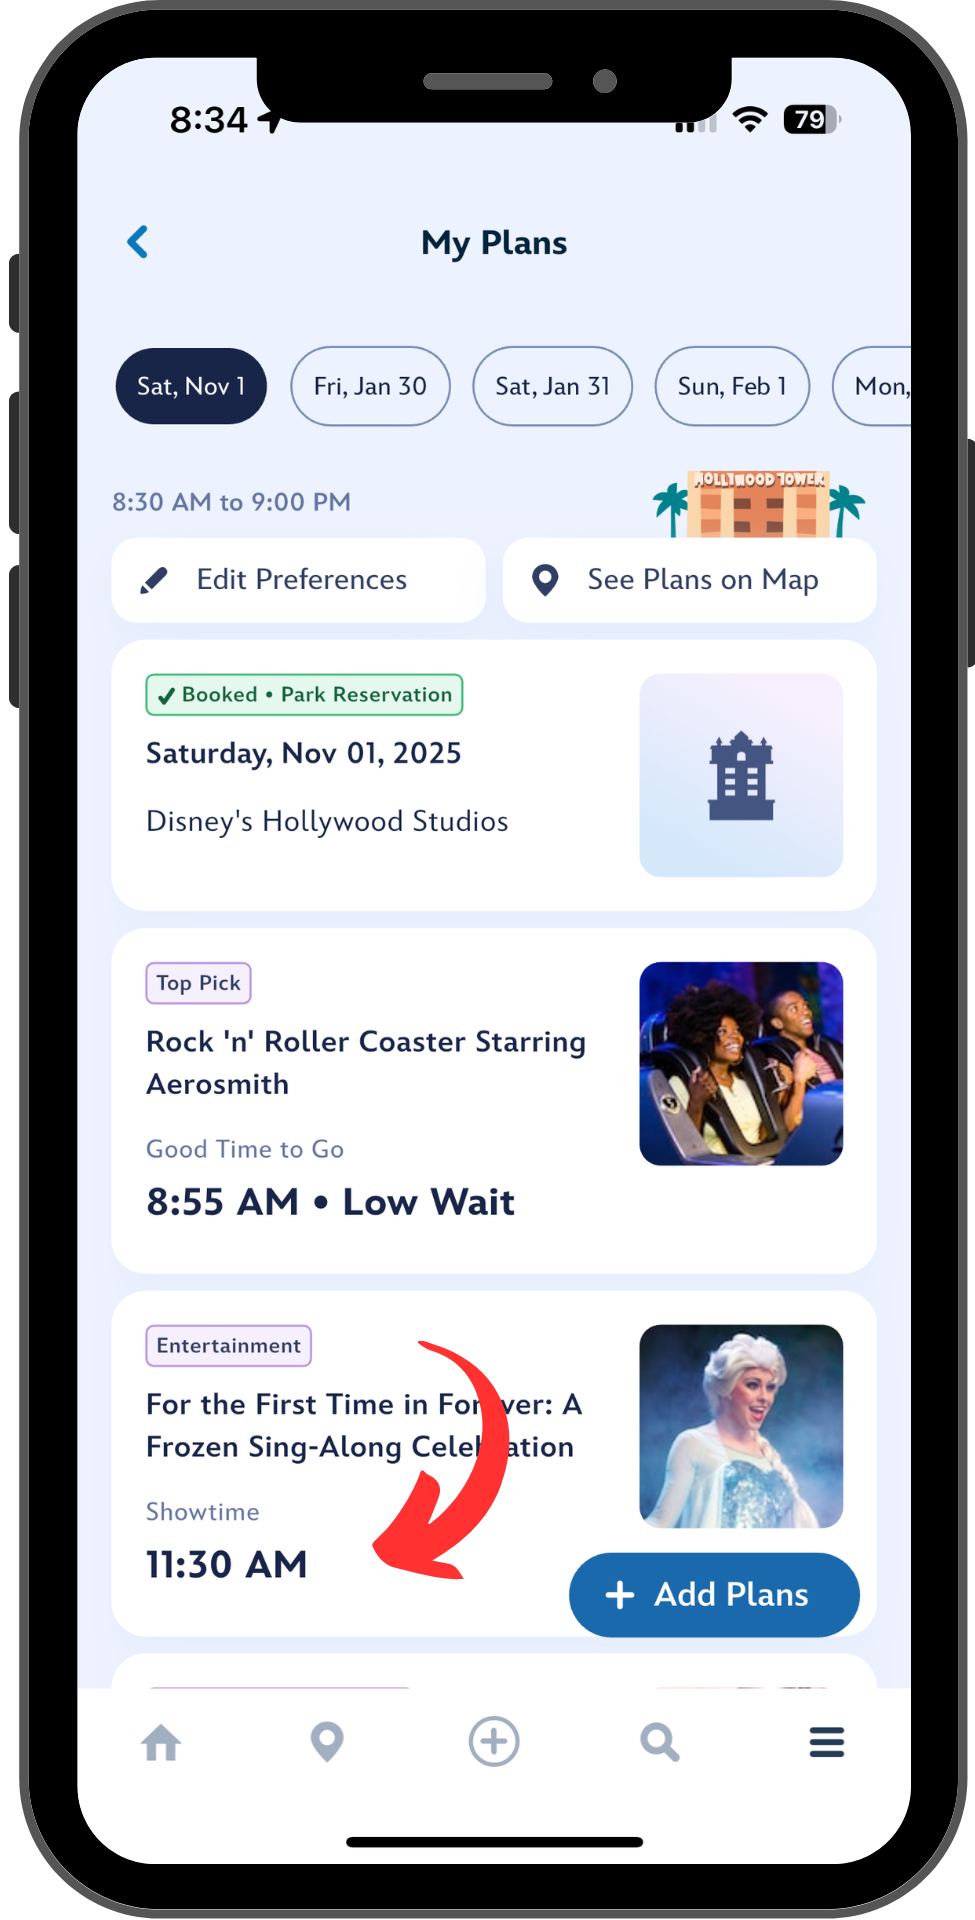
Step 6. Add an entertainment recommendation to your plans
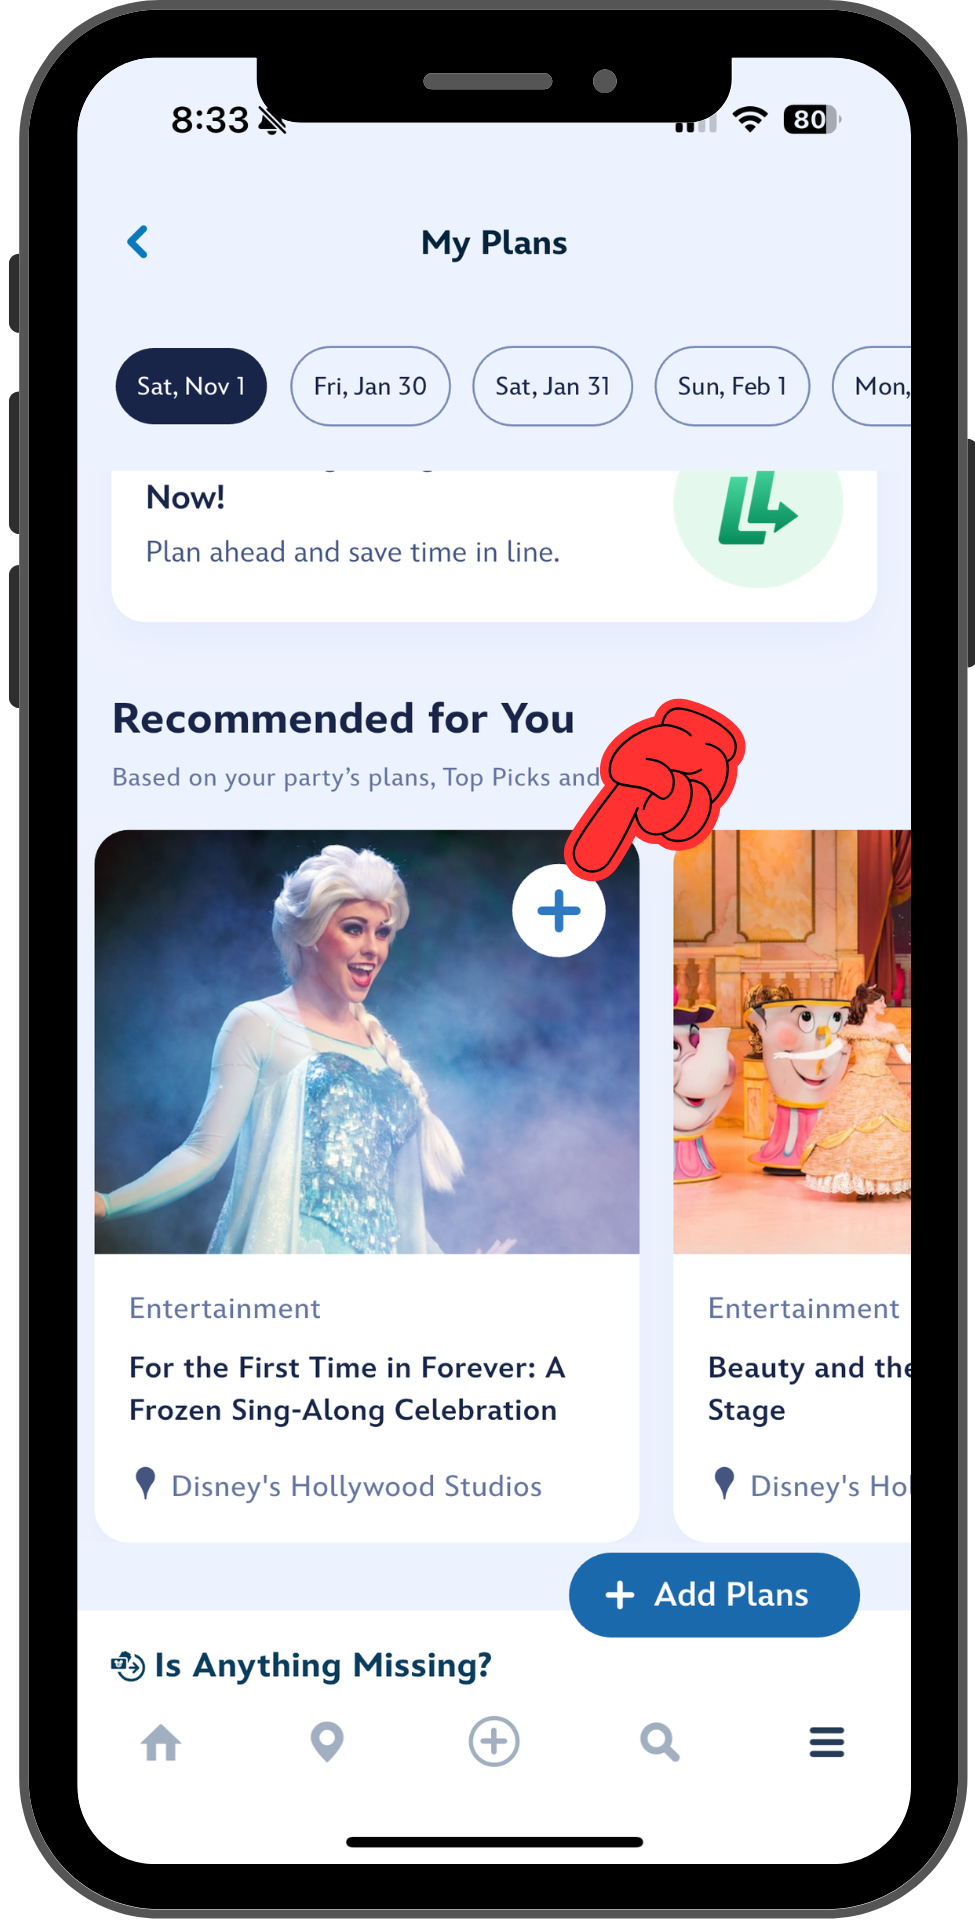
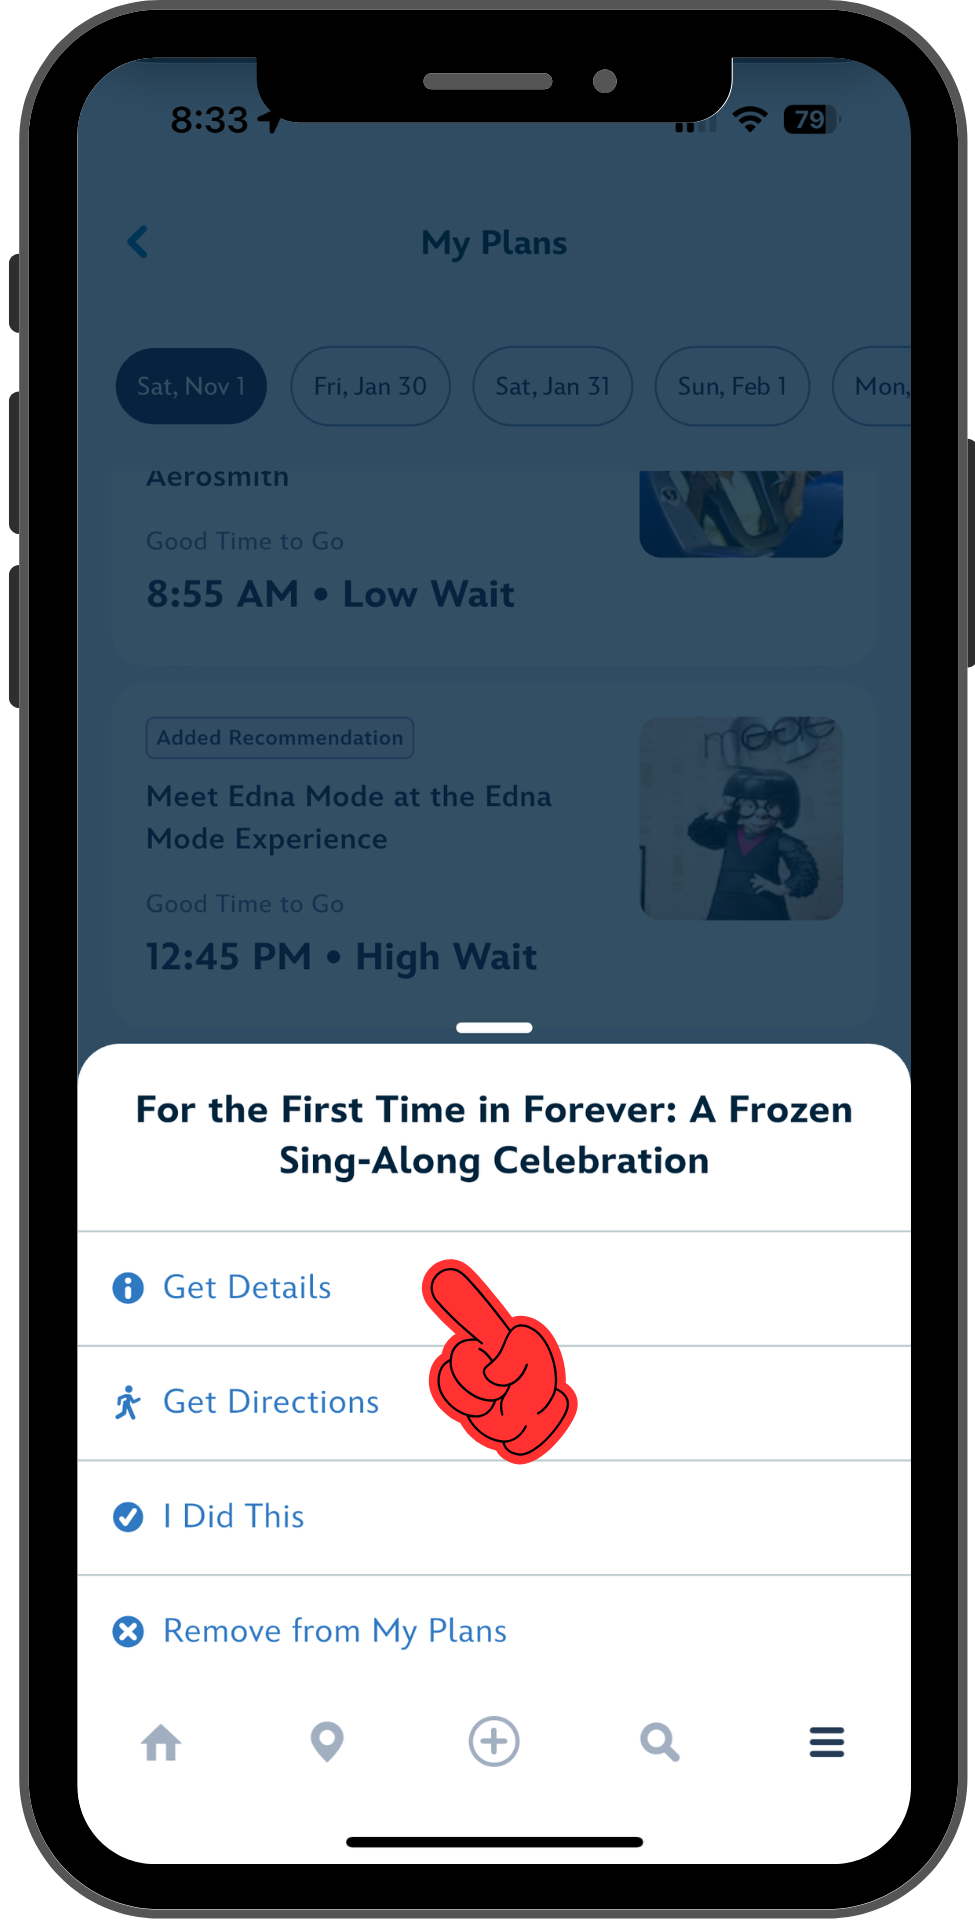
Your recommendations might include rides, experiences, or entertainment, which runs periodically at fixed times. Maybe I want to add the Frozen Sing-Along to my plans, but I don’t see it in my recommendations. Not to worry, you can usually get it to appear by adjusting your interests.
Tap the “Edit Preferences” button on the My Plans screen. This will take you back through the entire Genie setup – you can change the park, who is with you, your Top Picks, and your Interests. I added both Princesses and Live Entertainment, and when I returned to the My Plans tab, you can see that the Frozen Sing-Along is now in my recommendations. (And Beauty and the Beast Live on Stage is there too.)
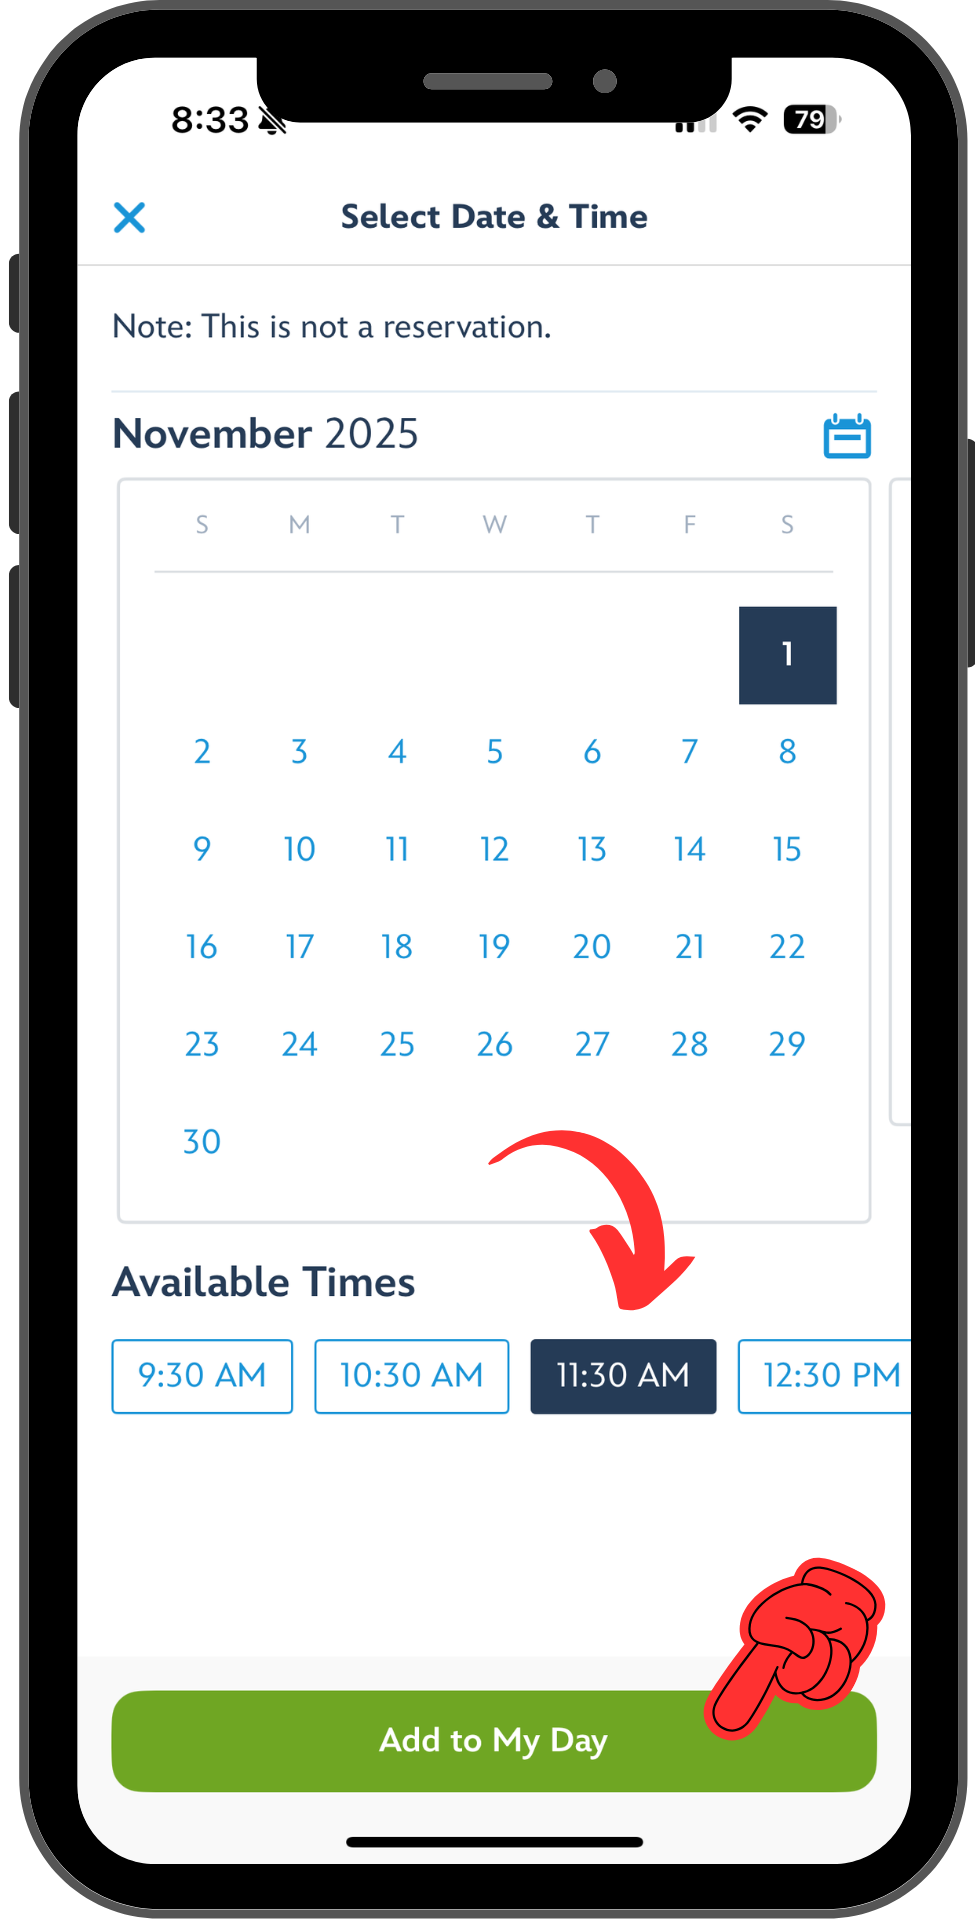
Since entertainment happens at fixed times, you can select to add a specific show to your plan. Tap the card on the My Plans screen, then select “Get Details”. This time, if you scroll down on the screen, there’s an “Add to My Plans” option. After you select the date and showtime you’d like, it appears on the card on your My Plans screen. Since it’s a timed activity, you’ll also see it on the home screen! And depending on how you’ve configured your Mobile notifications, you may get an alert when the time is near.
⚠️One thing to beware of when you add timed entertainment is that, like dining or Lightning Lanes, it’s for a group. But in this workflow, the only person who gets added to your party is you. If you’re touring with others who are also following along in My Plans under a different account, you’ll want to tap the card again, Get Details, and update your party to include them.
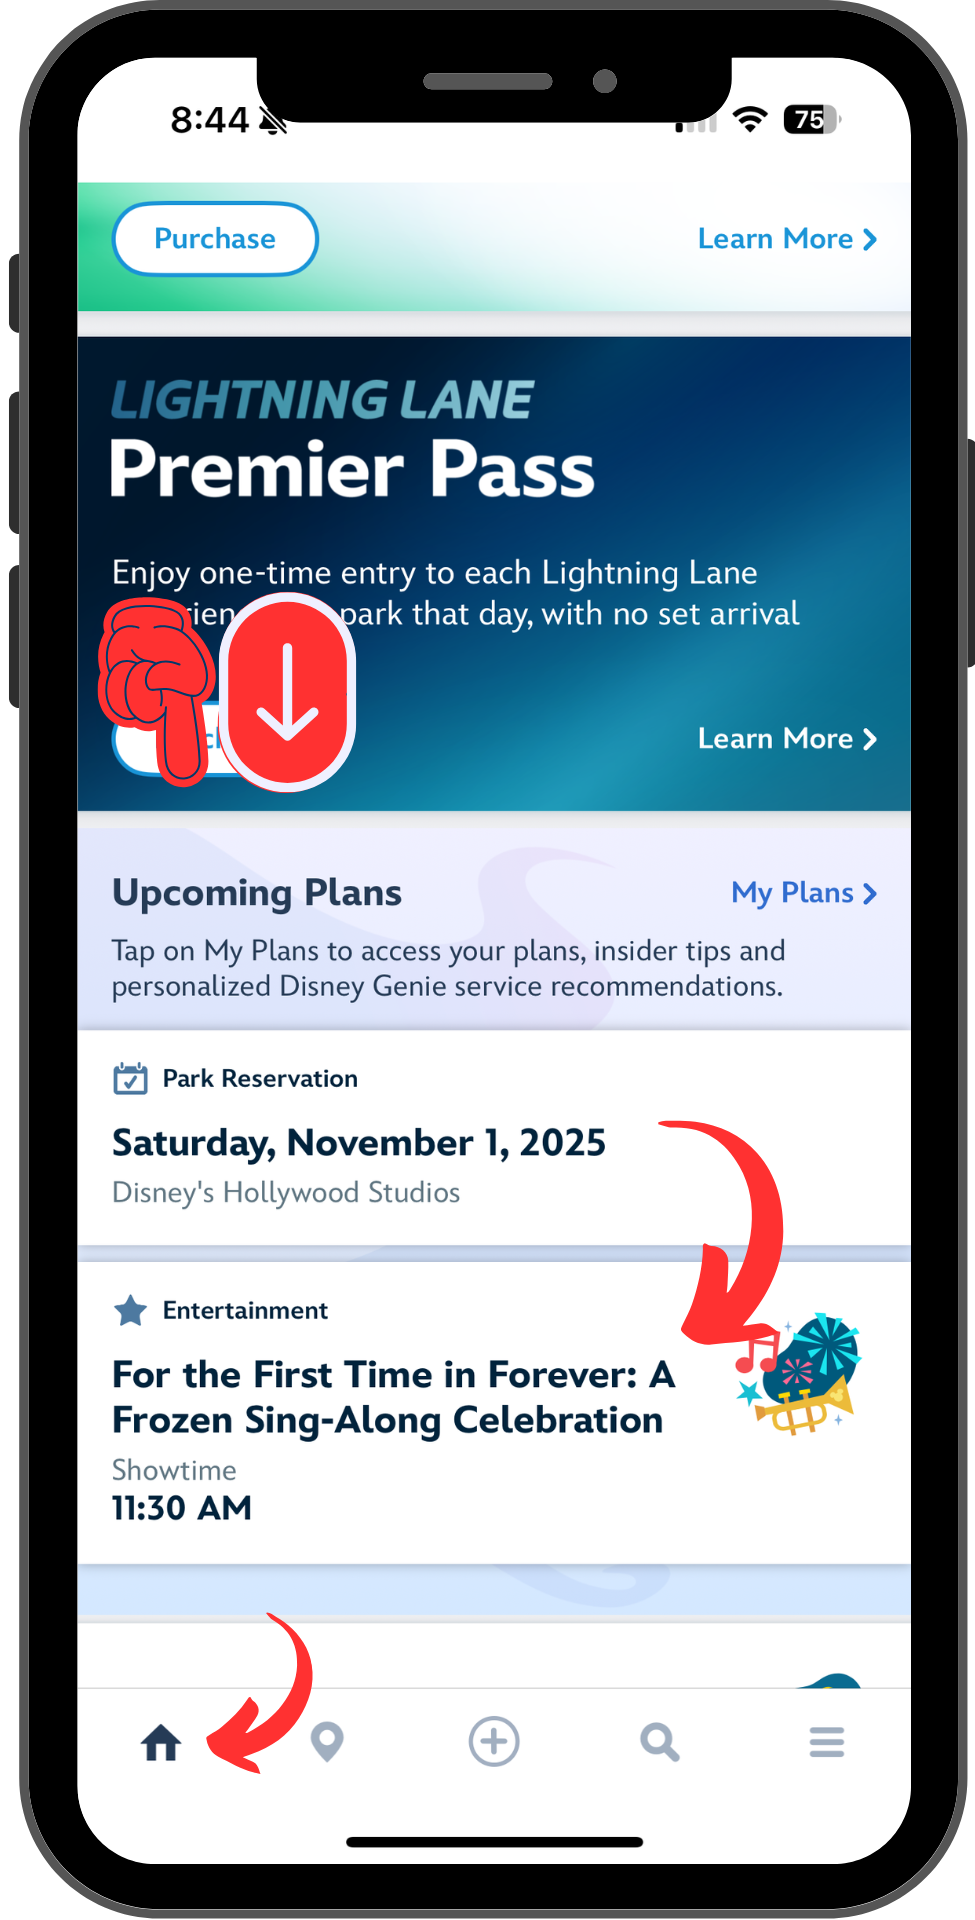
Other Useful Genie Features
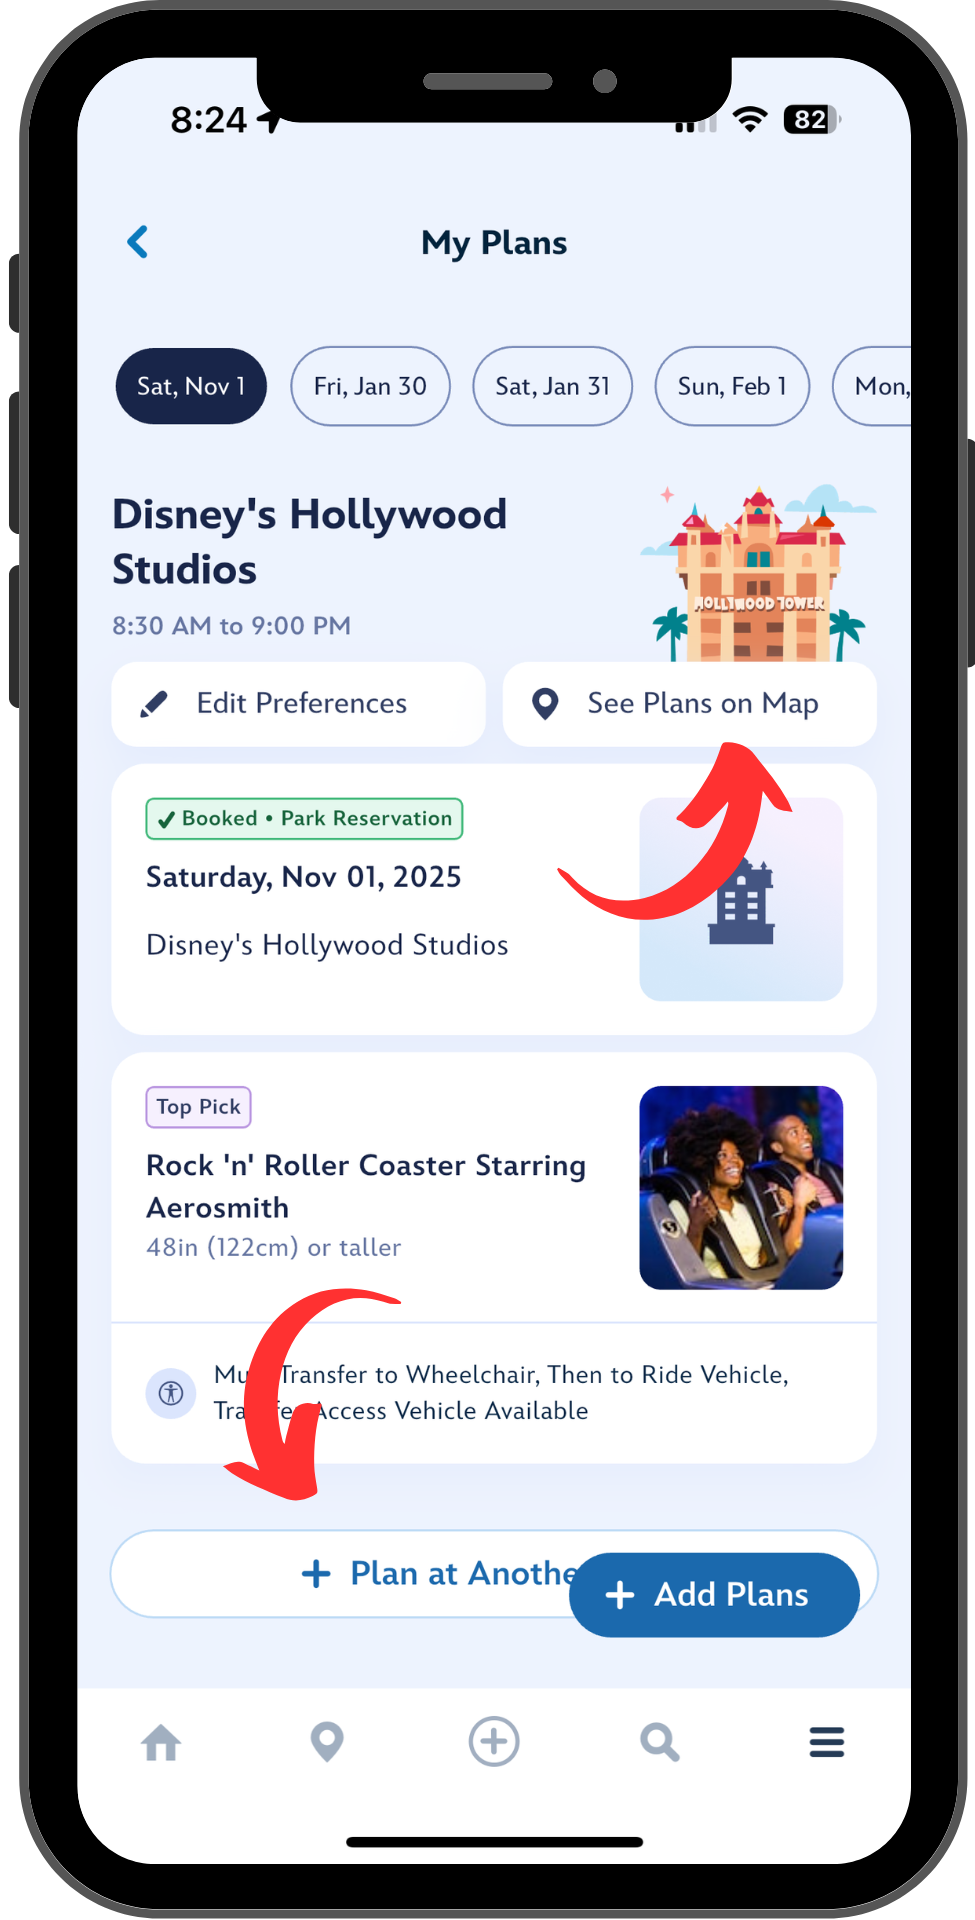
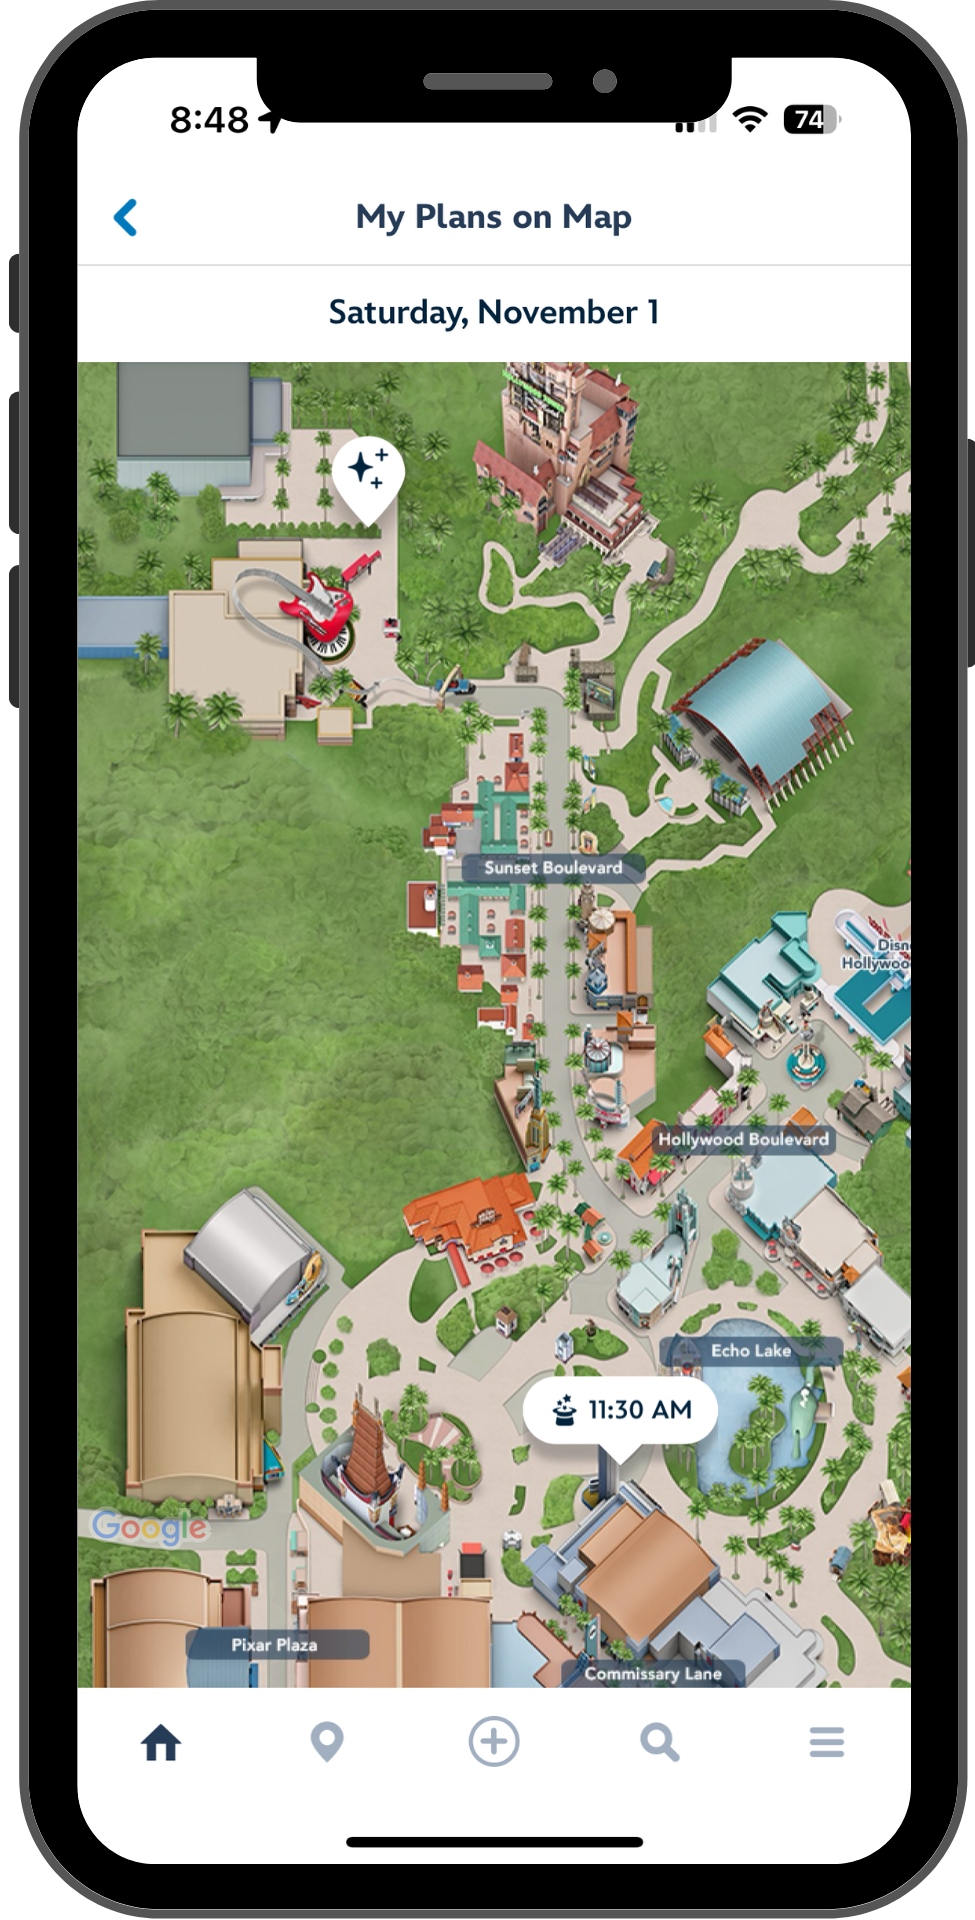
Here are a couple of advanced My Plans features that you might want to check out. On the My Plans tab, near the top, you’ll find an option to “See Plans on Map”. On the map, you can tap the markers to get Google Maps-style directions to the attraction from wherever you are in the park.
If you have Park Hoppers, you can also scroll down to add a park switch using “Plan for Another Day”. ⚠️This feature can cause a lot of problems. Once you’ve added a second park, you can’t remove it – and you may also have problems making changes to your first park. I highly recommend that you do not use it until you’re sure that you’re going to jump parks.

Planning the Future in My Plans
You might have noticed that although I took all these screenshots on November 1, the dates at the top of the My Plans screen go straight from November 1 to January 30. That’s because I have a trip booked beginning on January 30. But if I tap on one of those dates at the top of the My Plans screen, I won’t see the option to set up Genie – just the option to check into my hotel.
To set up those dates in the future, I’ll need to scroll all the way to the right on that top slider, and at the end of the dates, there’s an option to “Add a Day”. Tapping that will bring me to the Genie setup screen, where I can select the day that I want to visit, including any of the dates during my planned stay.

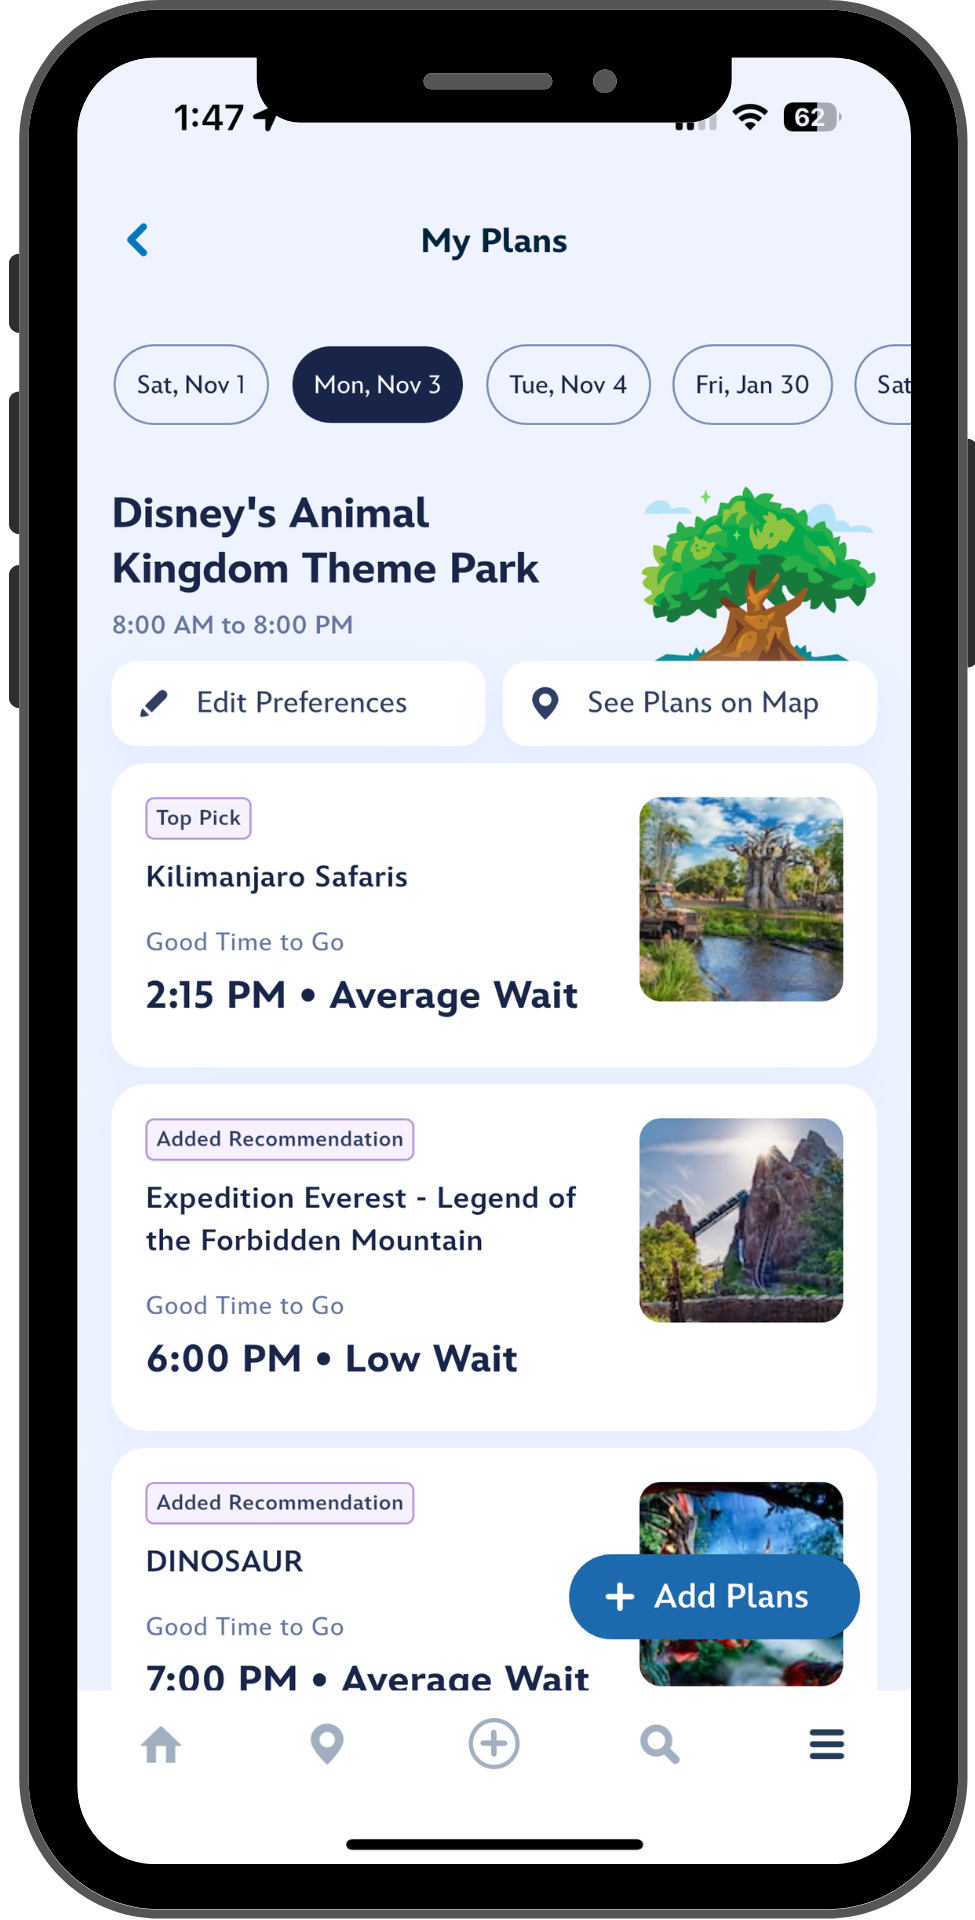
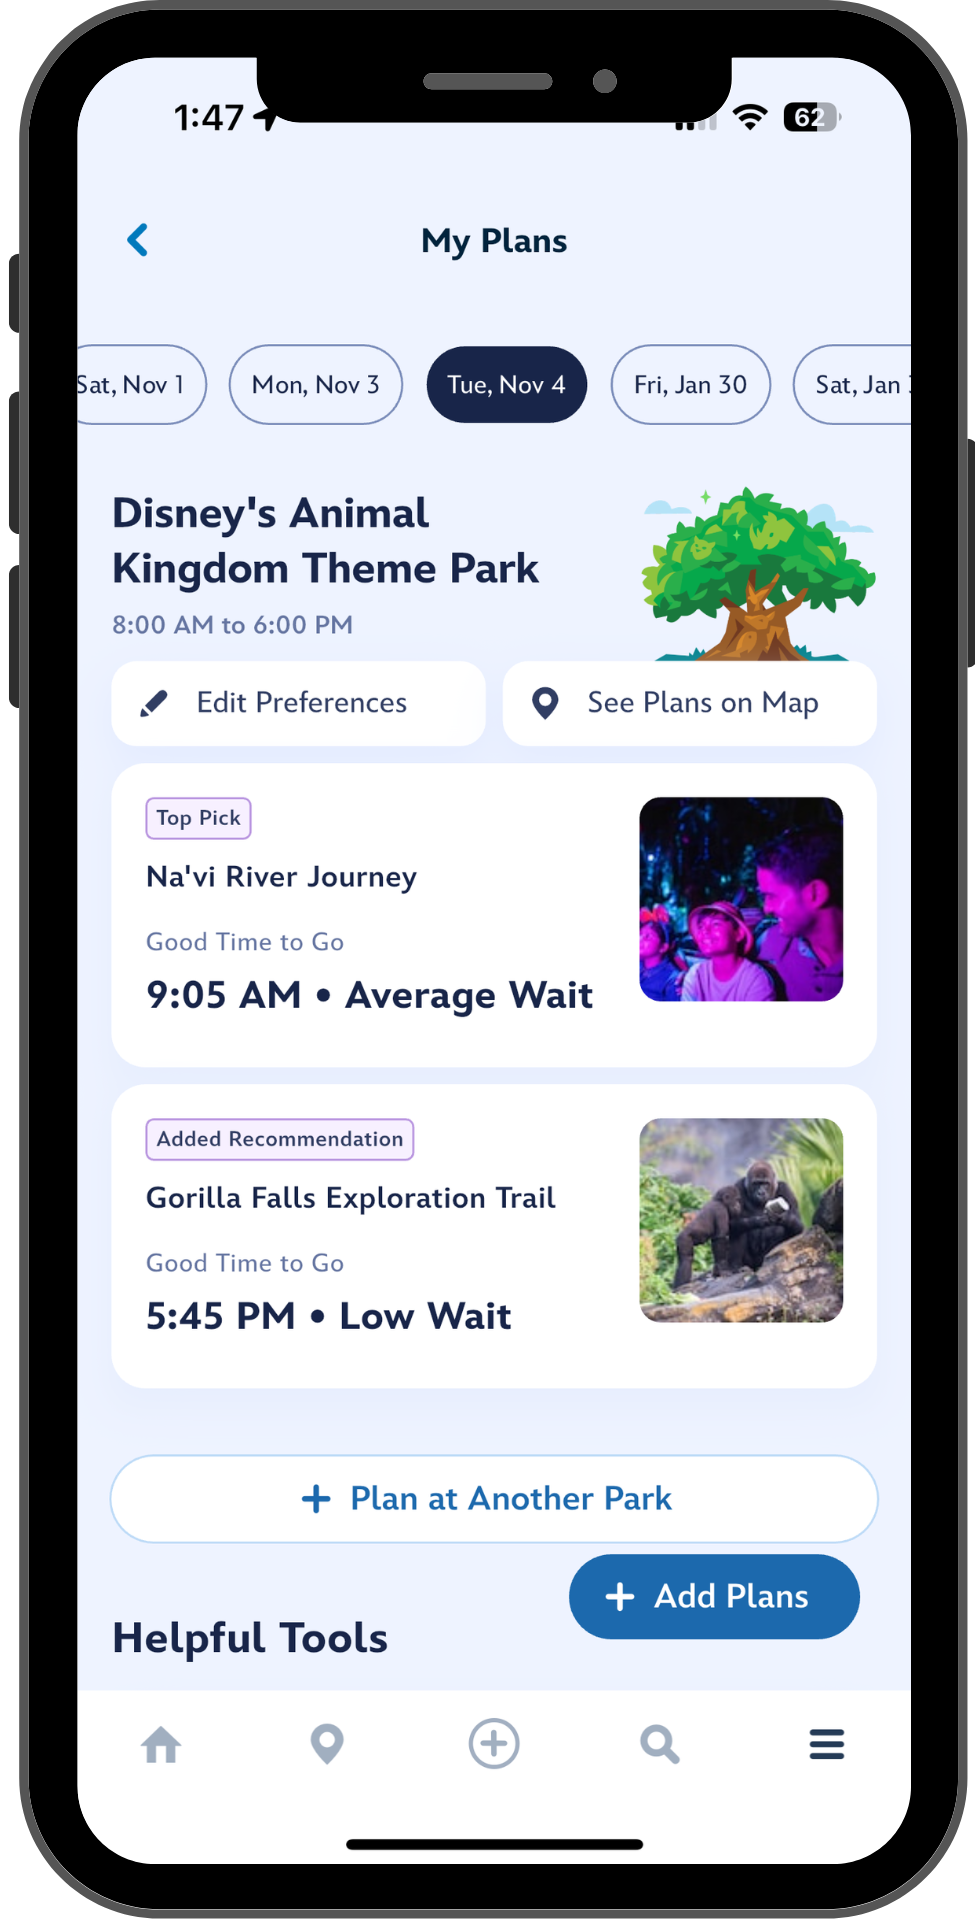
When you go through the Genie setup screens, what you choose in your Top Picks is specific to the day you selected. You can see in the screens above that although I’m visiting Animal Kingdom on November 3 and 4, I have different Top Picks and have added different recommendations to my plan for each day. But the settings in the My Interests screen control your recommendations; Genie remembers these from day to day if you’re setting up more than one day.
What Disney Genie Doesn’t Do
Genie can do a lot, and if you’d like to make your way through the parks without being overwhelmed by the choices, it might be your best friend. But in return for that ease, Genie takes away a lot of your control.
When Genie says to visit Edna Mode at 12:45 pm, there’s no way to tell it you’d rather go sooner. Of course, nothing stops you from doing that, but if I add the Frozen Sing-Along at 11:30 am, I don’t want to have to remember that I planned to go to Edna Mode earlier; I want to be able to organize my screen in the order I plan to go.
Genie’s recommendations on timing also don’t line up with a strategy to minimize your waits. No one who is familiar with the parks and knows how to tour efficiently would ever recommend visiting attractions in the order Genie comes up with.
Genie is brilliant for optimizing the display on your Wait Times board, and reminding you about reservations that you’ve booked. But if you’re looking for an app that lets you choose all the attractions you’d like to see, and then tells you the best order to visit them for the lowest total time in line – then TouringPlans customizable touring plans in the Lines app will do a much better job than Genie.
Frequently Asked Questions About Disney Genie
Do I need to set up Genie to make Lightning Lane reservations?
No, you don’t. It just makes it more convenient because it’s easier to find the attractions you want to book without scrolling.
How do I change my Top Picks on the Wait Times & Showtimes Board?
Select “Edit Preferences” from the top of the My Plans screen. You can redo your entire setup (Genie will remember what you already chose) and make changes.
How do I redo my whole Genie setup?
Select “Edit Preferences” from the top of the “My Plans” screen.
How do I see the Wait Times & Showtimes for a different park?
At the top of the Wait Times board, select “Change Park” right under the park icon and the date. This change is “sticky”; Genie will remember it until you change it back, even if you close the app and relaunch it.
How do I pin attractions for a park that I hopped to?
Scroll down on your “My Genie Day” tab until you see an option to “Plan for your next day”. Click here and set up your next park, including Top Picks for the Wait Times board.
After I choose a park, why does it say that nobody is eligible?
You can only select a park which you have valid admission for and, if necessary, a park reservation. If you see this after selecting “Plan for your next park”, then it means that park hopping is not available with your ticket.
Can I set up Genie for a future date?
Yes. It’s a little tricky to get to the starting screen, but once you’re there everything is good to go. To set up for a day in the future, scroll the dates at the top of the My Plans screen. All the way on the right, you’ll find an option to “Add a Day”.
Got a question or tip we missed? Put it in the comments below!
You May Also Like...
-
“My Disney Experience” is Disney World's all-in-one trip planning tool. The name is a bit clunky, and you might hear people…
-

Is Disney adding a third Dining Plan option? Are they changing the names of the Dining Plans? It sure seems that…