Step by Step: Link Your MagicBand or Tickets to My Disney Experience
You’re in the parks! You fell in love with a MagicBand+ design! You’re holding your precious new merch and admiring it … but how do you get it hooked up so you can start using it right away? Never fear, TouringPlans is here!
Hyperbolic article intros aside, the walkthrough below covers everything you need to know about linking a MagicBand or MagicBand+ to your My Disney Experience account. Linking park tickets to your My Disney Experience account is almost exactly the same, so you’ll find those directions here too.
Tap into any gallery to enlarge the images. Or tap below to jump directly to any section. If you haven’t already created a My Disney Experience account, do that first.
- Linking a MagicBand or MagicBand+ in the My Disney Experience app
- Linking a Disney World Ticket in the My Disney Experience app
- Pairing and Managing a MagicBand+
- Linking MagicBands and Disney World park tickets on the My Disney Experience website
- Activating or Deactivating MagicBands
One thing to know before you get started: If you ordered pre-arrival MagicBands as part of a Disney World resort stay, they will arrive already linked to your My Disney Experience account. This is one of the three big advantages of ordering MagicBands for a resort stay vs. just buying them once you arrive. The other two are that you get a small discount, and that your name will be printed on them inside so that it’s easy to tell which one belongs to whom. However, if they are MagicBand+, then they will still need to be paired to your phone if you’d like to manage them in My Disney Experience.
Linking a MagicBand or MagicBand+ in the My Disney Experience app
Using the My Disney Experience app to link your new band is definitely the fastest and easiest way. For a MagicBand+, you should be able to start by powering on your band, tapping it to the back of your smartphone and following the prompts. (Press the small button on the back of the band to power it on.) But if that doesn’t work, or you are linking a band that is not a MagicBand+, then start by tapping the hamburger icon at the bottom of the app screen, then scroll down and select “Link to Account”.
You have three options:
- Scan the QR code or barcode on the back of the band using your phone’s camera
- Hold the MagicBand against your phone (will typically be the best and easiest choice)
- Type in the serial number from the back of the band
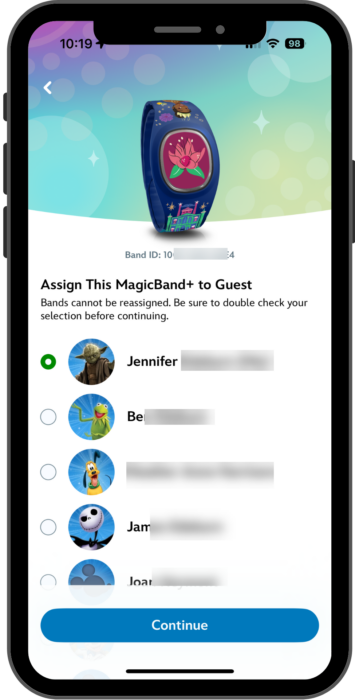
No matter which method you choose, once you begin the system will find your band and ask who you want to link it to. You can assign the MagicBand to anyone in your Friends & Family list – including yourself – but once assigned you will not be able to change it. If you’re linking a MagicBand+, you’ll be offered the opportunity to pair it immediately after you’ve linked it.

Linking a Disney World Ticket in the My Disney Experience App
Tickets from a third-party vendor, passes for a hard-ticket event, or special tickets such as Military Salute tickets or annual passes may need to be linked to your My Disney Experience account. You’ll start the same as you do for a MagicBand: tap the Hamburger icon on the bottom left, scroll down, select “Link to Account”. And for a physical card that you can tap, you’ll have the same three options: scan it with your camera, tap it to the phone, or enter the serial number from the back of the ticket.
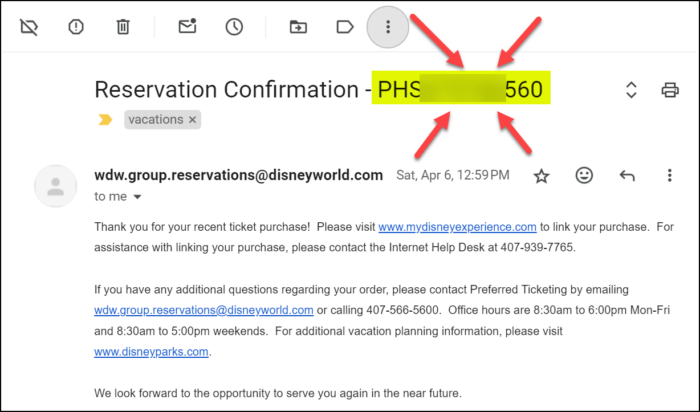
If you specified e-delivery, you’ll need to use the “Type ID” option and enter the confirmation number from the email you received. And if your confirmation number is for a purchase that included multiple tickets, you’ll be asked to assign each of them at the final step of the process by selecting multiple guests from your Friends & Family list.

Pairing and Managing a MagicBand+
You may have opted to pair your MagicBand+ when you first linked it to My Disney Experience. But if you skipped that step, or received pre-arrival MagicBands that came unpaired, then you’ll need to connect your band to your phone in order to manage the settings. It is not necessary to pair your MagicBand+ to use it for tapping into the parks or Lightning Lanes, for purchasing, or for opening the door at your resort. You also don’t need to pair it to use the interactive features in the parks. You only need to pair your MagicBand if you’d like to change the settings.
To begin, make sure that the MagicBand+ that you’re trying to pair is charged, and that Bluetooth is enabled on your phone. Then tap the Hamburger, scroll down to MagicBands & Cards, and select the person whose MagicBand+ you’d like to pair.
Make sure that MagicBand+ is selected in the top slider menu, then tap through to the MagicBand+ that you’d like to pair (if you have more than one). Hold down the button on the back for three full seconds, then tap “Pair” when you see the request on your phone. If you don’t see the pairing request from your phone, it is usually one of two things. Either you didn’t hold down the button long enough – you should hold it until you see the pairing request – or you aren’t holding the MagicBand+ close enough to the phone.
Changing the settings on a MagicBand+
Once paired, you may see an option to update the band, or if you open a band that was paired a while ago you may see the option to install updates. You can also scroll down to update the band’s settings and features; your band must be charged and close enough to the phone to modify the settings. You can change color themes, and you can also toggle or adjust many of the features such as light, vibration, and connected park experiences.
Linking MagicBands and Tickets on the Website
If you don’t have your phone in front of you and you’d like to use the website to link your MagicBand, you can still do that. To use the website for linking a MagicBand, you’ll need the serial number on the back. For linking tickets, you’ll need the serial number on the back of the card, or the confirmation number from the email.
Begin by going to the “My Plans” page of the My Disney Experience website. Load the “My Plans” screen and tap “Add More Plans”, then “Link Reservations and Purchases”
On the linking page, you’ll see that you can choose to link MagicBands, Tickets, or even resort and dining reservations. You can click here to access the My Disney Experience linking page directly.
Select MagicBands or Tickets, whichever you are trying to link. You’ll need to enter the serial number or confirmation number. One thing you might not easily notice is that you can scroll the list of sample tickets or Magicbands for examples of where to find the ID that you’ll need, depending on the ticket type. Then you’ll be asked to associate your MagicBand or ticket with an individual from your Friends & Family list (or yourself).
Activating or Deactivating MagicBands
There are a couple of good reasons why you might want to deactivate some MagicBands, or to report them lost. The first is that if you have lost your band, deactivating it prevents anyone who might find it from using it. The second is that if you are a frequent visitor and have several bands, leaving them all active can cause problems, especially with check-in and check-out at Disney World resorts. It’s recommended to keep no more than 5 or so MagicBands active at any one time.
To deactivate a MagicBand or ticket card, navigate to the MagicBand management page (reminder: Hamburger, scroll, MagicBands & Cards, tap the person). You’ll find that your cards and MagicBands are organized by type. Select the type, then tap the bands to scroll through your collection. You’ll see the option to deactivate or report as lost underneath the selected items. Both of these actions are reversible, and it’s not clear that there’s any functional difference between them.
On the website, you’ll select “My MagicBands and Cards” under the My Disney Experience menu on the top right. You’ll find that the process is similar except that you’ll see all your bands and cards in a big list instead of seeing them sorted by type.

Have more general MagicBand questions in mind? Check out Getting to Know MagicBands for extensive FAQ coverage!
Did we cover all your questions about linking and pairing MagicBands? Did you notice that I have all three versions of the Grumpy MagicBand? Let us know in the comments!


