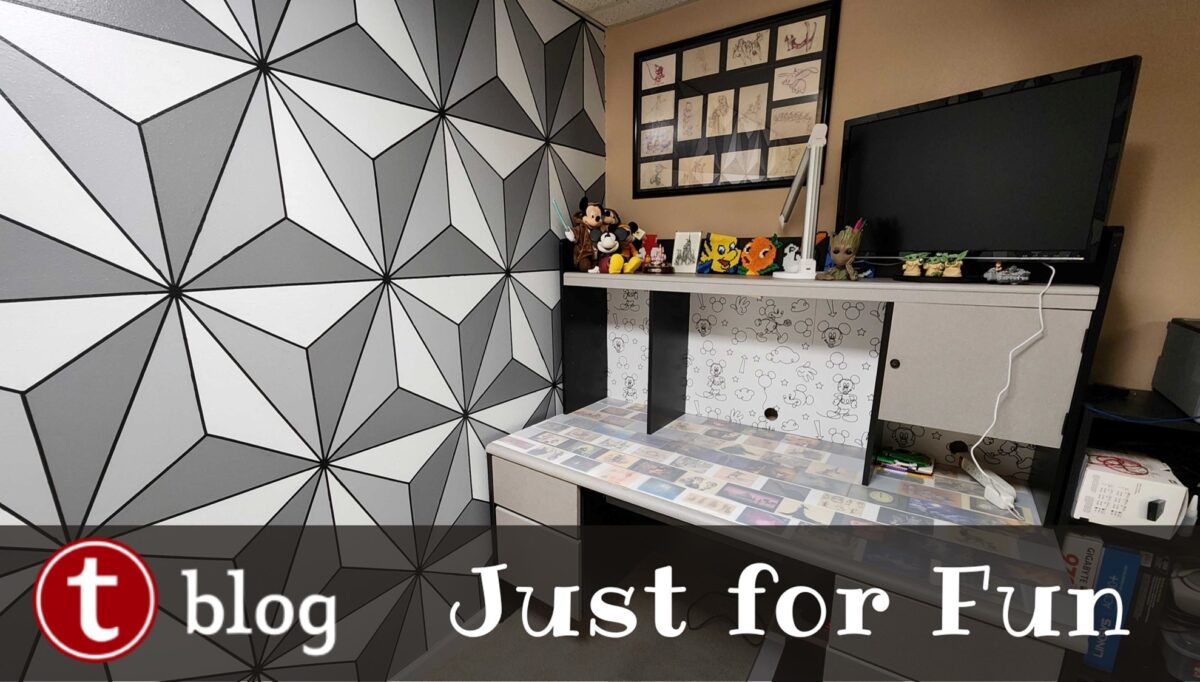
Disney at Home: Spaceship Earth Accent Wall
Now that the 50th anniversary of Walt Disney World is over, we can all recognize what the best part of the celebration was. The Beacons of Magic lighting on Spaceship Earth at EPCOT. Obviously. And that’s because Spaceship Earth is the best of all park icons, anywhere, ever. If you’re an EPCOT fan like me, who lives far away from Orlando and doesn’t get to visit the parks frequently, I have the perfect idea for bringing some of that Disney magic home. Inspired by everyone’s favorite giant golf ball, this DIY project will help you to create a stunning accent wall that will transport you to the grand and miraculous spaceship.
Choosing the Right Wall for Your Spaceship Earth Decor
If you’re wanting to have some Disney at home, it’s important to start by choosing the right space. Maybe you want to select a spot in your home where guests can come and admire your Disney vibe, in which case you could choose a wall in a public space like a dining room (people still have those, right?) or a lounge. Or maybe you don’t want visitors to think that you’re too obsessed, so you could pick something more private like a bedroom, laundry room, or kids playroom. If you’re like me, you find the best of both worlds and choose a wall in your home office. The best part about Disney themed office decor is that it isn’t immediately visible to visitors, but it provides a great backdrop and conversation piece for all of my video calls during work hours.
Step 1: Gather Your Supplies
To embark on this project, you’ll need a few essential supplies. Purchase 1/4″ painters tape for creating Spaceship Earth’s iconic precise lines, and then choose four paint colors: black and three different shades of gray within the same hue. This variety of grays is key for adding depth and dimension to your Spaceship Earth-inspired wall.
For my wall, I used Dutch Boy paint in the following shades:
- Black Magic
- Thin Ice
- Flagstone
- Dover Gray

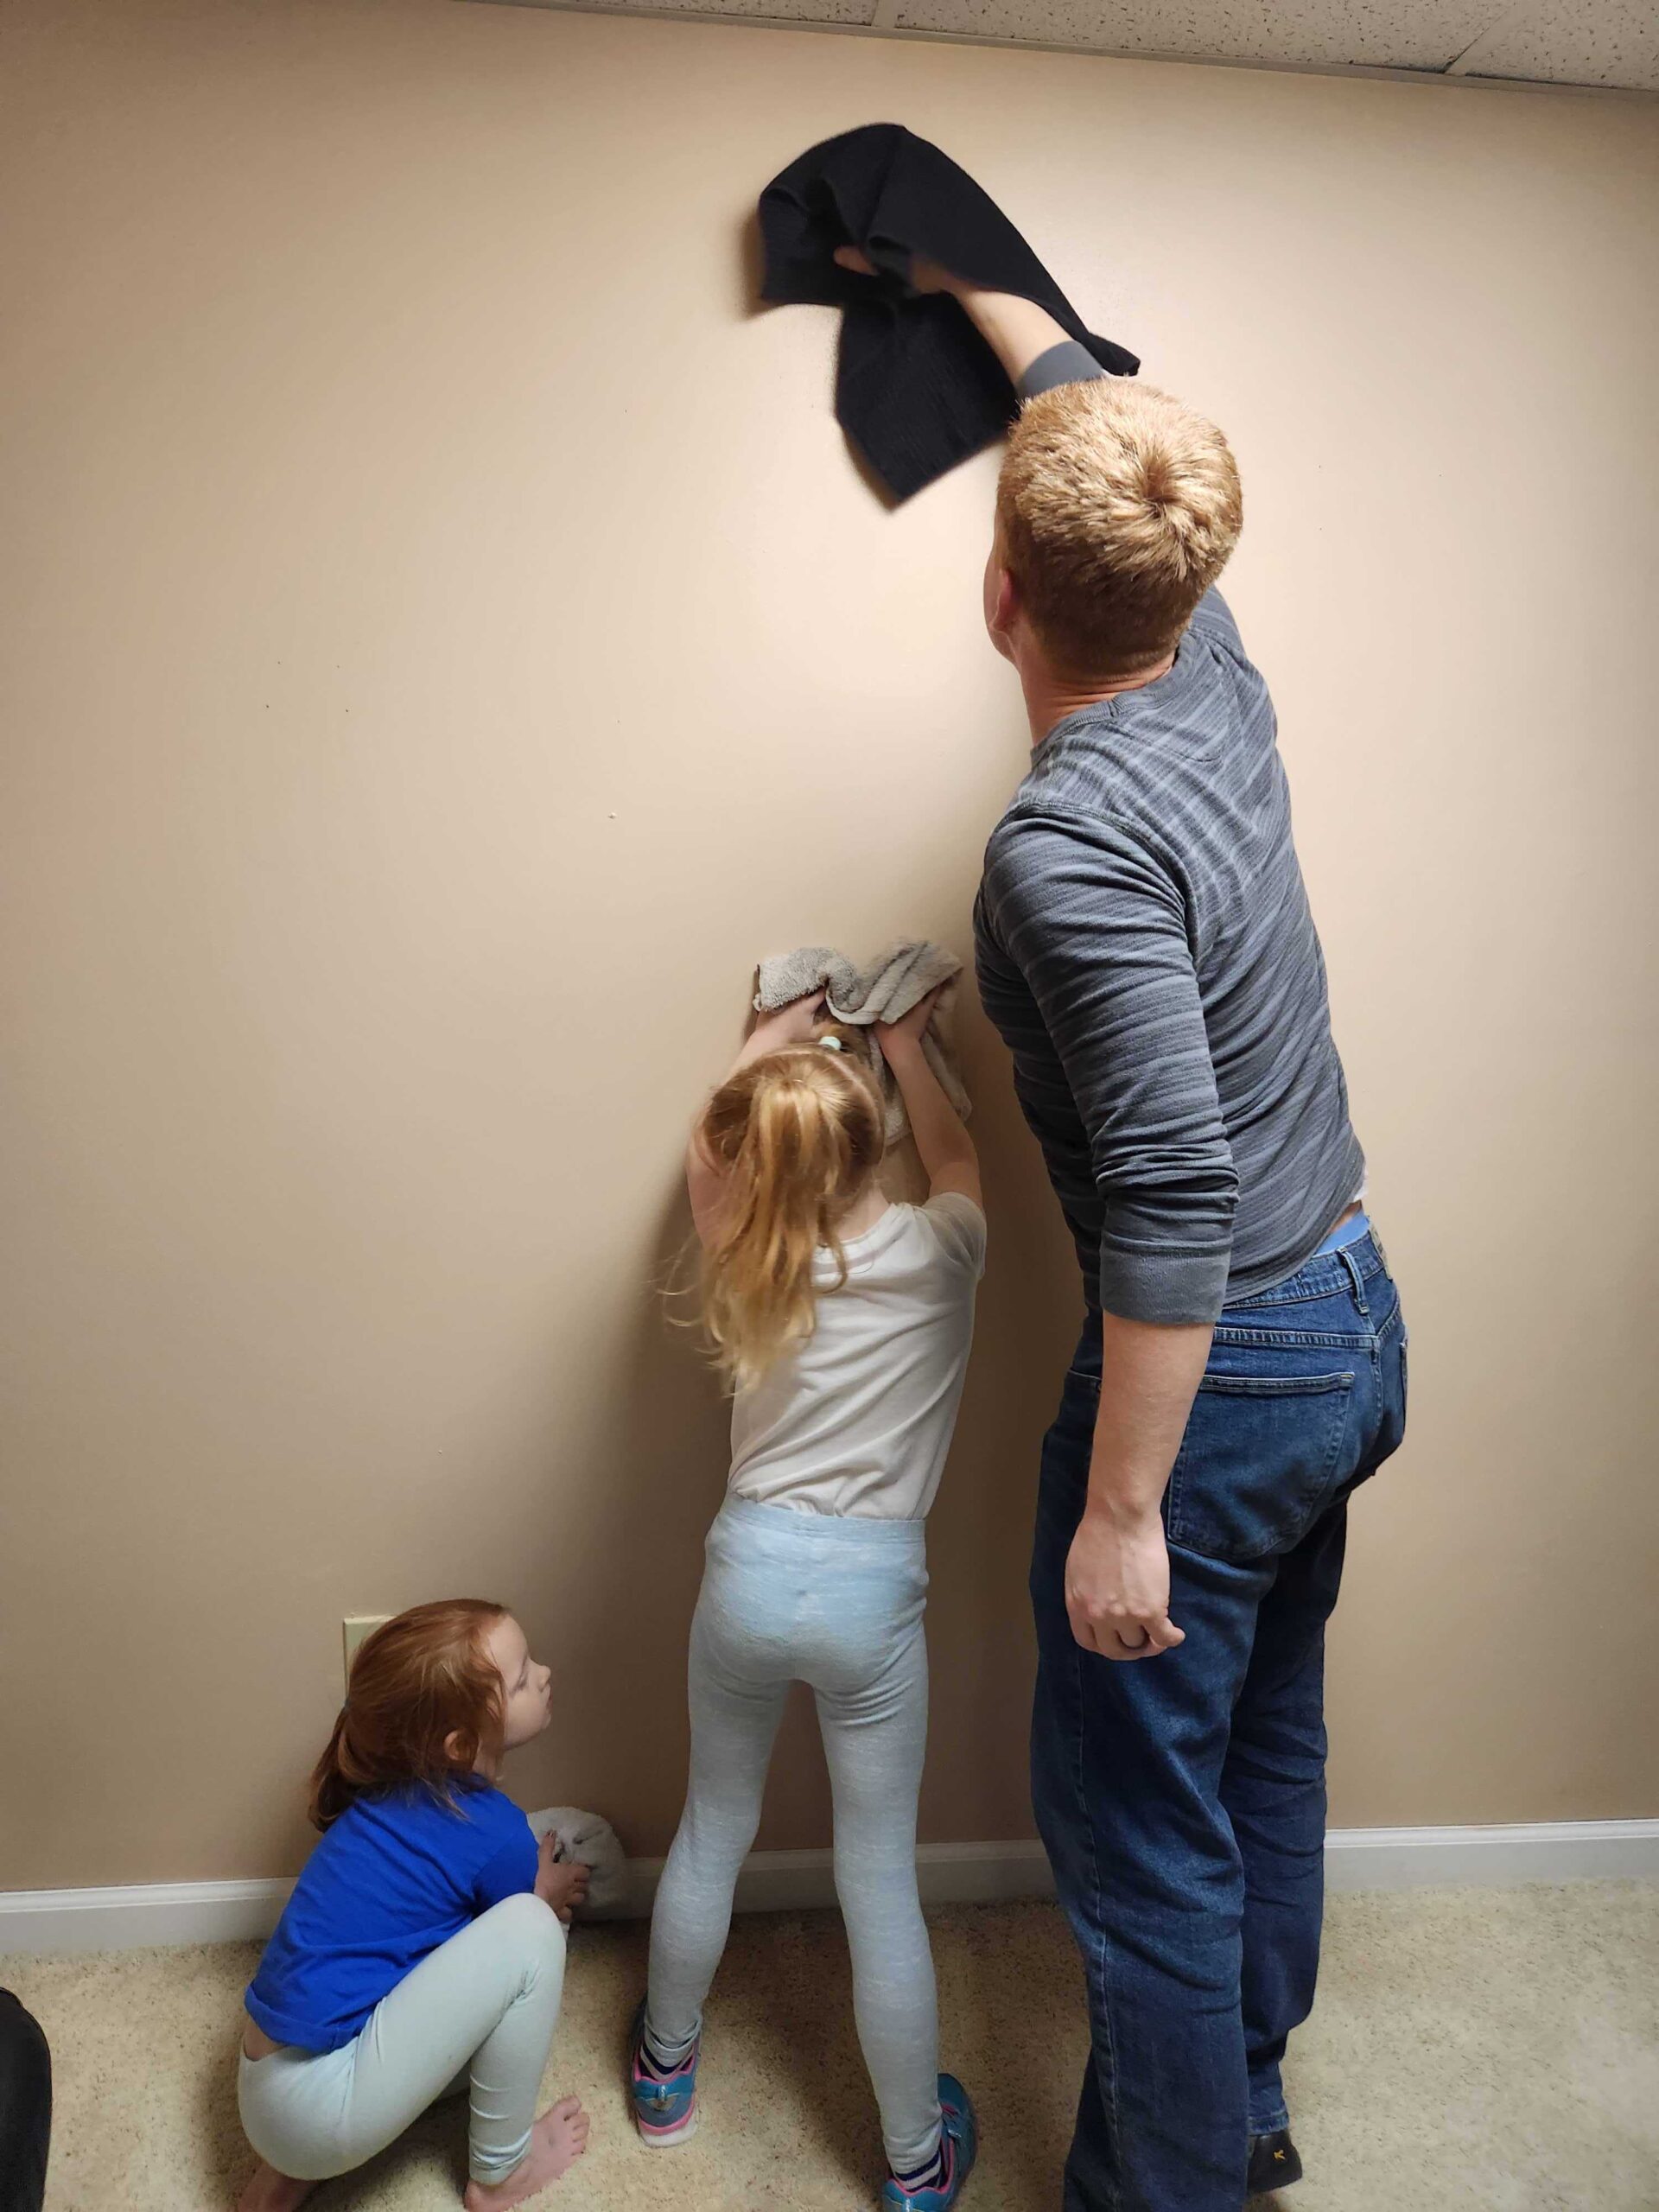
Step 2: Clean and Prep the Accent Wall
Don’t get hasty and start painting right away! This is a wall you and your children are going to treasure for centuries, so you want it to be great from the beginning. Clean the wall surface to ensure it’s free from dirt, dust, and imperfections. If necessary, repair any holes or other patches to create an even finish. If your wall is textured, that’s okay, but it will require much more careful taping to avoid paint bleeding.
You’ll also want to make sure that the surrounding area is clear. You’ll need space for stepstools or ladders, paint trays, your pump-up music sound system, a tripod capturing your progress … or at least some of those things.
If you haven’t prepped a wall for painting before, here is a good tutorial to show you want to do!
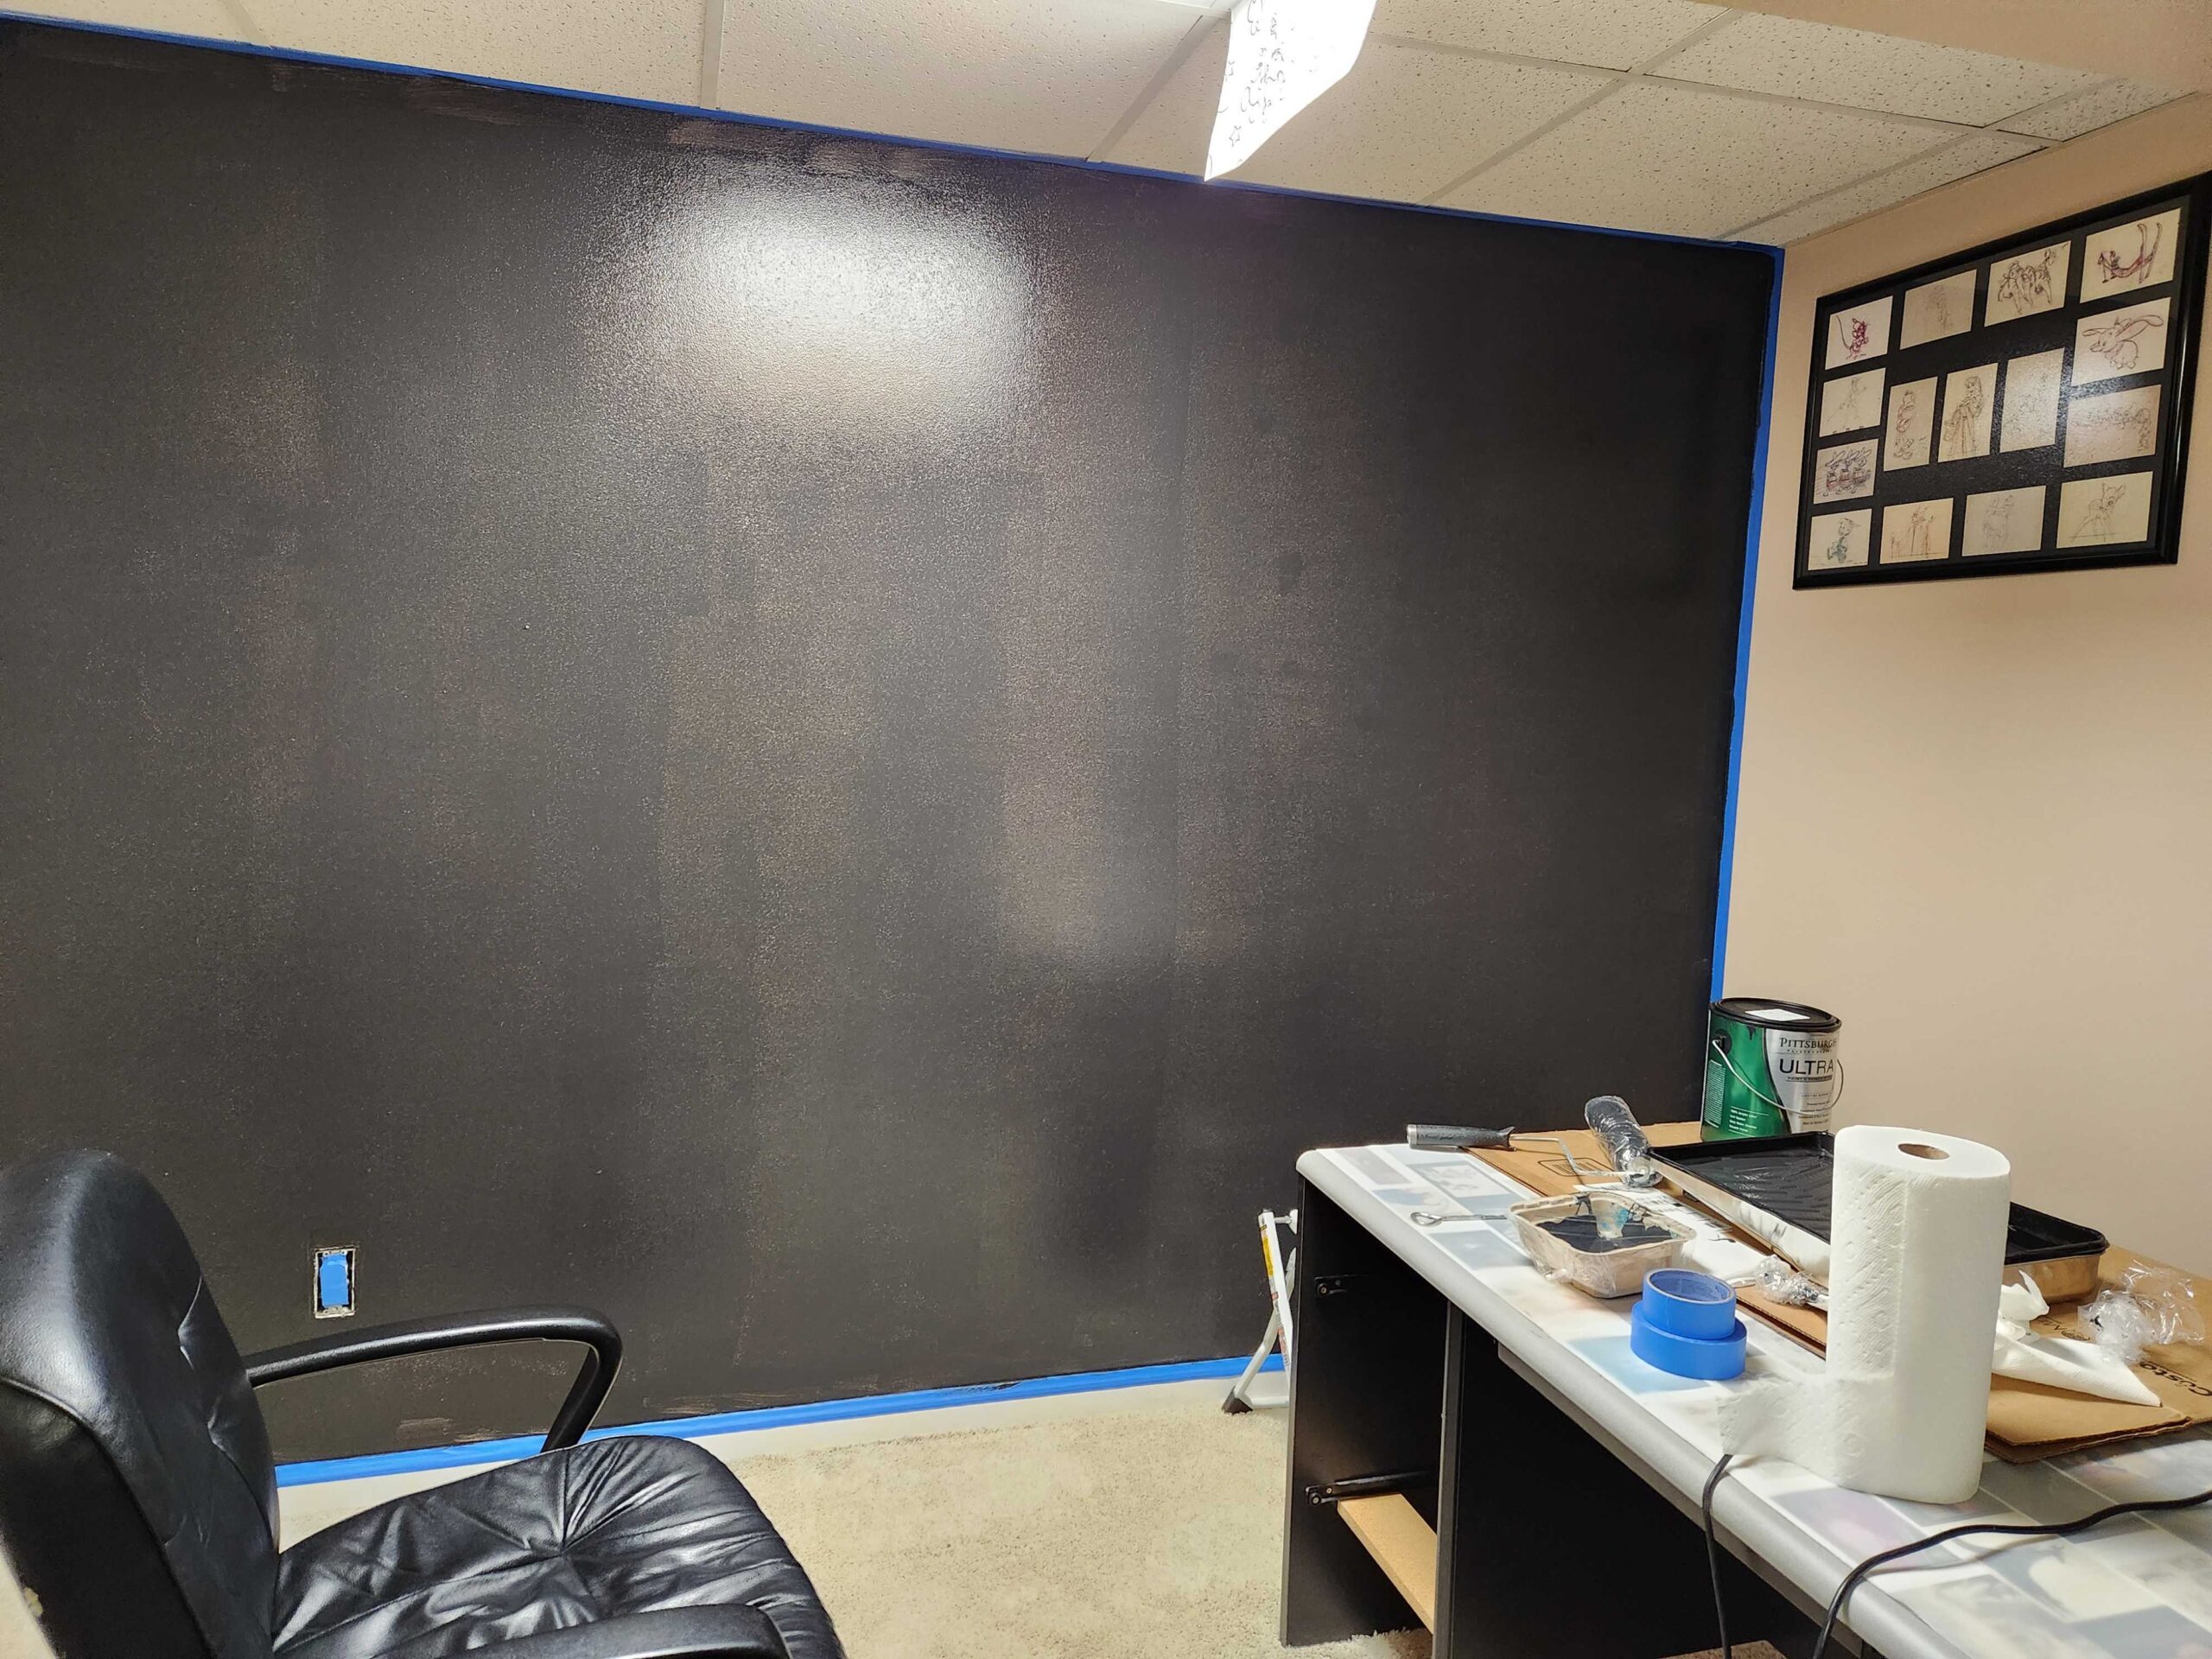
Step 3: Paint the Wall Black
Now it’s time to set the stage! Begin by painting the entire accent wall with a coat or two of black paint. This step serves as the backdrop for the upcoming geometric design. This black background will eventually only show through in the areas that you tape – it will be the contrast that sets apart each of the gray triangles. Make sure coverage is even, and then let the paint completely dry before you move on to the next step!
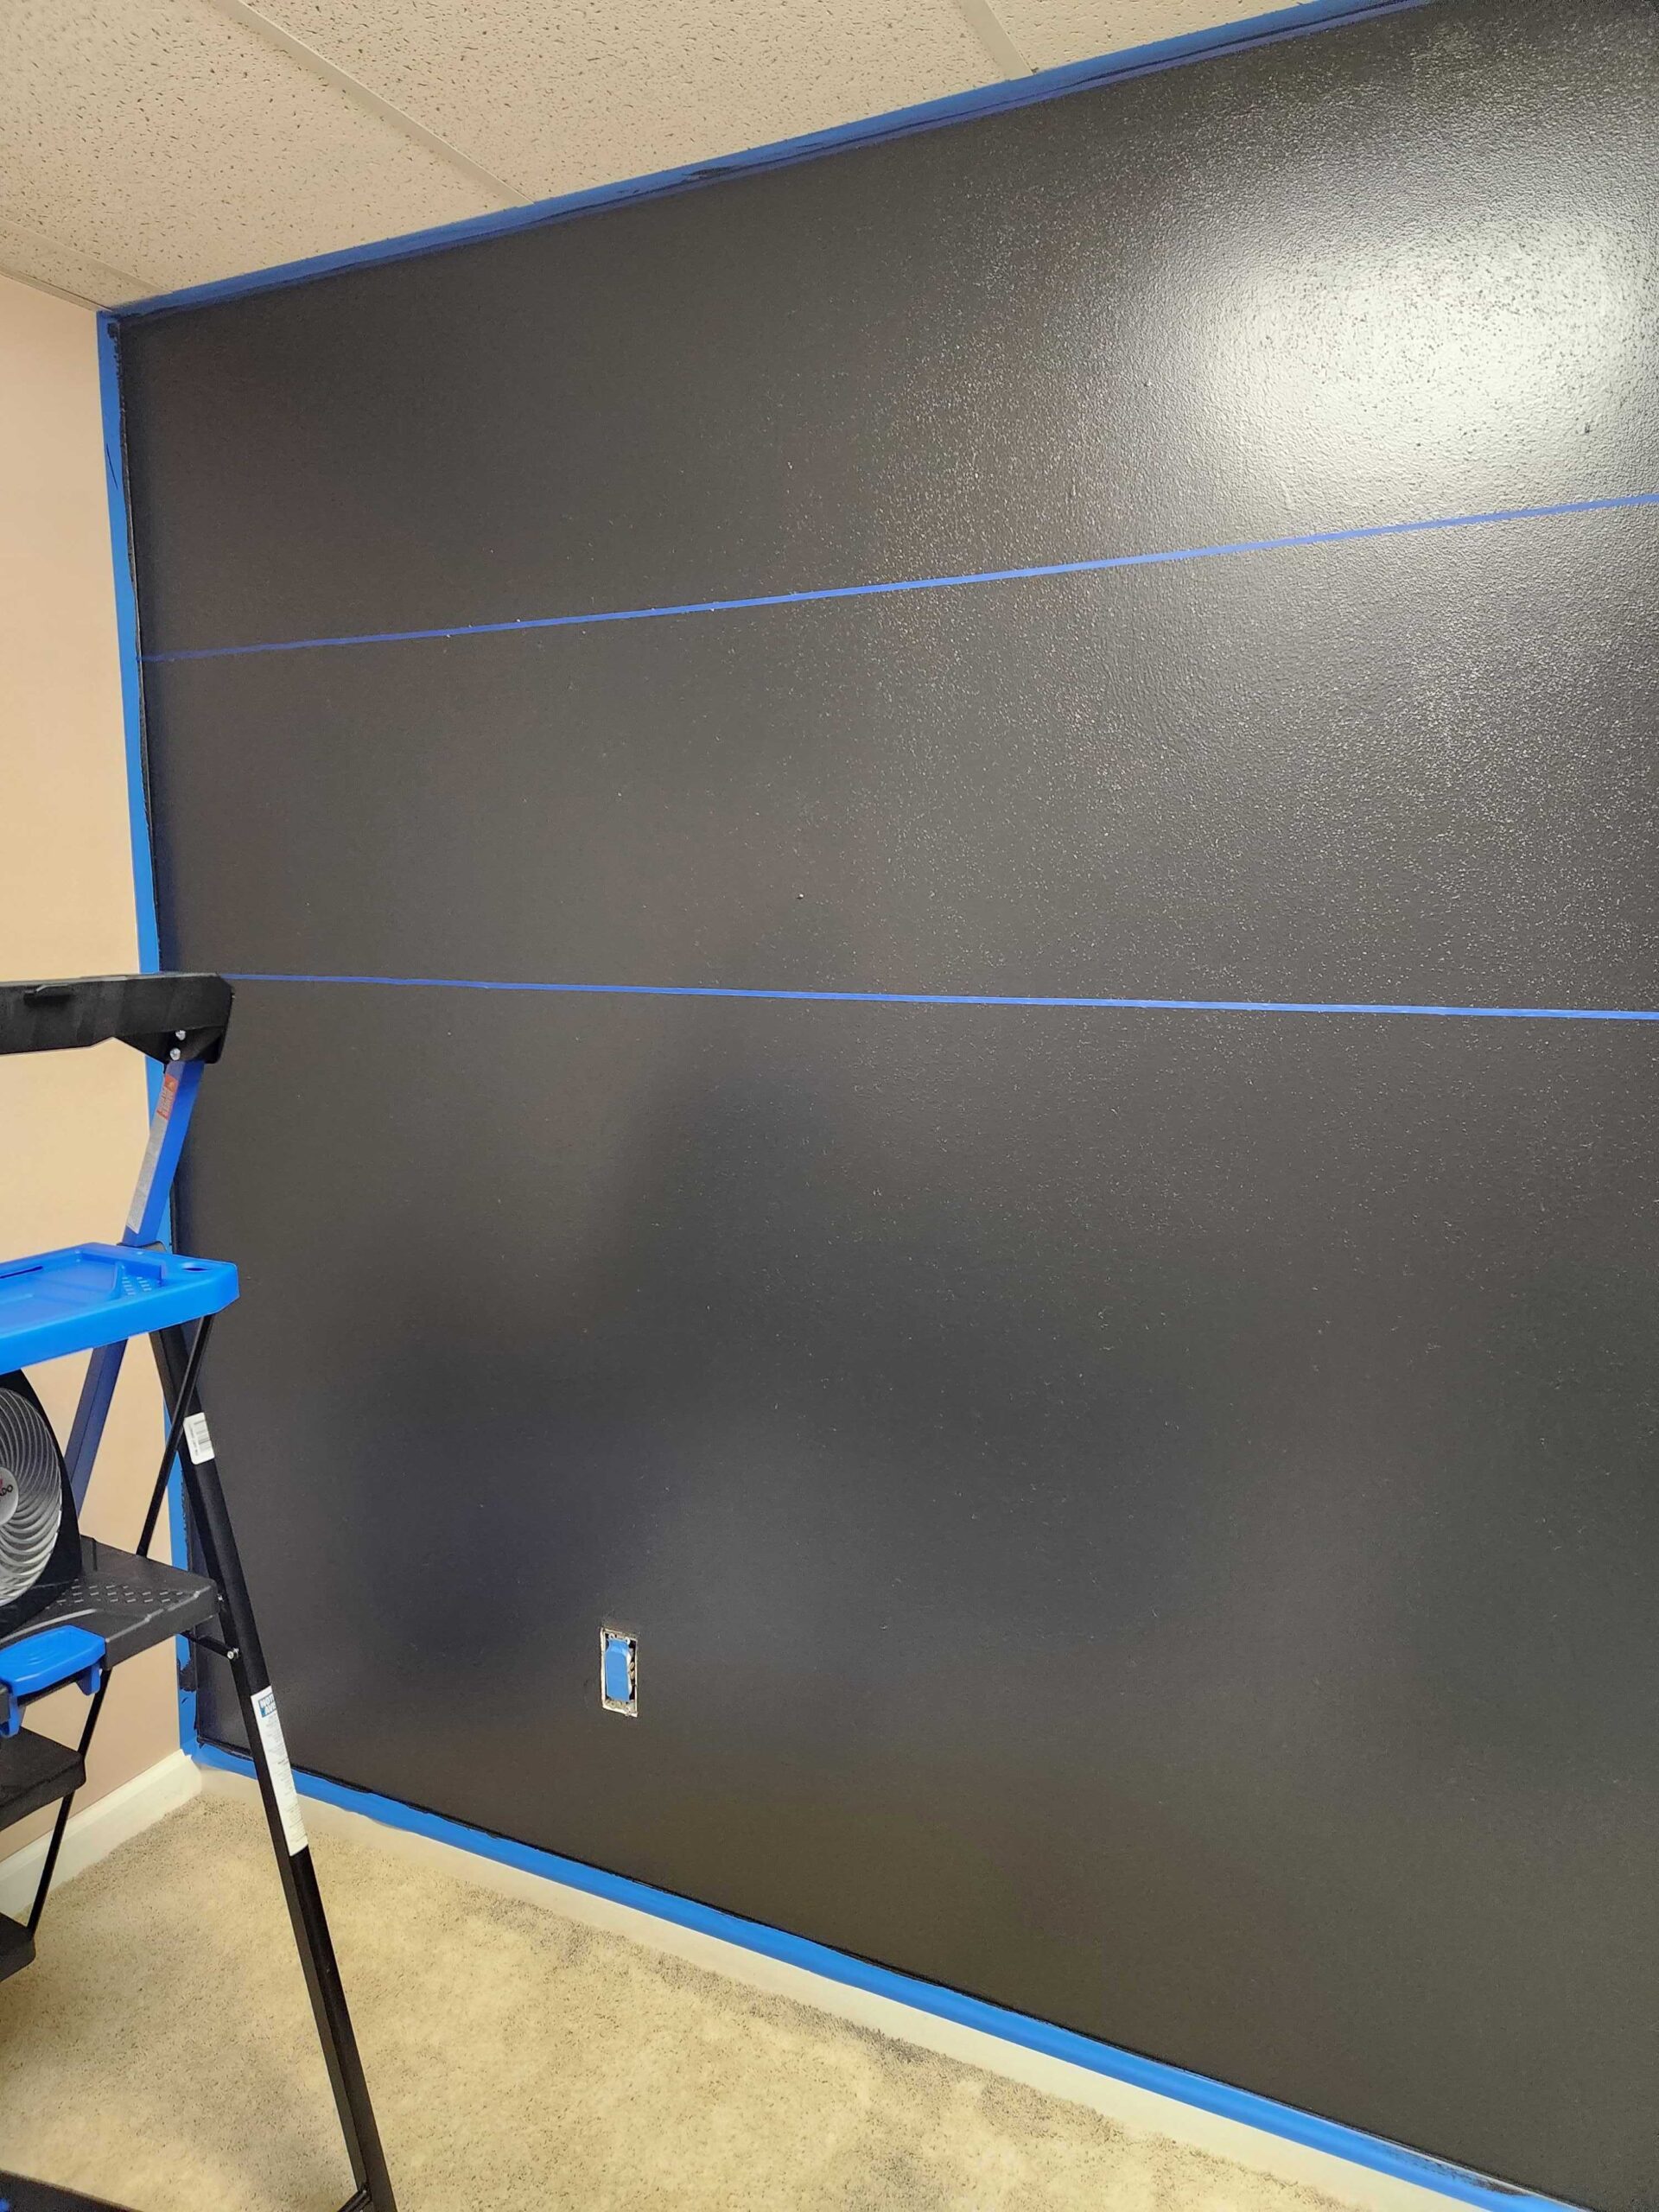
Step 4: Measure and Tape Horizontal Lines
Using your painter’s tape, a measuring tape (or yardstick), and a level, measure and mark where you want your horizontal lines to appear on the wall. The spacing between these lines will determine the size of your triangles and therefore the scale of your pattern. For a full wall, I recommend a spacing of 18 inches. Ensure the lines are evenly spaced and level across the entire wall. Apply the tape carefully along the marked measurements, creating straight and crisp lines across the black-painted wall.
Step 5: Measure and Mark Where Diagonals Will Cross
To create the triangular patterns that mimic Spaceship Earth’s iconic geodesic sphere, measure and mark where the diagonals will intersect the horizontal lines. These marks will serve as your guide in the subsequent steps.
The space between these marks needs to be the same as the space between the horizontal lines. If the horizontal lines were spaced 18 inches apart, then you’ll start marking at the very left side of the top horizontal line, making marks at 0 inches, 18 inches, 36 inches, 54 inches, and so on. If you go down to the next horizontal, your marks will be at 9 inches, 27 inches, 45 inches, 63 inches, and so on. The next horizontal lower will go back to the 0/18/36/54 marks.
Step 6: Tape Diagonals to Make Triangles
With your measurements in place, carefully tape along the marked diagonal lines. You can begin by starting a line of tape at the top left corner and moving down and to the right to the next mark on the next-lower horizontal, until you get to the floor. Keep moving right along the wall, creating lines that look like backslashes. Then, start a line of tape in the top right corner and keep applying it down and to the left to the next mark on the next-lower horizontal, until you get to the floor. Keep moving left along the wall, creating lines that look like forward slashes.
You’ll know you’ve completed this step when you have a wall full of beautiful triangles.


Step 7: Measure and Mark the Center of Each Triangle
Next, measure and mark the center of each triangular section. This step will help you achieve symmetrical and balanced designs. This step is what sets you up to get the 3D effect with each of the individual panels that you will paint various shades of gray. Specifically, three shades of gray.
To mark the center, we get to do some math! And you’ll need a plumb bob. Which is a set of words I never thought I’d write in a blog.
Let’s say your horizontal lines were 18 inches apart. To find the center of any triangle that is pointing up, use your plumb bob to measure straight down from the point of the triangle, and mark a spot that is exactly 12 inches down from the point. That’s your center! If the triangle is pointing down, you need to use your plumb bob to measure straight down from the middle of the top “base” of the triangle, and mark a spot that is exactly 6 inches down from that base.
One note: I didn’t have a plumb bob just lying around at home. So I made my own with some string and a car key! You can create your own, too, by following a guide like this.
Step 8: Tape Lines Separating Triangles
Using the painter’s tape, connect the corners of each triangle to the marked center, creating additional lines within the geometric shapes. These lines will be what creates the illusion of depth and perspective that everyone will recognize straight from EPCOT. This is a lot of small lines of tape. Persevere! You’re almost to the painting part!

Step 9: Paint the Accent Wall Black. Again.
In what will feel like one extra step before you can get to the fun part, you need to paint that whole wall black. One last time! This is critical and you cannot skip it. You will be tired of taping and tempted to skip it. Don’t skip ahead. Don’t pass go. Why? Painting over all of the tape lines you just created “seals” the tape. If there are any bubbles in the tape where paint would leak through, the paint that leaks through will be … black! Just like you want it to be. Not those sneaky grays that will ruin your gorgeous, crisp lines. And, as always, the paint will need to dry before you move on.


Step 10: Paint the Light Grays
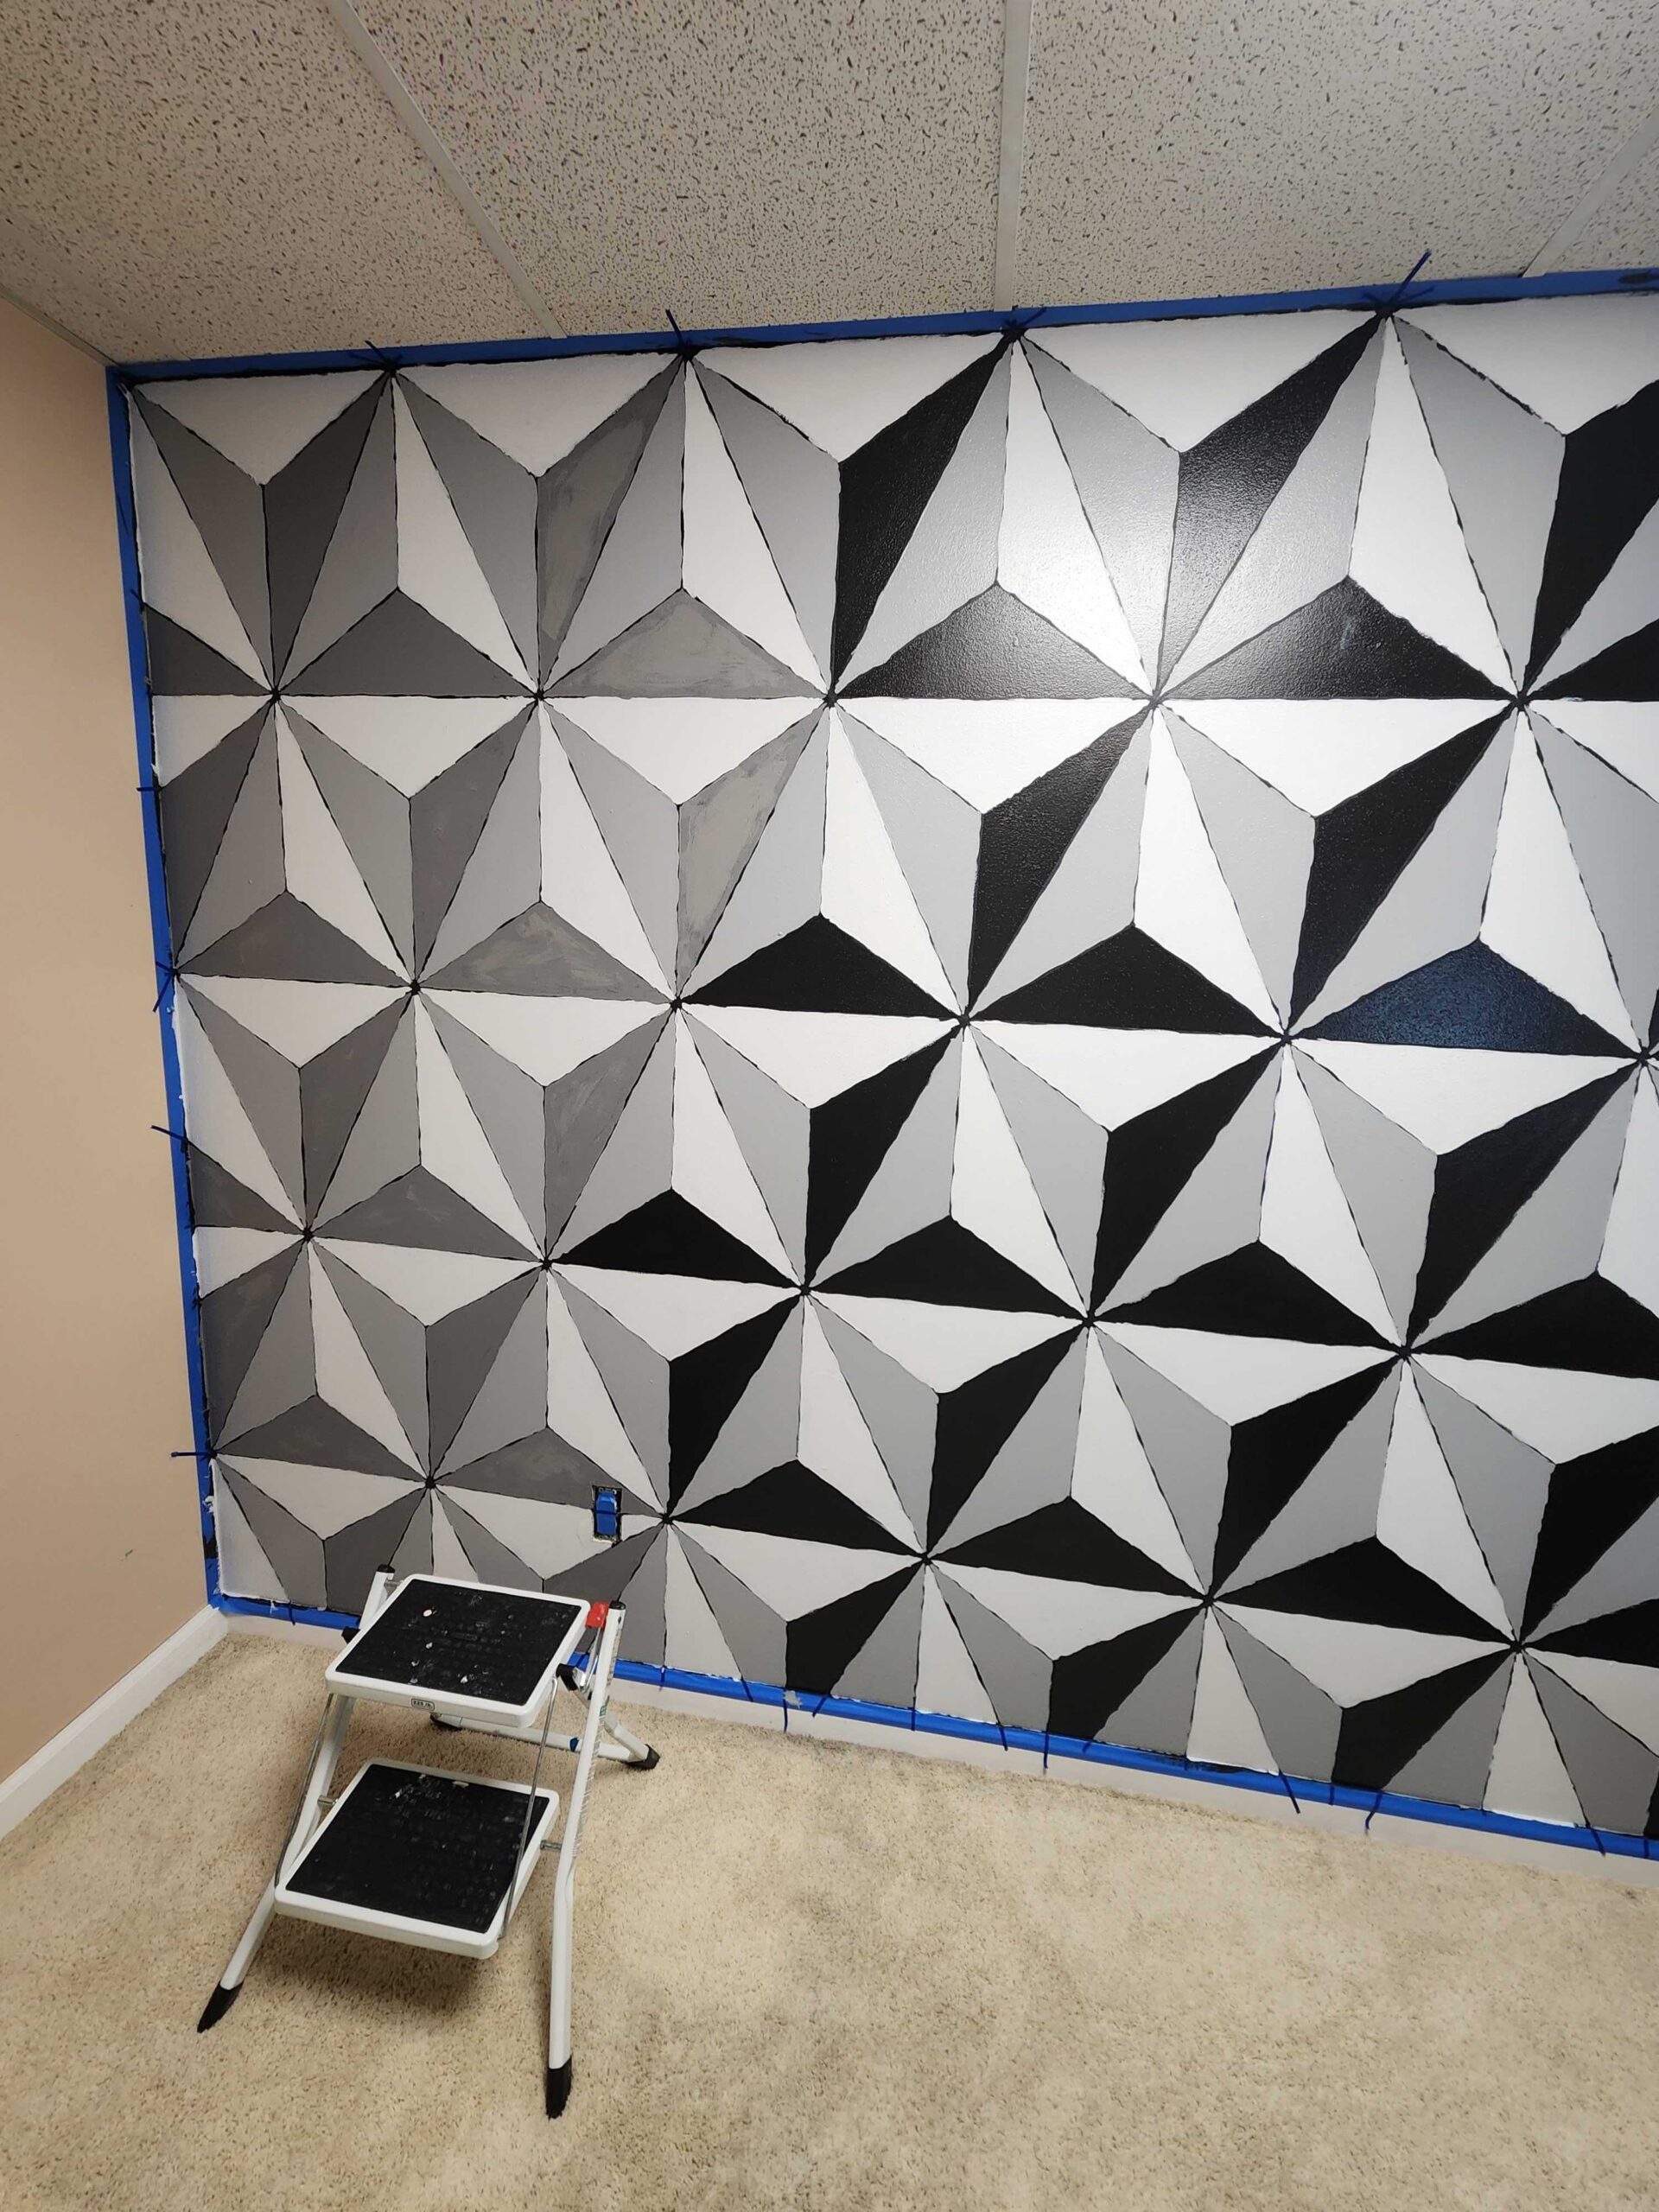
Now comes the exciting part—gray painting! Start by applying the lightest shade of gray to the triangular sections. Fill in the “top” section of each large triangle that is pointing down, and the “right” section of each large triangle that is pointing up. Carefully fill in each triangle, ensuring clean and even coverage. Allow the paint to dry before moving on to the next step.
This is the easiest of the gray painting steps, because if you accidentally paint outside of the lines, it will get painted over in future steps. Go crazy! But not too crazy.

Step 11: Paint the Medium Grays
Continuing with your design, switch to the next shade of gray and paint the next set of triangular areas. Your medium gray should go on the “left” sides of every large triangle, whether it is pointing up or down. Now is when you need to start being careful about painting outside of the lines – if you paint over any of the light gray spaces, you’ll have to go back and retouch. And that’s no fun. Stay inside the lines! And allow the paint to dry before proceeding.

Step 12: Paint the Dark Grays
For the final touch of depth and contrast, apply the darkest shade of gray to the remaining triangular sections. This should be the bottom of any large triangle that is pointing “up” and the “right” of any large triangle that is pointing down. Take your time, ensuring that each triangle is perfectly filled with the appropriate color. This will be the trickiest coat because you’re so close to being finished, and because you can’t paint over any of the lines. Allow the paint to dry completely. Again.
Step 13: Remove Painter’s Tape and Touch Up
Once the paint is dry (REALLY dry – you don’t want peeling!), carefully remove the painter’s tape. Peel it back slowly and at an angle to avoid any unintentional damage. Take a minute to appreciate the thing of beauty and stunning EPCOT scene that you just created. And then, if necessary, touch up any spots that that ended up the wrong color or bled over or through the tape lines.


Step 14: Enjoy Your Spectacular Spaceship Earth Wall
You did it! Many, many hours of work – all for one glorious tribute to the best park icon around.
Bonus Tips and Tricks:
- This project includes many layers of paint, each of which needs to dry completely before you apply the next. All of that drying time can greatly extend the length of the project. So if you’d like to speed things up, you can use space heaters or hair dryers. Don’t get things too hot, but get the air moving and warmer.
- If you don’t want to take the time to do all of the painting and measuring and taping and waiting, you can skip ahead and use Spaceship Earth wallpaper instead. A quick search online should yield plenty of options that you can then apply yourself.
- Want to decide if a big fancy EPCOT accent wall is just right or too much for you? Start with baby steps like a background on your phone or computer, and then decide if you can live with the commitment of a full wall!
What is your favorite piece of Disney decor in your home? Let us know in the comments below!
You May Also Like...
-

Disney Cruise Line has announced today that the debut of the new Disney Wish is being delayed by six weeks. Supply…
-

The newest Walt Disney World fireworks show, Disney Enchantment will debut at the Magic Kingdom and it will tell stories of…
-

In Florida, everyone's keeping an eye on Tropical Storm Fred to see where it ends up impacting the state. Meanwhile, on…
-

Have you ever wished you could travel back through time to witness some key events in history? Or wanted to see…
Neat!!!
Now how do I install color-changing LEDs at each intersecting point to get the full effect?
That’s the real challenge …