Custom Mickey Ears Tutorial and Giveaway
I love building up excitement before trips to Disney World. I think it stems from my love of planning: planning meals, planning FastPass+ selections, and even planning outfits. Ohhhhh, I love planning outfits for Disney! Whether you view it as Disney bounding or just spirited dressing, I love focusing on every aspect, down to the details (except for shoes – my feet demand comfort in Disney, so it’s tennis shoes 99% of the time!). One of my favorite details is my custom Mickey ears.
To make a (very) long story short, a little over a year ago I wanted some custom ears, and I knew I could make something better than what I saw on Etsy (certainly cheaper), so I set out to create my own pattern. Since then, I’ve perfected the design, and I’m very pleased to be able to share this tutorial with you. If you’ve got some basic sewing skills and can wield a hot glue gun, I’m confident you can make your own custom Mickey ears, too!
Do you feel like maybe your crafting skills aren’t up to snuff to make your own Mickey ears? No problem! Read through to the end of the post for how you can enter to win your very own custom Mickey ears, made by me!
First things first, I do almost all of my shopping for my Mickey ears at Joann Fabrics. The greatest thing about Joann’s is that they have these fantastic $1 glitter/sequin headbands that are perfect. I’ve yet to find a better headband for this project, and I certainly haven’t found anything that compares in price. They also have some great Disney licensed fabric and a good selection of fancier fabrics that are perfect for princess themed ears.
Planning Your Custom Mickey Ears
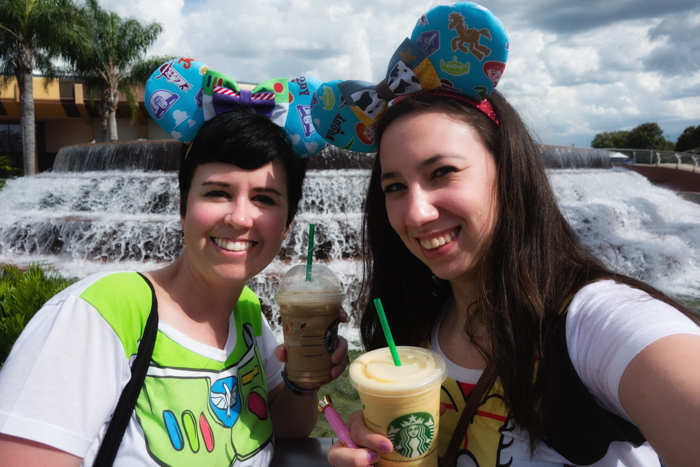
The hardest part about putting together Mickey ears is figuring out exactly what you want to do. You can approach it simply, and just pick out some cute Disney fabric for both of the ears. With this approach, you might want to go easy on the embellishments, since something complicated might not mesh well with a simple character fabric choice. I went simple for my Buzz Lightyear ears, since I was making a matching pair of Woody ears for my sister-in-law. We were competing in a scavenger hunt against my husband and her boyfriend, and Team You’ve-Got-a-Friend-in-Me wanted a little extra something to stand out. (Side note – we destroyed them. I credit the ears.) In the case of those ears, I bought Buzz and Woody bows from Etsy, and those were the only embellishments I used. To date, those are probably my simplest creation, but they were fantastic!
Another option in planning out your ears is selecting colors indicative of the character you are representing. You don’t need Ariel fabric to portray your character if you pick the right sea foam green and purple. With the princesses in particular, it is fairly easy to find some great fabrics that tell your story for you. Spend some time in the special occasion fabric section and see what speaks to you. Keep in mind that silky or slippery fabric can be slightly more challenging to work with if you’re not used it, but don’t let that deter you. Also, there are plenty of great sheer fabrics that have designs on them that are perfect for this type of thing. Don’t rule them out because they’re see-through; just get a solid fabric to go underneath it and you’ll be covered.
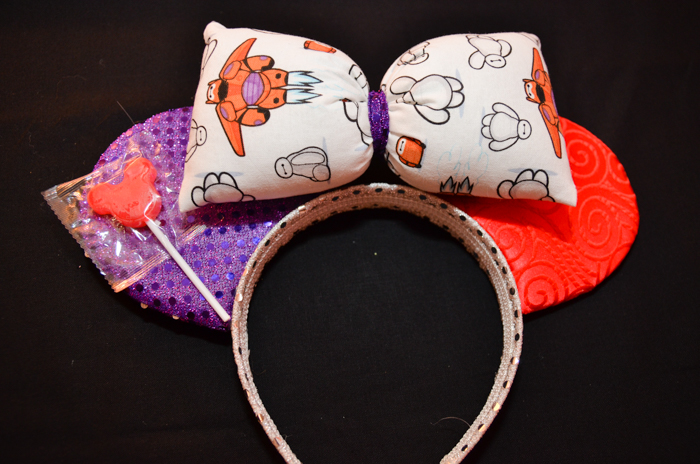
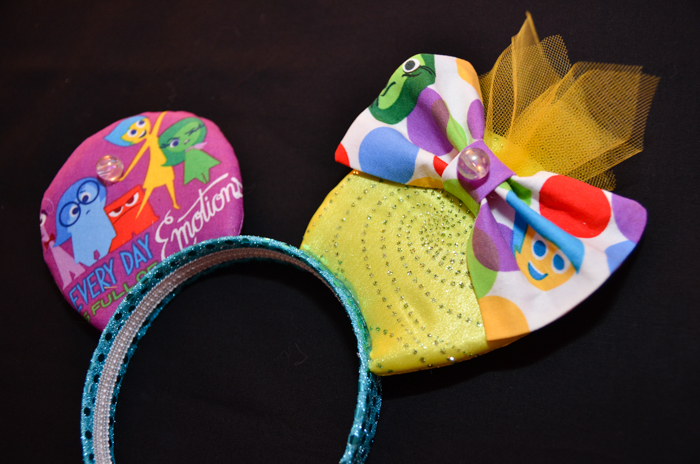
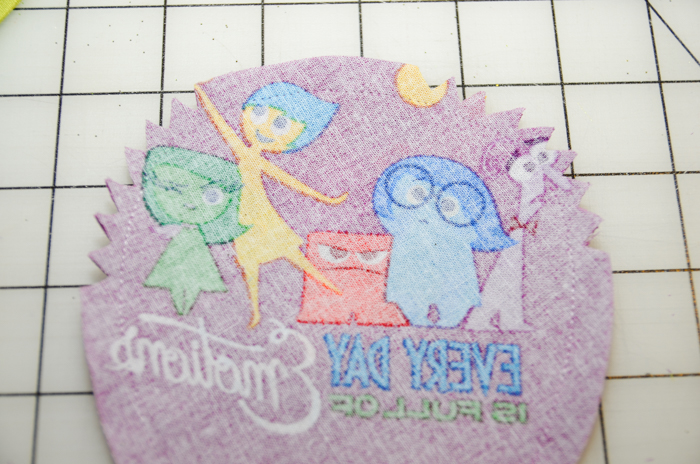
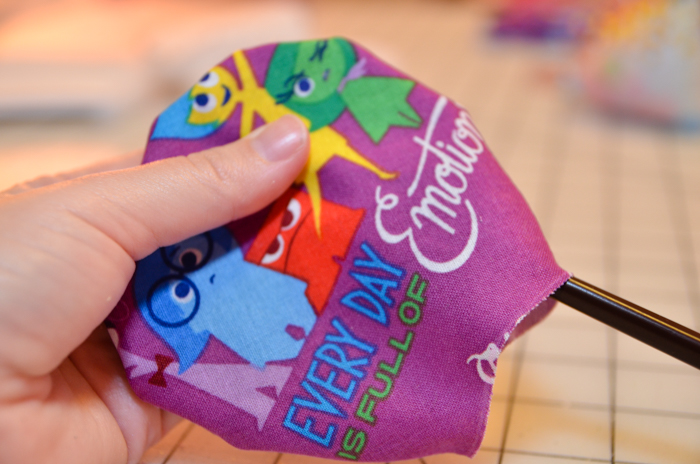
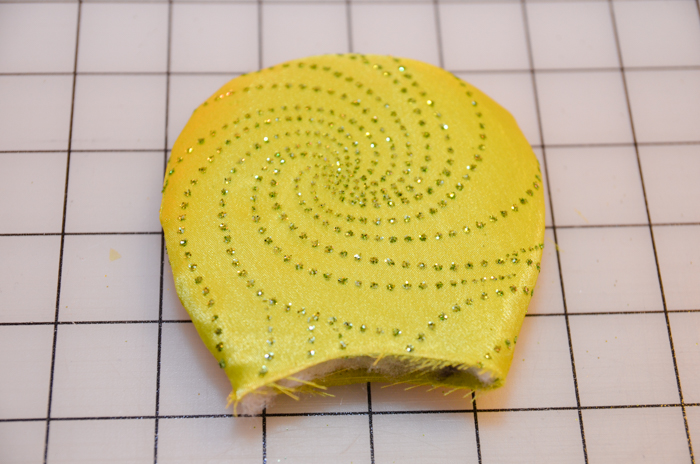
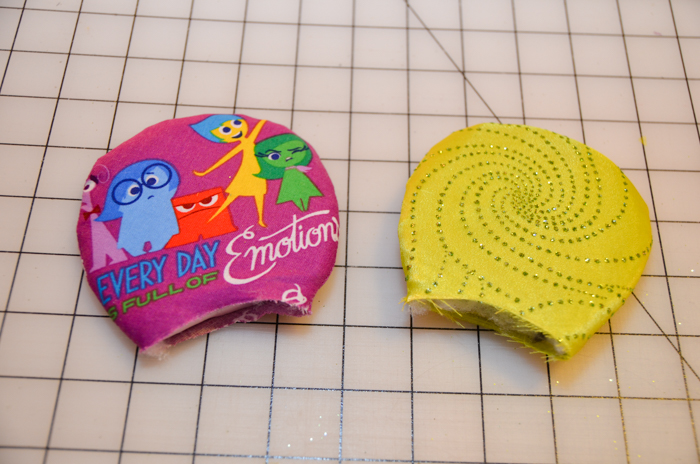
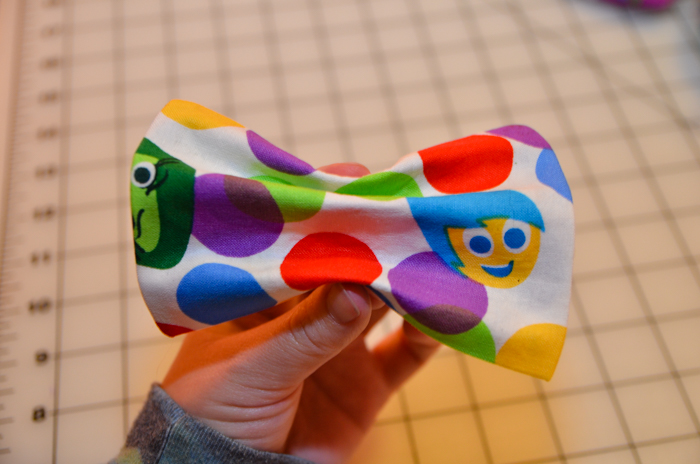
One of my favorite things to do in planning out ears is splitting the difference between options one and two presented above. Mixing a Disney fabric with other, specialty fabrics can strike the balance between formal and whimsical quite well. For example, take a look at my Baymax ears. Red and purple are definitely Baymax’s colors, but how evident would it be that these were Baymax ears without the Baymax fabric for the bow? And consider the Inside Out ears I made for this tutorial. I found some great Inside Out fabrics, but what if I’d gone with just Joy’s signature colors of blue, green, and yellow? Is she recognizable enough that people would have known what I was going for?
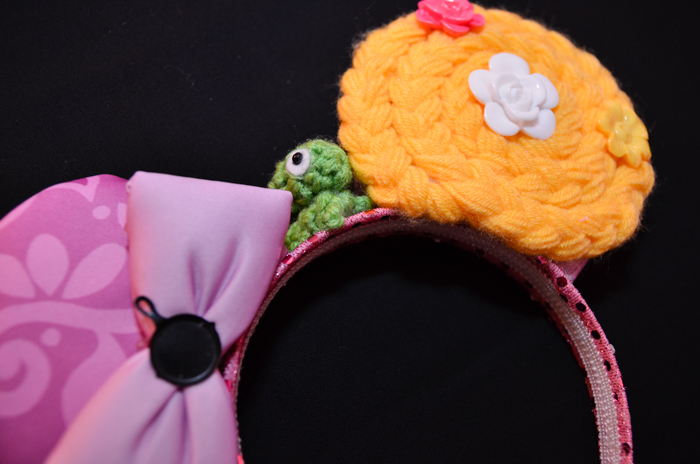
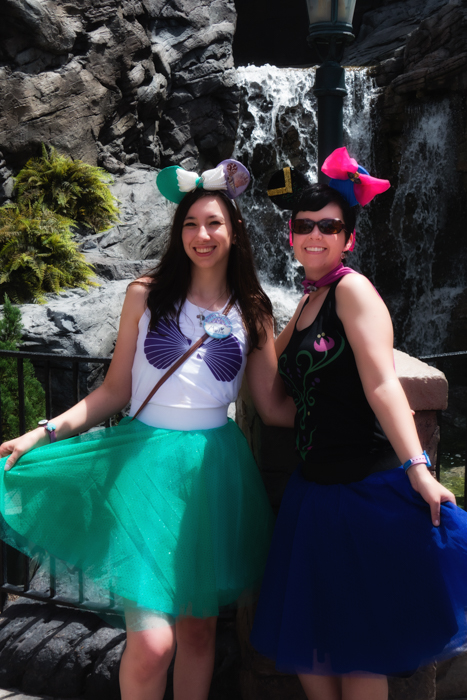
The last thing I want to touch on in regards to planning your ears is embellishments. These can be the pieces that bring your entire vision together. Take my Rapunzel ears. Yes, the braided hair would have been enough to indicate that they represent Rapunzel. But add some flower buttons to that and you’ve got something even better. And a frying pan in the center of the bow takes it even farther. And A TINY PASCAL throws these ears over the top! (Possibly my best embellishing ever. And no, I didn’t make Pascal. I bought him off Etsy for less than $5.) Let me share a little secret with you: I almost never know what I’m going to do with the items I purchase for embellishing until it is time to do it. I buy stuff that I think will work (sea shells for Ariel, iridescent beads for Inside Out’s memories, heart-shaped cloak clasp for Anna) and then figure it out when I get to that step.
Custom Mickey Ears Tutorial
Materials needed:
Fabric remnants or scraps (I often buy ¼ yard cuts for ears, and that is more than enough)
6mm thick foam sheet
Ear pattern – download pdf (Make sure you print the pattern as “Actual Size”)
Batting scraps (for the ears)
Scissors or rotary cutter
Sharpie or other marking implement
Sewing machine
Hot glue gun
Thread (I’ve found that transparent thread works the best)
Embellishments (GET CREATIVE!)
Headband
Straight pins
OPTIONAL – hand sewing needle and thread
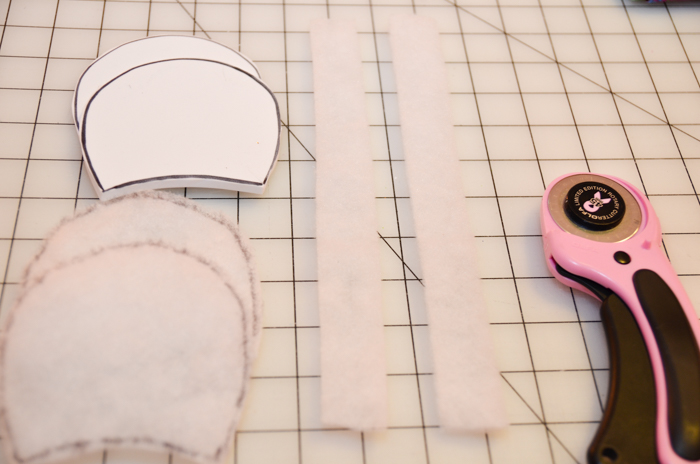
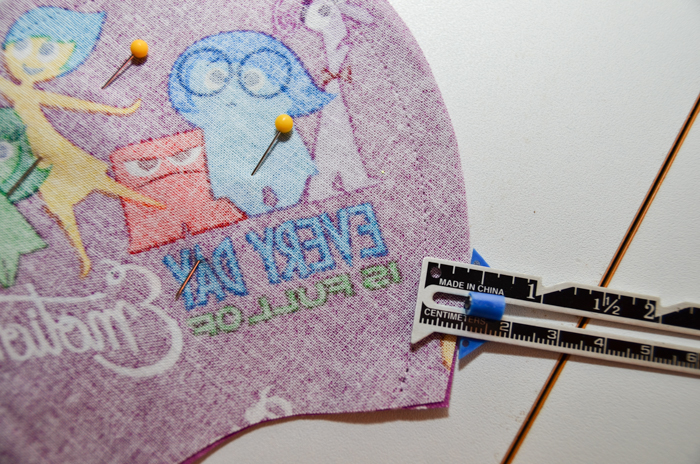
1) Cut out the ear templates from the pdf pattern. Since I use mine often, I traced them onto template plastic. You can use the paper version or do what I’ve done for a heartier template.
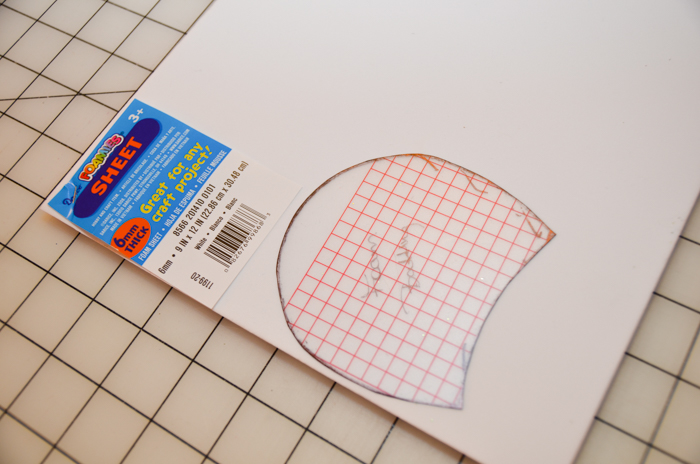
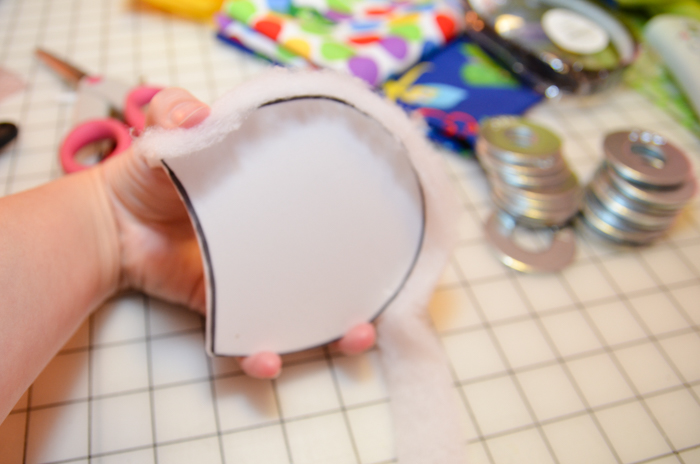
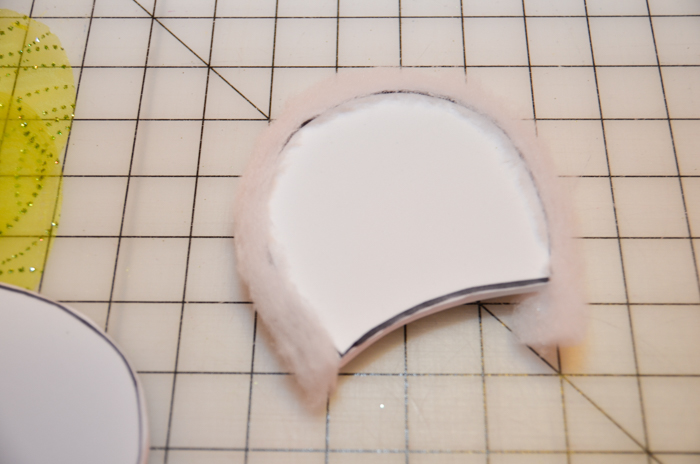
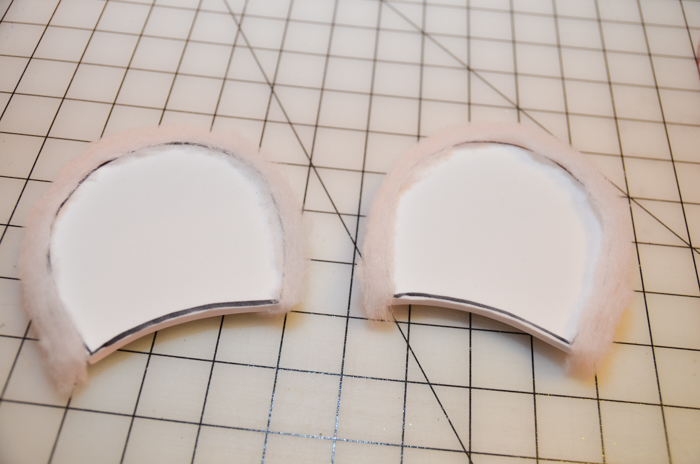
2) Trace the foam/batting template onto your 6mm foam twice. Cut out your two ear pieces. It is difficult to cut the foam out smoothly without creating ridges along the curved edge. To minimize this, you can use a rotary cutter and try to cut them out with one smooth motion. Since you probably don’t own a rotary cutter unless you are a quilter, I do have an optional extra step that helps hide the ridges later on.

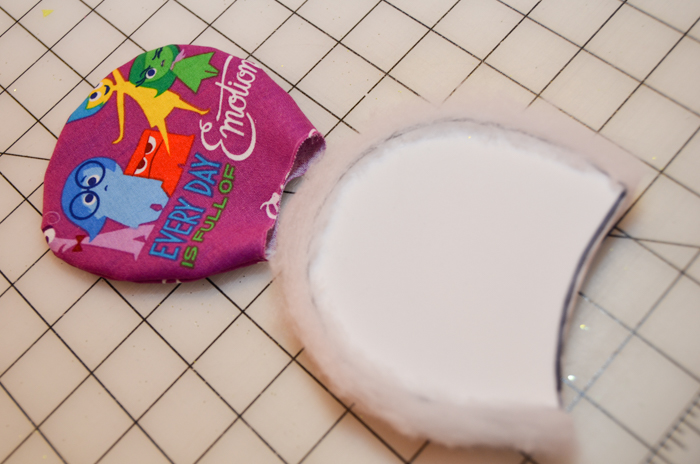
3) Repeat this process on your batting scraps and cut out two ears. This will give some added puffiness to the front side of your ears, which makes them look more professional and less rigid.
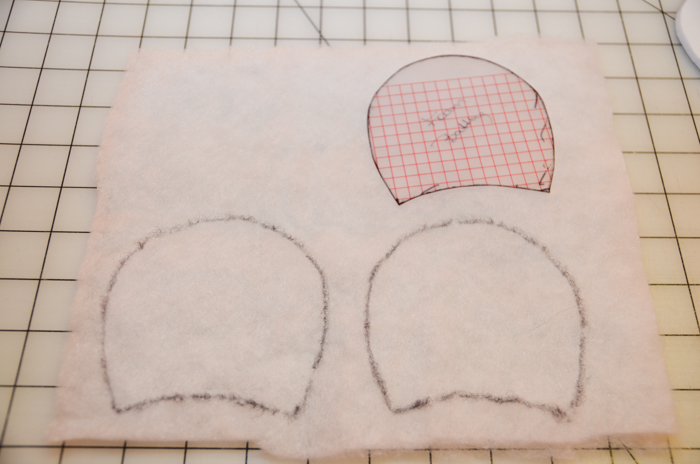
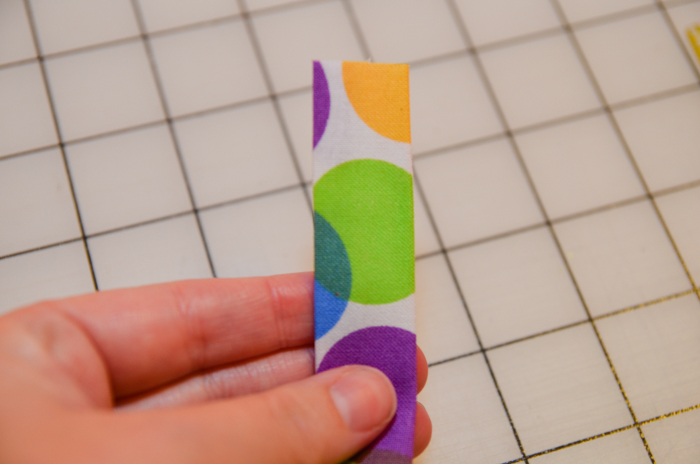
4) (Optional) Cut two 1-inch strips out of your batting. They need to be long enough to cover the entire curve of the ear – about 10 inches. (These will be used to hide any ridges in the foam.)
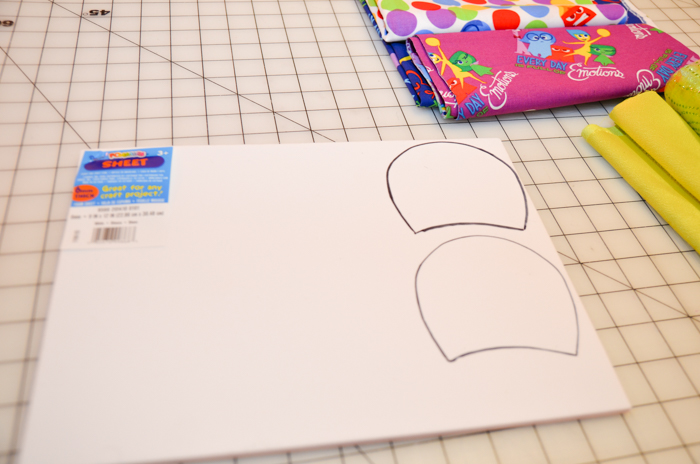
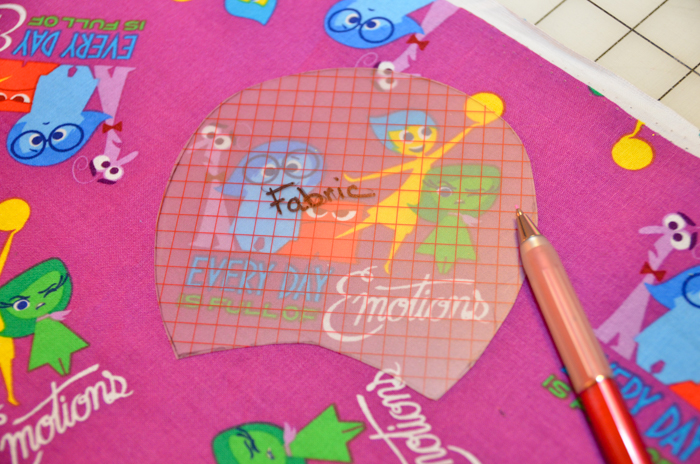
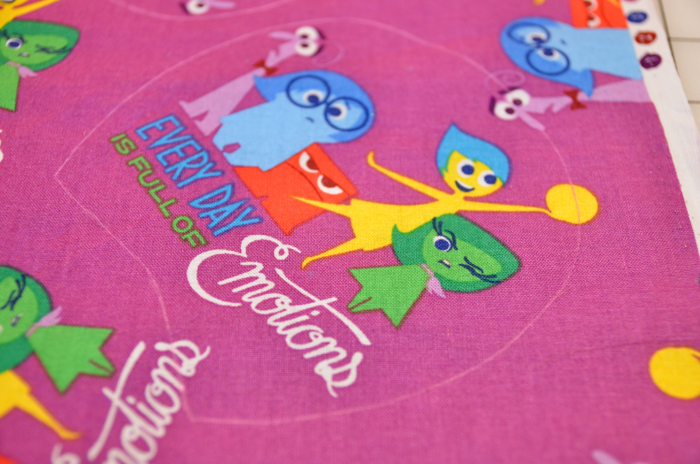
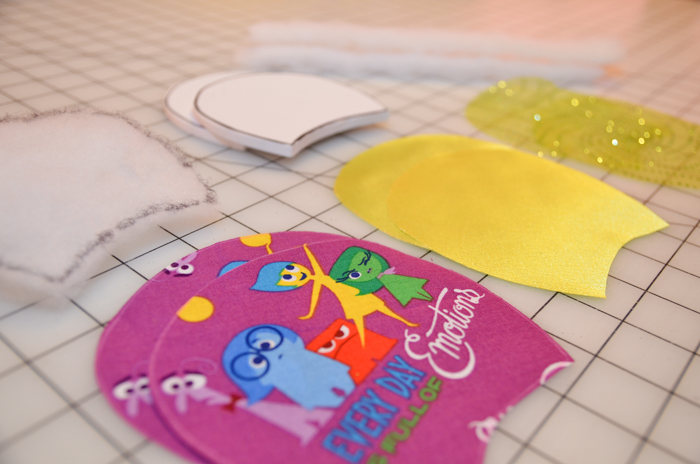
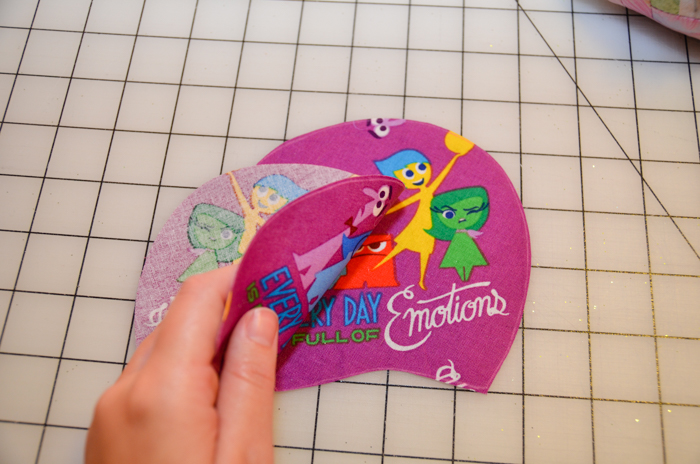
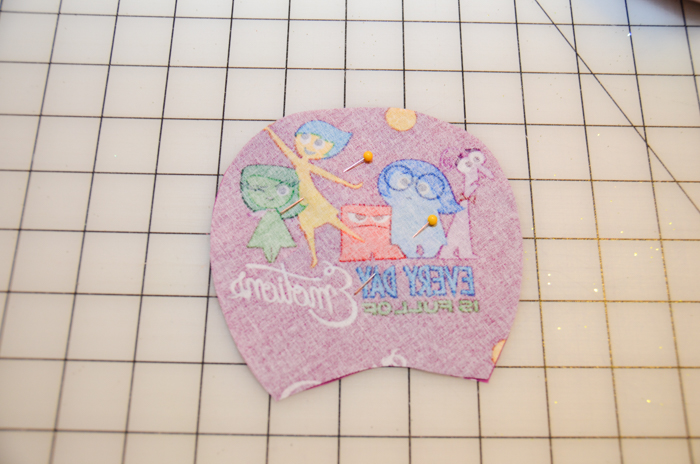
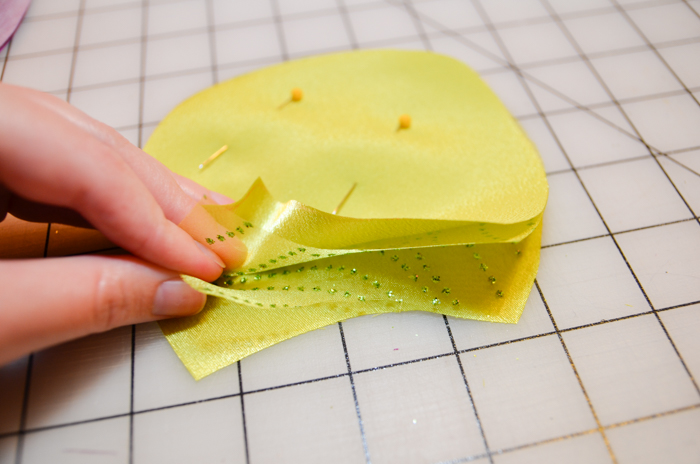
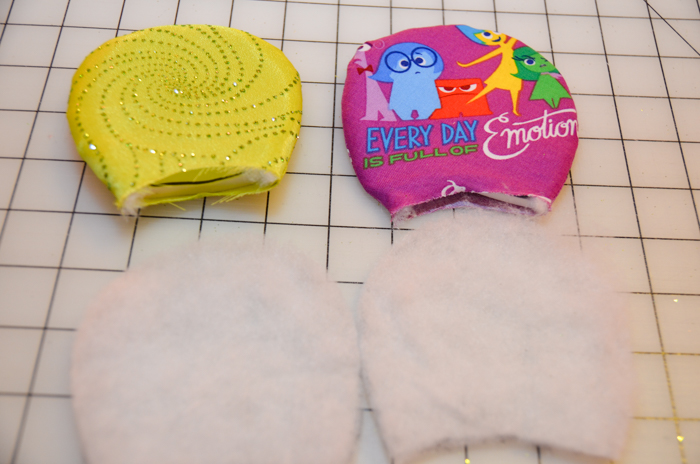
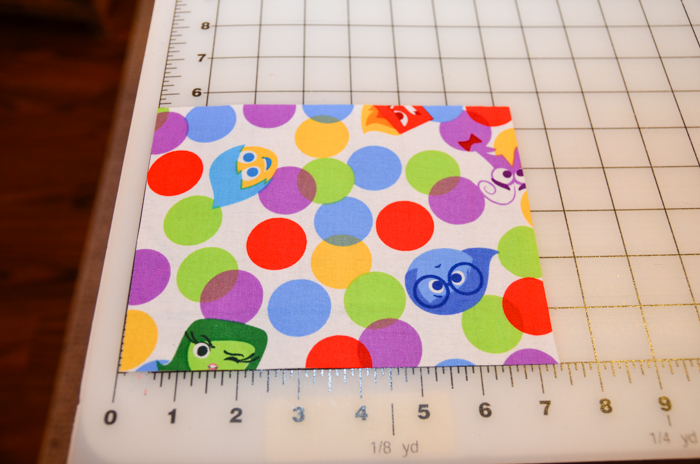
5) Next you need to cut out the fabric for the ears. You need two pieces of fabric for each ear, so if you’re using a single fabric, you’ll cut four of the ear pieces out. Use the fabric ear template (you’ll notice it is larger than the foam/batting template) and trace it onto the fabric you wish to cut. For my ears, I had a design that I wanted to be the focal point, so I placed the template just so on the fabric. My transparent template plastic helps me do this. Remember, your seam allowance will cut into your design somewhat, so do your best to guesstimate how you would like it to look. My design was slightly too large to fit perfectly, so I cut the front and back side of that ear slightly differently; once they were assembled I picked the side I thought looked better and made that the front.

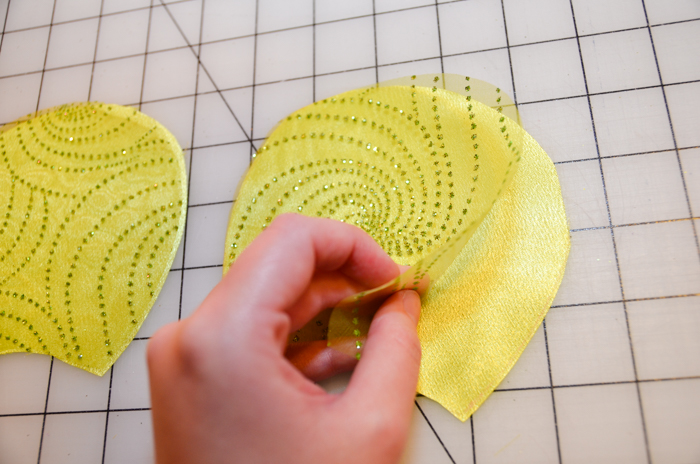
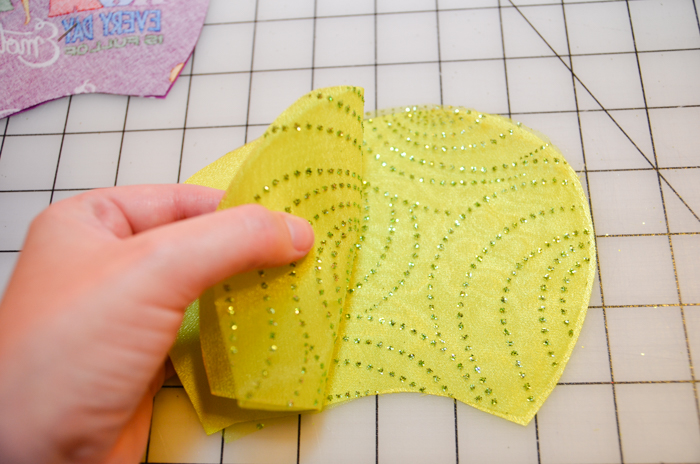
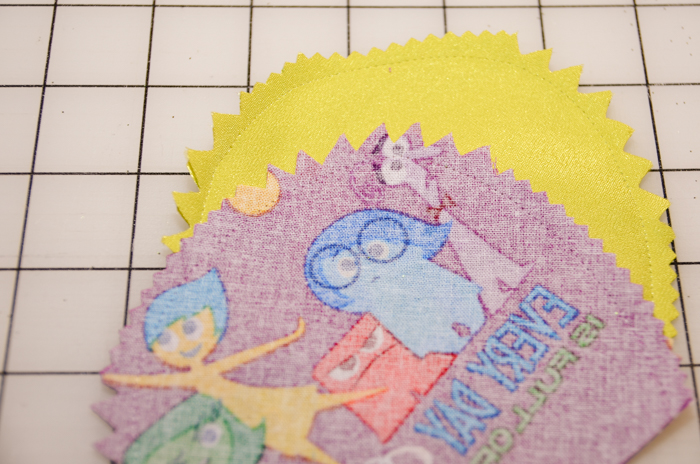
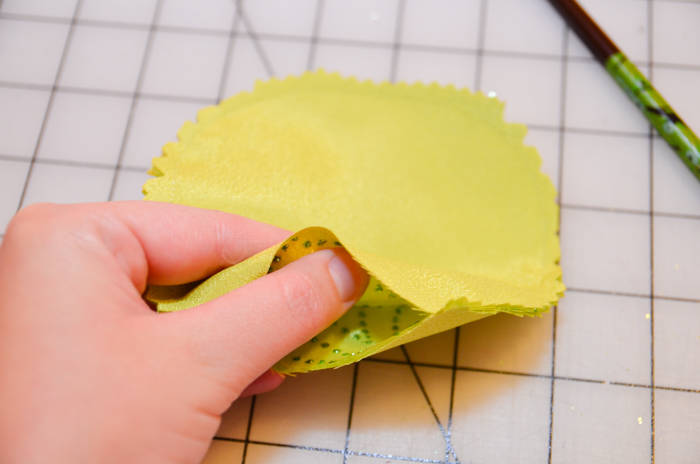
My second ear was slightly more challenging. I chose a sheer fabric that had a swirly glitter design that reminded me of Joy’s dress. Since it was sheer, I had to get a fabric to place behind it. This meant that I had to cut two ear pieces out of both the solid fabric and the glitter fabric, for a total of four pieces. Once you’ve cut out all the fabric ear pieces you need, you should have two foam ear pieces, two batting ear pieces, fabric for your two ears, and batting strips.
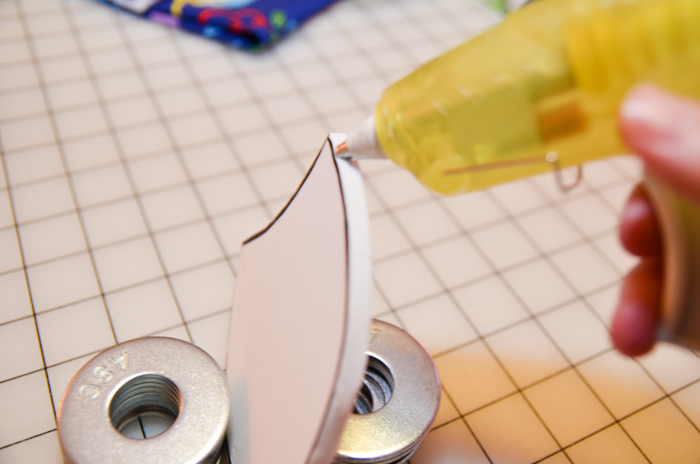
6) (Optional) Now this is where you will use those batting strips to smooth out the ridges on the ear edges. Using your hot glue gun, put a line of glue along the entire edge of the ear. Then, take that batting strip and press it into the glue along that edge. DO IT QUICKLY! Once that glue is on the edge, it starts to dry. You have to move fast to smooth the batting into the glue while it is hot. And please, don’t burn yourself. The batting I use is thick enough to prevent me from getting burned, but you might be using something thinner. Please be cautious. After the batting is attached, trim the extra bits hanging over the bottom edges. Set your ear pieces aside to give the glue time to set.

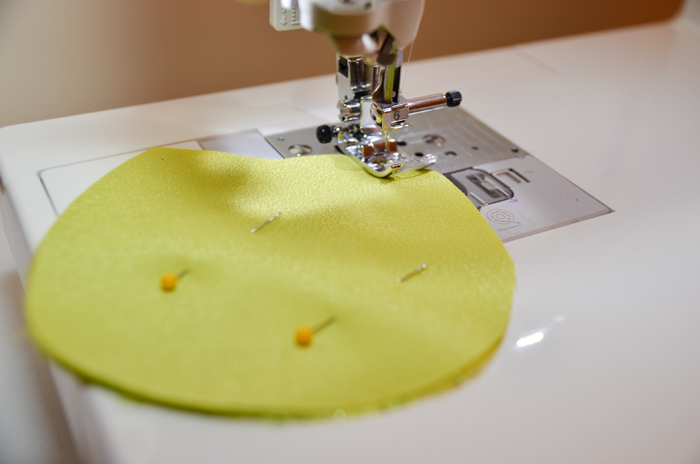
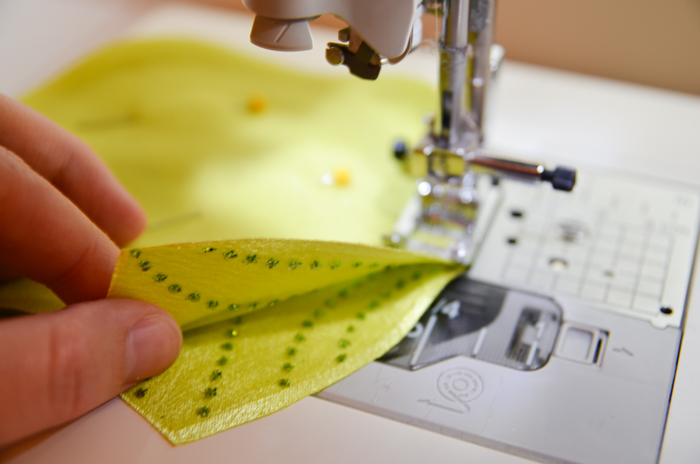
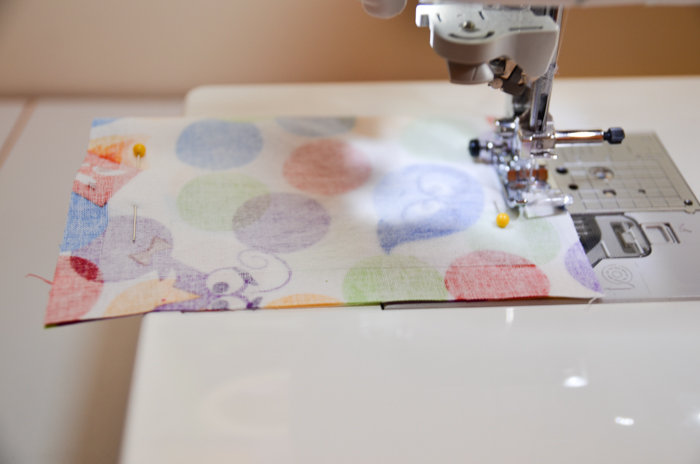
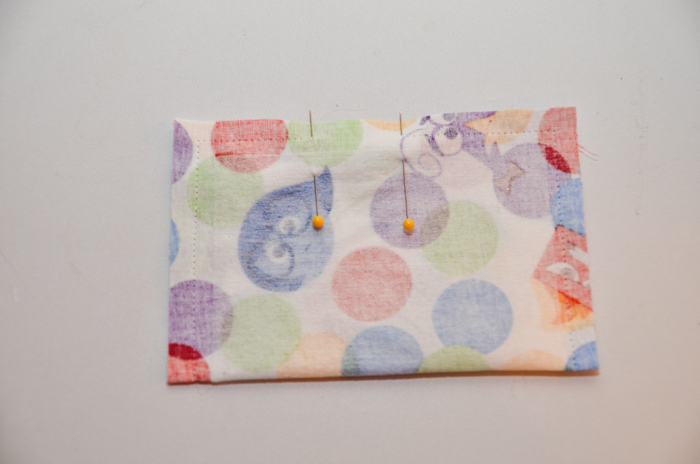
7) Take the first pair of fabric ear pieces and stack them one on top of the other, right sides together. Pin them. Do the same for your second set. If, like me, you have double the fabric for the second ear, lay your ear pieces out as follows: on the right, you’ll have your solid fabric, right side up, with the sheer fabric on top, also right side up. On the left you’ll do the same. Then you will take the left set of fabric and flip it over to place it on top of the pair on the right. The photos show the process much better than words, so take a moment to scroll through the next few if you’re more of a visual learner. You will pin through all four of the ear pieces you’ve just stacked.
8) Time to sew! I mentioned in the materials list that I recommend transparent thread for this project. You can absolutely use something else, but I’ve found that the transparent thread has just the right amount of stretch. Plus, since you’re sewing a curve, the thread does have a tendency to show when the ears are finished. When I use a cotton or poly thread, even when it matches the fabric, I find it to be too noticeable. The transparent thread addresses this issue.
You want to sew the curve of the ear from one side to the other, leaving the bottom edge open. Make sure you back stitch at both the beginning and end, since the process of turning the ear right side out and placing the foam/batting can put some strain on the ends. Use a 3/8 inch seam allowance on the seam. After you complete your first ear, you’ll do the same for your second. In my case, this meant that for my second ear I was sewing through four layers of fabric. When sewing your ears, go slowly so you can keep a smooth seam line along that curve. Any imperfections along that curved edge will show, so this is a step worth spending some time on. Once you’ve finished sewing, trim your thread and remove the straight pins.


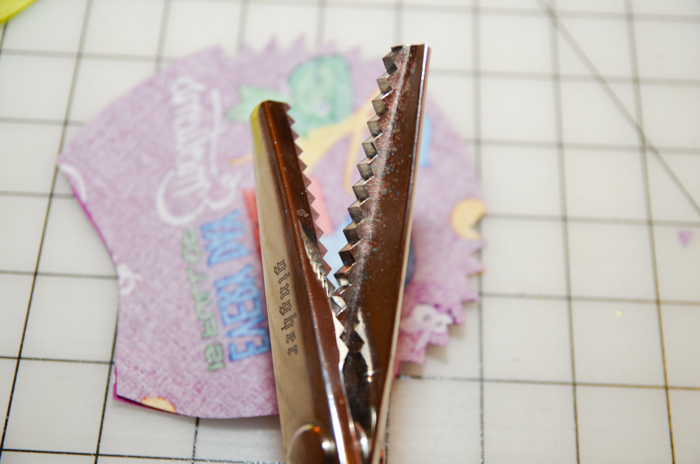
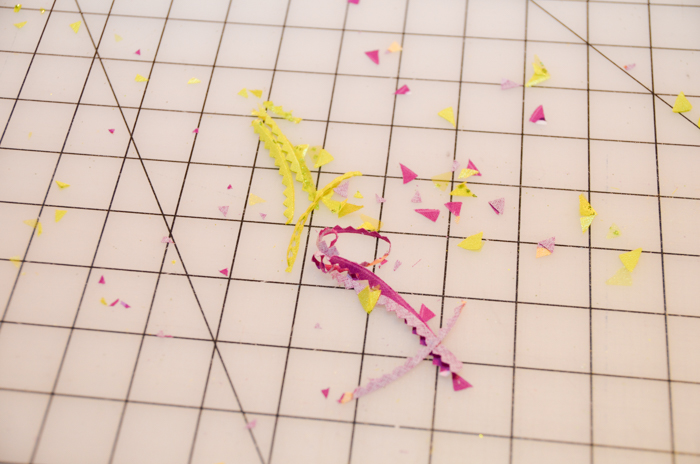
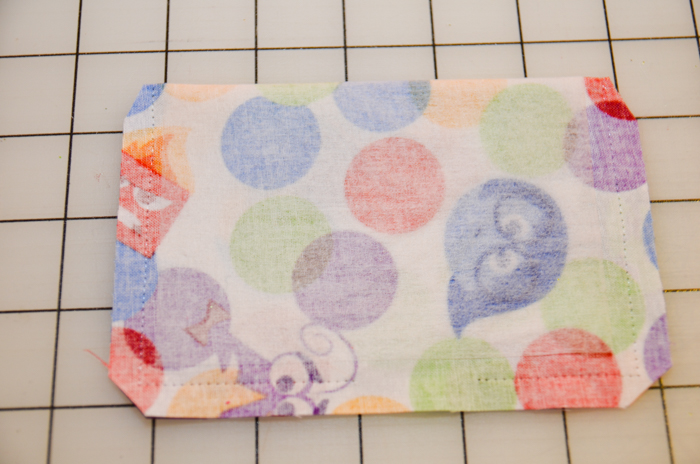
9) The next step is clipping the curves of the ear to remove the bulk of the seam allowances. For those of you who aren’t used to sewing, this process involves cutting out little wedges along the curviest part of the seam. Whatever you do, don’t clip through the seam! You’ll have to start over if you do. After I clip the wedges, I also do an added step of using pinking shears to take out some additional bulk on the less curved seams. (Honestly, you could do this entire process just using pinking shears or just cutting out wedges, but you may have noticed I’m a little OCD.) Anyhow, this is a messy step, but it is what will make the curve of the ear smooth. If you skip it, you won’t be able to get the curve right when you turn the ears right side out.
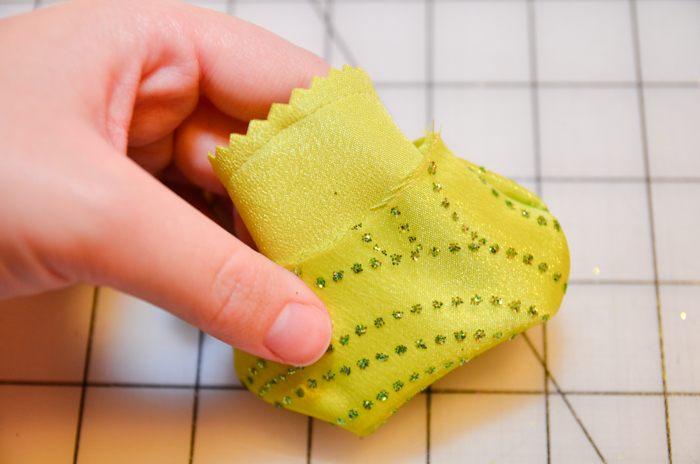
10) Now it is time to turn the ears right side out. Just like you’d turn a pillowcase inside out, grab the inside (right side) of the fabric and pull it through the opening at the bottom. Use your hand to smooth it out as best you can, but that isn’t going to make it perfect. You can use any pointy (NOT SHARP) tool you’d like to smooth out the edge along the curve – I like to use a chopstick. I run it along the entire edge seam until it is nice and smooth.
Then you’ll move onto the second ear. Even though it is four layers of fabric, because of the way you sewed it together, you’ll be able to turn it right side out with both sheer sides as the exposed fabric. Do the same thing you did for the last ear, smoothing out the edges with something like a chopstick.
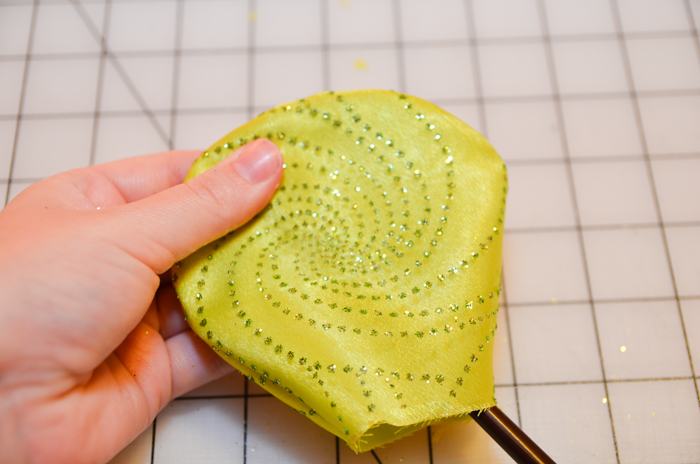
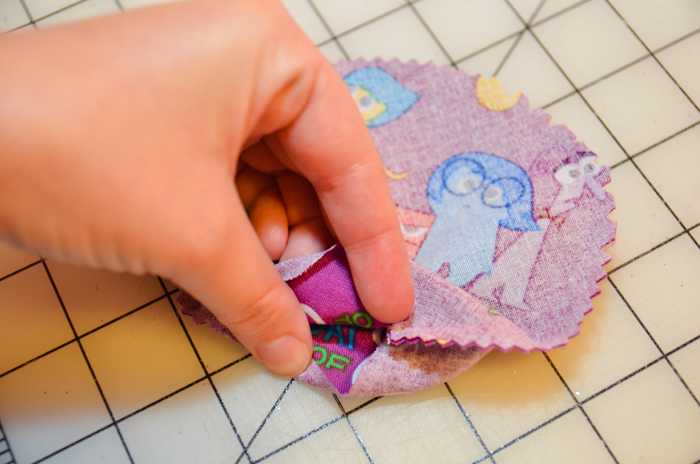
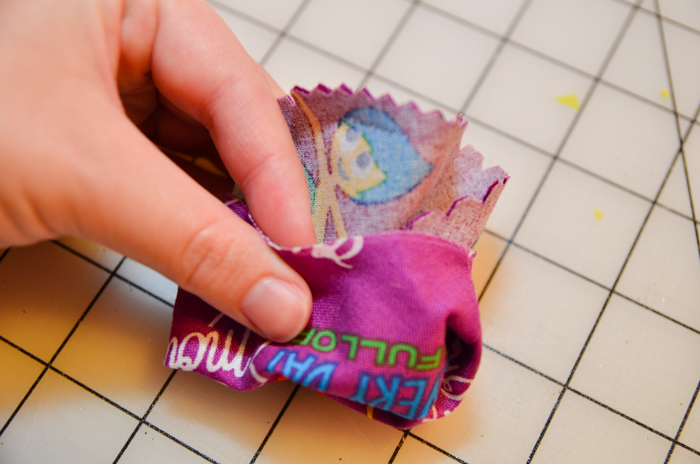
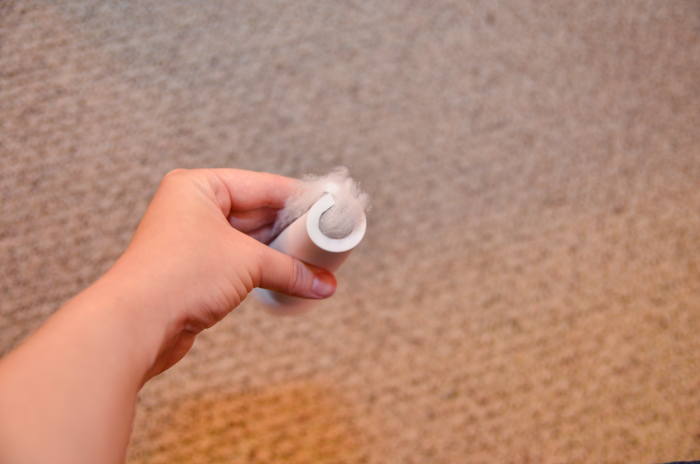
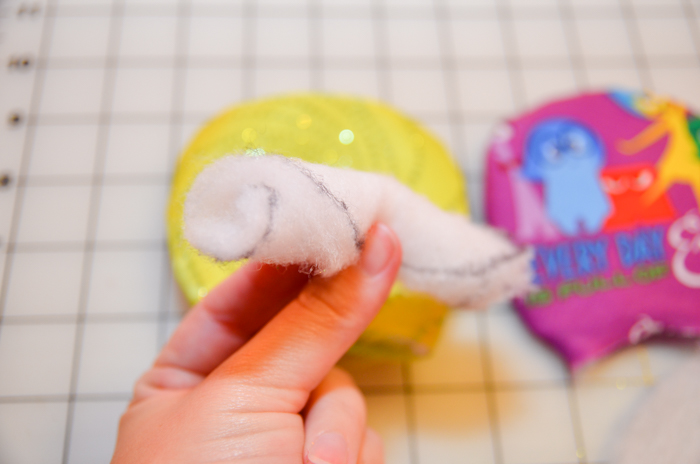
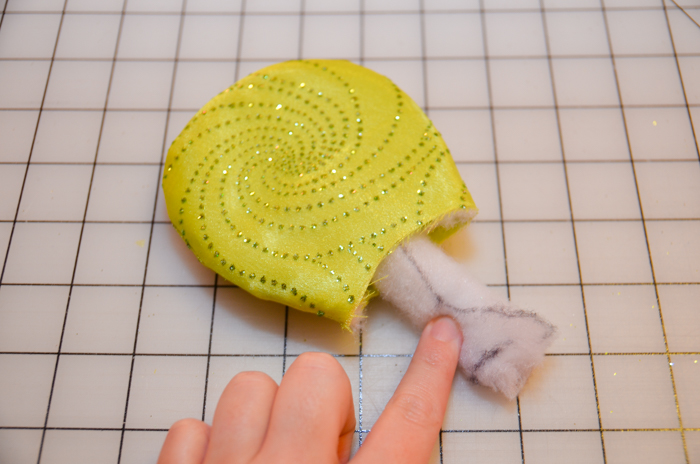
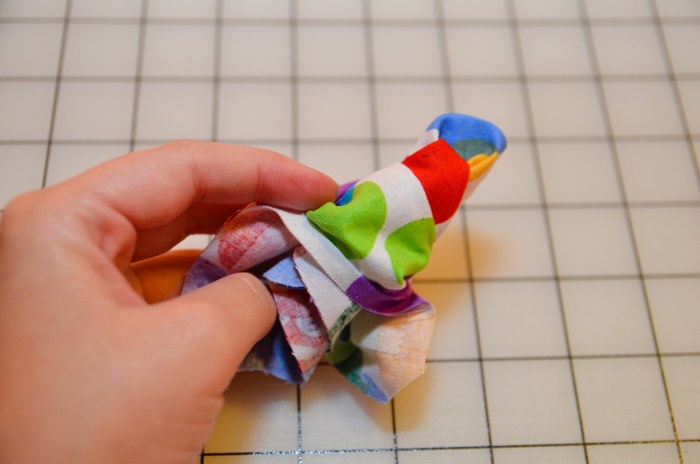
11) To put your foam ear piece into the fabric ear, the trick is to roll the foam up like a little hot dog. Trust me, there is no better way to make the foam fit into the fabric than this! Take your little hot dog foam and slide it right into your fabric ear, not unrolling it until you’ve pushed it all the way into the ear. You’ve got to be careful that you don’t rip the batting off the foam ear edge – you want that batting strip to settle right into the curved seam of the ear. Feel free to push and pull and move the foam piece around until you like the way it fits. It may take some finagling, but you should be able to get it snug into the fabric with the batting strip in the seam. If you cut everything to the templates I provided and used a 3/8 inch seam allowance, you’ll notice that the foam fits the ear so snugly that it actually causes the ear to curve a smidge. That’s normal, and it actually makes it fit on the headband a little better. Do the same thing to the second ear piece.


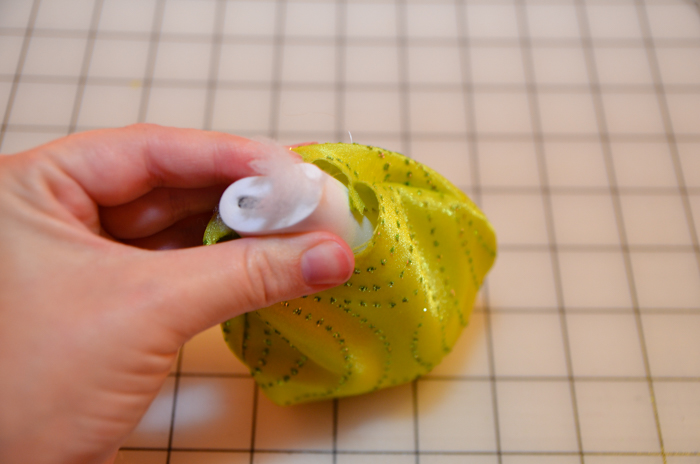
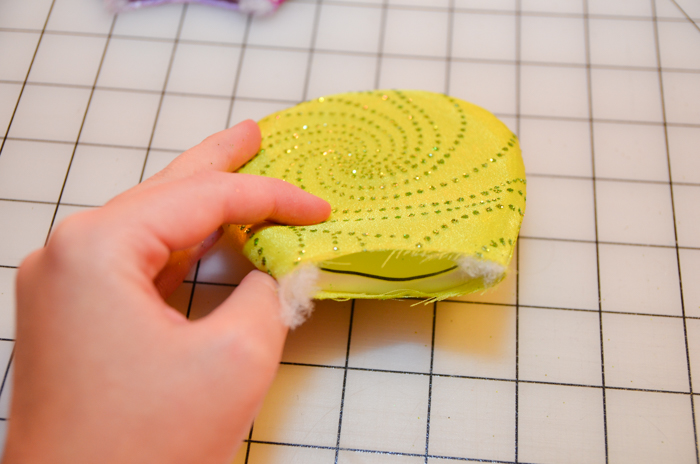
12) Remember those batting ear pieces you cut out earlier? It’s time to insert those into the ears. Use the hot dog method and slide one into the front side of each ear piece, between the fabric and the foam. I’ve tried a lot of different methods with the batting. Some ears I’ve made used none (they didn’t look quite right – too unyielding and rigid) and some I’ve made used twice as much batting, with a layer on each side of the foam (these looked a bit too puffy to me). How much you use is up to you, so feel free to make your own call on this step. The batting will likely slide all over the place while you try and get it situated just right – it’s kind of annoying, but there is no way I’ve found to make it less so. Just keep shifting until you get it rolled out correctly.
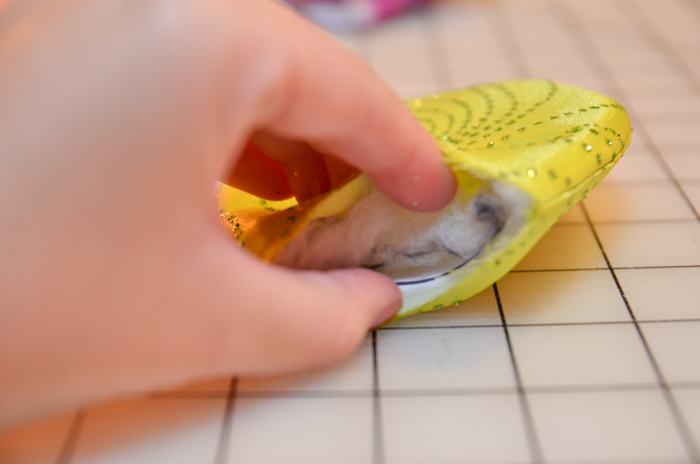
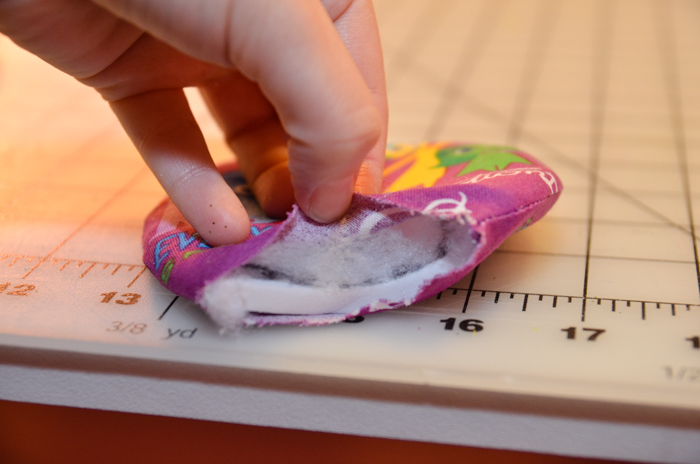
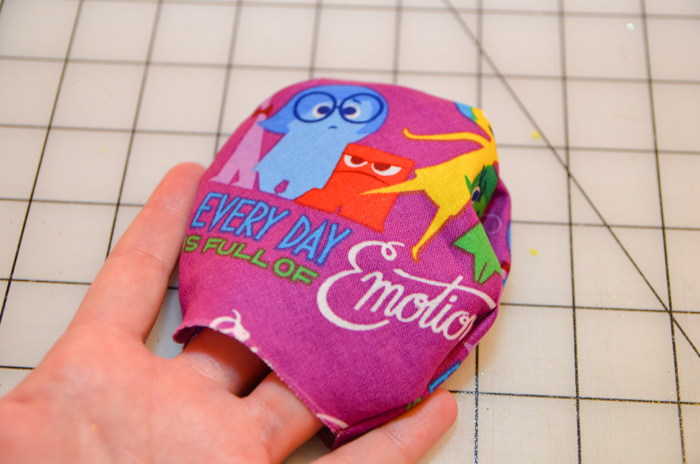
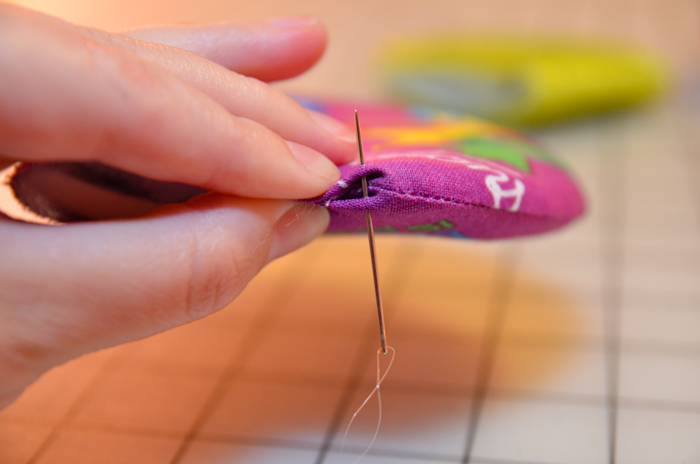
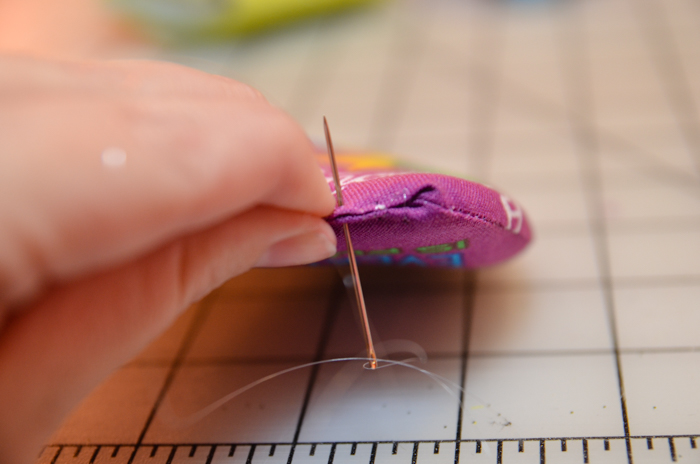
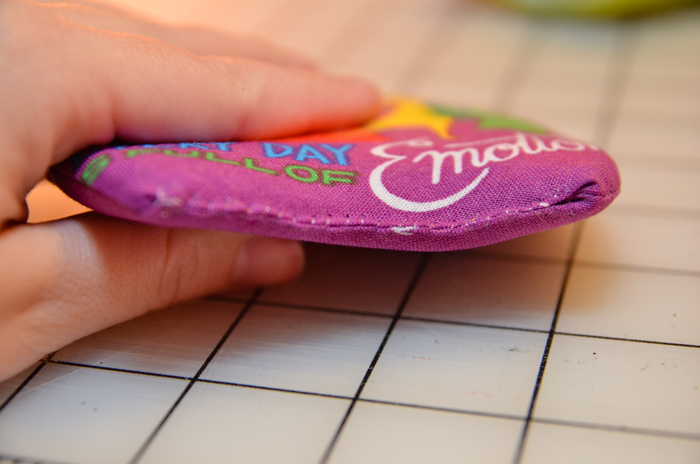
13) Once the ears are stuffed, you need to seal them up. I always use a needle and thread for this step, but I’m a sewer. If you’re more comfortable with a hot glue gun, you can seal it that way, but don’t burn your fingers! I fold the edges over and use a whip stitch all along that bottom edge. This edge is going to be glued to the headband, so it doesn’t have to be perfect. Follow the bottom curve of the foam piece as you put your stitches/glue in. If you sew it straight across the bottom, it will be slightly more difficult to attach to the headband straight (not a big deal – just my OCD exerting itself again).


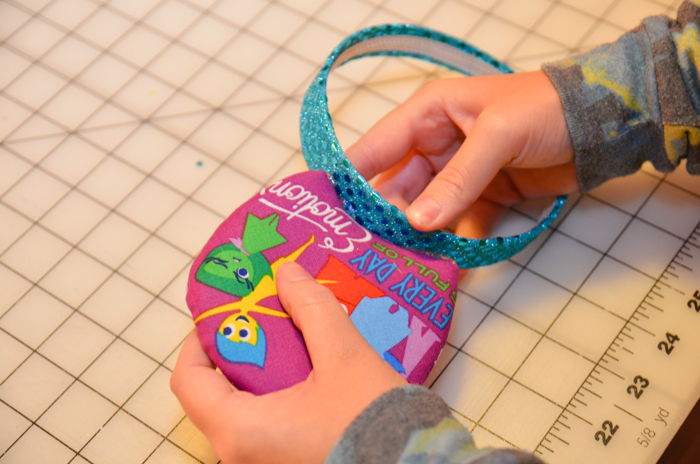
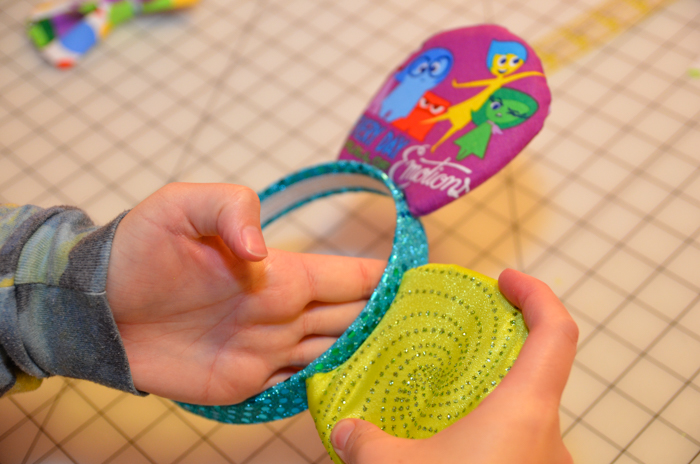
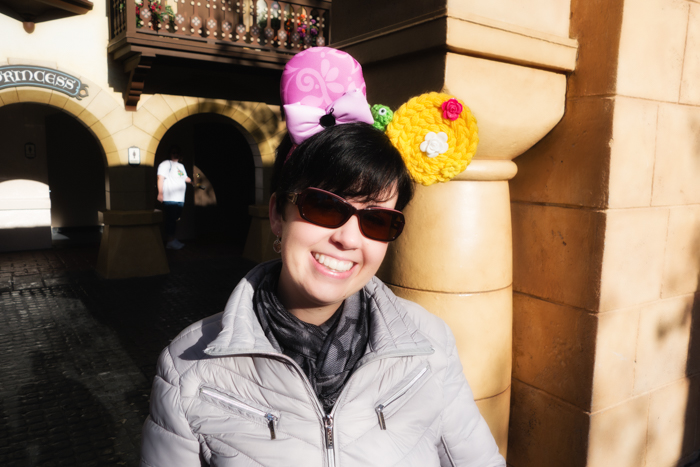
14) Time to break out that headband (stylistically, I chose turquoise for the color of Joy’s hair – pick something that works with your design). First and foremost, I’m going to give a shout out to my husband, who was kind enough to take some photos of this step after I spent 20 minutes trying to figure out how to do it myself, and failing horribly. My cat wasn’t exactly the best assistant.

This part is pretty straightforward – you need to hot glue the ear pieces to the headband. Lay the pieces out on a table and shift them around until you like the way they look. Then mark the headband where you want to place the ears. I have the luxury of having multiple pairs of ears, so now I just take a previous pair and use it as a template for where the ears should be placed on the headband. The first time you just have to wing it and place the ears where you think they look best. Don’t overthink it! (Says the overthinking, OCD, sometimes-crazy person…)
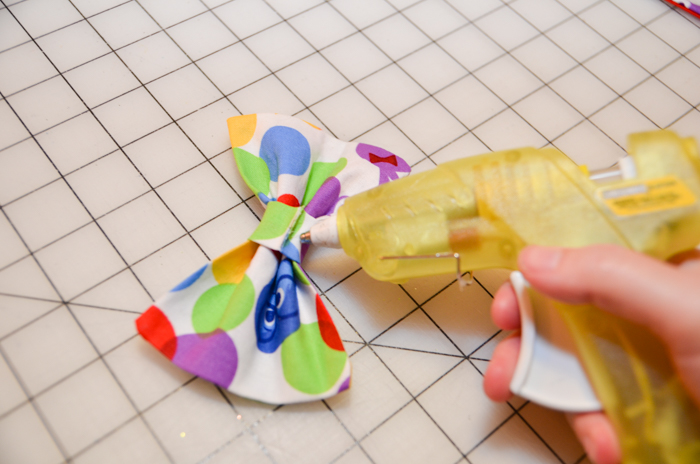
This is another step that has to be done quickly, so make sure you know exactly where your ear pieces are going before you put the glue on them. Mark the placement on the headband with a pencil or something similar. When you’re ready, put a thick bead of glue along the bottom edge of the ear piece and then smash it into the designated spot on the headband, holding them tightly together while they bond. The curve of the bottom edge should adhere nicely to the curve of the headband. Give it at least sixty seconds and then check to make sure they’re well-attached. Repeat for the second ear.


15) You’ve got ears! All that is left now is the fun stuff. Embellishing can be awesome, particularly when your own ideas make you giggle fanatically to yourself. Not that I’ve ever done that… Only once did I find the embellishing step to be challenging, but I’m fairly certain it was because of a run-of-the-mill creative block when my sister-in-law and I were attempting to embellish her Ariel ears. After she and I puttered around trying to get the embellishments right and still not having a solution, we called in my husband for a new perspective. Wouldn’t you know it, he was the break we needed! His fresh eyes rearranged what we had placed, and it looked perfect. (In retrospect, I’m not sure he wants to be known for this…)
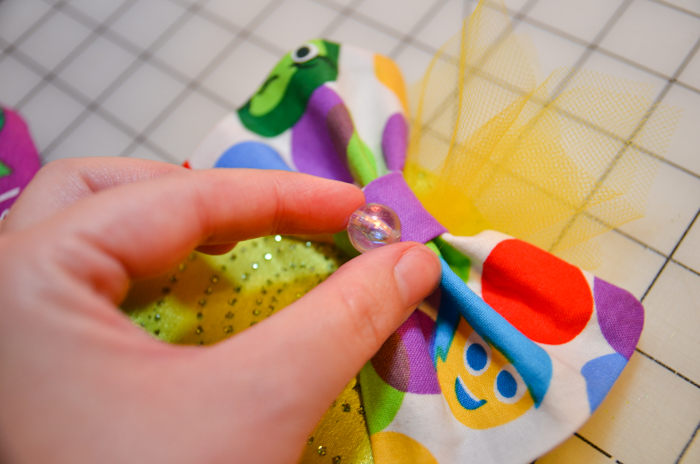
For the Joy ears, I purchased some beads that I thought resembled the memory balls from Inside Out. I didn’t know what I was going to do with them at the time, but I realized (okay, my husband made the suggestion when he was photographing the gluing step) that Joy’s appearance on the fabric was ideal for putting a “memory” in her hand. The first embellishment was a simple bead glued to the fabric.

(Bow assembly starts – skip if you don’t want to make this bow. Yes, I give tutorials within tutorials!)
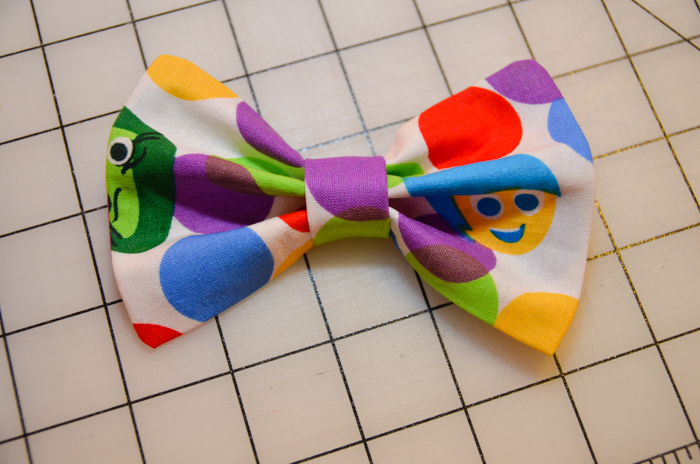
Next, I figured out what I wanted to do for the bow. Sometimes I do big puffy bows (see the Baymax bow), but this time I wanted something a little crisper. I cut out a rectangle of fabric 7.5 inches by 5.5 inches and I ironed some lightweight interfacing onto the back (this is entirely optional; I wouldn’t have used it if I didn’t actually have some on hand). I then folded the fabric in half and pinned it. In order to make this type of bow, you have to sew from the folded edge, up the short side, pivot at the corner, and sew partially down the long edge, back stitching. Then skip about an inch (leaving it open) and, back stitching, sew the remainder of the long edge, pivot around the corner, and sew down the short edge. (See the photos – the pins show the open section.)
Clip off your corners without cutting through the seams and turn your bow right side out. Using your chopstick, poke out the corners so they’re nice and crisp and iron the rectangle flat. Since the hole in the seam is going to be on the center edge of the bow, you don’t actually have to worry about sewing it shut, as it will be covered in just a moment.


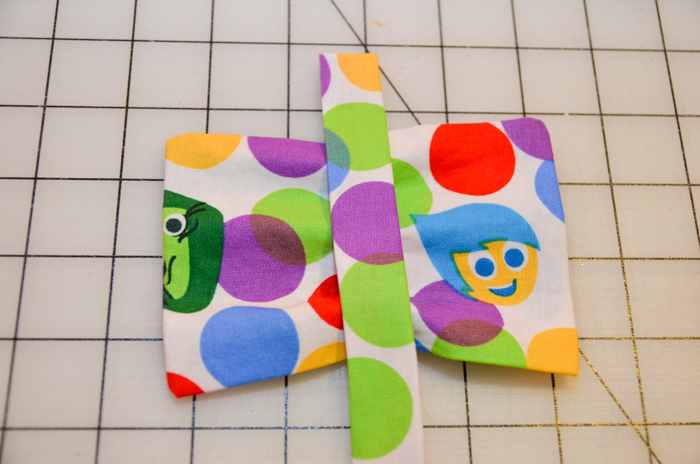
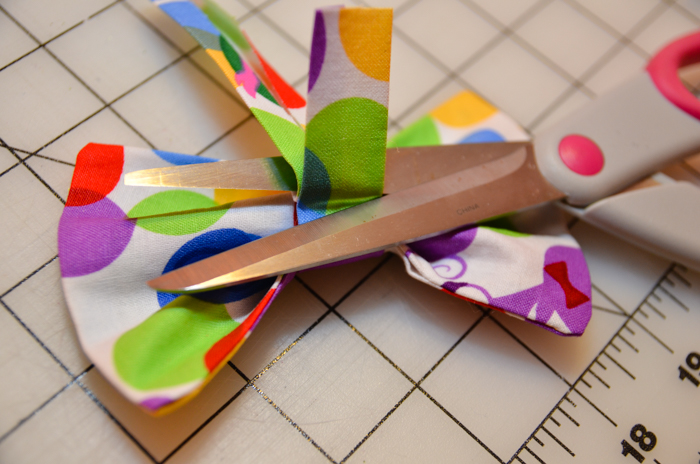
Cut a strip of fabric about 1 ½ inches wide for the center section of the bow. Lay the fabric with the right side down on your ironing board, and fold the two edges inward so they meet in the middle and iron. Try not to burn your fingers with the steam. I mean, I’m not saying I’ve ever done that, but I’m just, uh… sharing some insight.

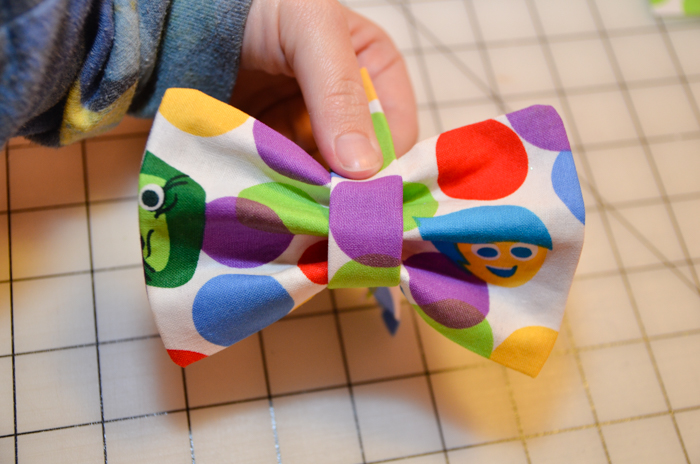
Now you just have to scrunch the rectangle into the bow shape, playing with it until you like how it looks. Wrap your fabric strip around the center of the bow and keep playing with it until you’re happy. Once you’re satisfied, use your hot glue gun to seal the strip on the back side of the bow. When that has bonded, clip the excess fabric from the strip and voila! Fabric bow.


(Bow assembly ends)
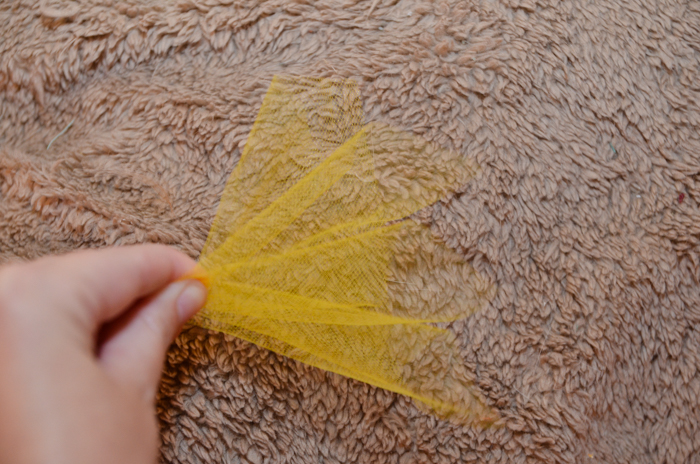
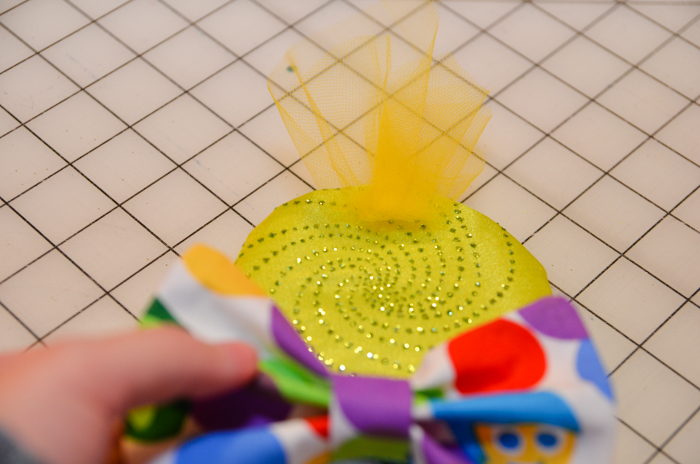
When I reached this step of the ears, I knew I wanted to do a little something else for embellishing. Tulle is one of the most versatile fabrics in my arsenal, so I cut some yellow tulle and started playing with it. Folding it this way and that way, holding it in front of the ears here and there. Finally, I decided I wanted a little jolt of tulle behind the bow. I cut off a 6 ½ X 6 ½ inch square of tulle and fanned it out in a pleasing manner. Then I hot glued it to the ear, let it set, and then hot glued the bow directly over it. I liked how it looked, but the bow was not lying as flat as I wanted it to. This happens every time I attach a bow, and I address it by going back in with the glue gun and putting dots of glue behind the bow in the spots where I want it to be flush against the ear. Still, I wanted a little something else… I had an entire bag of “memories,” so why not put in another?! I decided to glue one final bead in the center of the bow. Now the Inside Out Joy ears were complete!


Final Thoughts & Giveaway

There you have it, my custom Mickey ears tutorial. I hope you can use these instructions to make your very own Mickey ears! There is something particularly magical about being in Disney and having cast members and guests stop you to compliment your ears. That feeling is magnified tenfold when they ask if you got them from Etsy, and you can answer that you made them yourself!
If you have any questions about making your own Mickey ears, please leave a comment and I’ll try and help you through it. If you make your own set of Mickey ears, send me a tweet (@Angela_Wilhelm) – I WANT TO SEE THEM!
Okay, now the part I’m sure many of you have been waiting for – the giveaway! You have two ways to enter (and if you enter both ways, you get two chances to win). First, there is a special tweet from the Touring Plans twitter account: Retweet it! Second, share the special Touring Plans post on Facebook. We’ll draw the winner one week after the article is posted, so make sure you tell your family and friends to RT and share for their chances to win! The prize itself will be handcrafted by me. You pick the character, I design and make the ears and send them to you. Make sure you follow me on Twitter @Angela_Wilhelm as I’ll post updates on ear design and crafting as I make the prize ears!
You May Also Like...
-

Do you buy ears? Now, you'll have a brand new set to purchase and they are themed to look like Mexican…
-

It's January, but go ahead and strike up "Pomp and Circumstance" already. We spotted these Class of 2020 Graduation Mickey Ears…
-

The latest entry into Disney's collection of designer Mickey Mouse Ear Hats has marched onto the scene. This Mickey Mouse Ear…
-

If you want a little extra magic in your life, look no further than these Minnie Mouse Unicorn Mouse Ears. You…
Soooooo it’s 2020 and I’m just now finding your tutorial 🙂 I am in the process of making some now! Your post is very informative! Thank you so much!!!!
Great tutorial. I am very anxious to try this out. I spent a couple hours JoAnns yesterday picking out fabric and supplies haha. One question, how far apart do you place the ears?
I just did a quick measuring of my ear supply (that sounds so weird!) and I place them between 1.5 and 1.75 inches apart. It depends on my plans for the bow, usually. If I’m using a bigger, puffier bow dead-center, I’ll place them further apart so the bow doesn’t obscure the entirety of the ears. If I’m using a smaller bow and/or placing the bow on the corner of the ear, I’ll place them closer together. Get them in that range and then eyeball it until you like the way it looks. Good luck! 🙂
I can’t believe I won the giveaway! I love your work. We will be at Disney world in mid October so I will get back to you soon in the hopes we can have something by then. Thanks again for the ears and sharing your talents with the world.
You’re welcome! I’ll definitely be able to get you the ears before your October trip. 🙂
The winner of the Custom Mickey Ears Giveaway is (drum roll please)… Melissa Barkley! Melissa, please message me on Twitter so we can talk about what character you’d like your ears based on and where you would like them shipped. CONGRATULATIONS!
My tween daughter is going to LOVE this. She collects ears but is ready to branch out with some ideas of her own. This post is just what we needed. <3
I love Touring Plans blog posts – and this went above and beyond. This group keeps getting better and better everyday! Much thanks for sharing!!!
Thank you, Jodi! You just made my day! 🙂
I love this tutorial! I’m so excited to make a pair for me & my daughter. Only trouble will be deciding which characters to go for!
That is, hands down, the hardest part. 🙂 Just ask my giant collection of ears!
Thank you for writing this tutorial! I’ve only recently started seeing custom ears around, and was planning to “figure it out.” You’ve saved me countless frustrations I’m sure!!! <3
That’s awesome! The hardest part for me was actually coming up with accurate patterns for the foam and the fabric, and I thought that if I could save other people from having to figure that part out, they could focus on the fun parts. Good luck!
I want to attempt for our family for trip In October, thanks for the clear tutorial. I dint tweet, but did share on FB, so my fingers are crossed 🙂
Good luck! 🙂 If you give it a whirl, make sure to let me know if you have any questions. And of course I want to hear about them! 🙂
These were very cute & I love how you provided the tutorial!
Thanks! I’m glad you enjoyed it!
Thanks for sharing I can tell a lot of time went I to this post. I just recently started looking on Etsy for ears and a few were $ 12 but most wanted over $30. So I will be trying some of my own. Thanks for sparking some creativity in me.
You’re welcome! I love making them (it’s kind of addicting), and I felt like I spent so much time creating this pattern and method that I needed to share it!
Im work atm but i will be sharing on FB when i get home!
Yay! Of course, I wish everyone would win, but then I’d have to quit my day job to make Mickey ears 24/7. Maybe if I could harness the power of my cats in some sort of assembly line… 🙂
Thank you
You’re welcome! 🙂
Ok, so let us know when you open your own etsy shop! Would totally buy these!
🙂 If that day ever comes, I’ll announce it right here!
I was thinking the same – an Etsy store is in order! I don’t think I could do all this myself.
I think that what has stopped me from creating an Etsy store is knowing that I can’t be terribly competitive in regards to pricing with what is already out there. The $30 range is about right when you factor in materials and labor, and there are a lot of great ears already available for that price. BUT, if I ever change my mind, I’ll announce it on Touring Plans. 🙂
As a technophobe I don’t have twitter but my DD does. I will be telling her to sort it out!!! I really want to have a go at these myself, I’m a crafty person, cards, wedding horseshoes, door hangers, coasters, sewing. I have so many ideas in my head, thank you so, so, so much!!!!!!!!
With that kind of craft experience, you’ll be able to tackle this project with no problem! If you make some, have your DD tweet me a picture. I’d LOVE to see them! Best of luck!
DD was very excited when I told her about the custom ears. We are in the UK so the 6mm foam is the main concern. When I find a supplier there’ll be no stopping me. Will definitely tweet you a picture, thank you!