
Extend the Magic: Using Photo Books to Tell Your Story
I’m sure you’ve all been there – your Disney vacation is over and the dreaded Disney blues set in and all you want to do is extend the magic from your trip. The end of a Disney trip can be depressing, but I’ve developed methods for extending the magic past the vacation so I can bask in the Disney happiness just a little bit longer. One of my main methods of doing this is through the creation of photo books.
Now I know what you might be thinking, “Photo books? Anyone can create photos books to document a vacation! What makes your method so special?” Well I’m glad you asked. I approach photo book creation for Disney trips from a unique angle. Rather than just documenting step-by-step the different events that take place on a trip, I attempt to find a new and different storytelling theme for every photo book I create. My desire is that the photo books not only transport us back to the wonderful memories from the trip, but also make us laugh at the way I chose to tell the story. Essentially, I’ve embraced the idea of being goofy. Let me break down my process step by step.
Step #1 – Editing Photos
This step won’t apply to everyone, but it is something that I do because I am an amateur (strong emphasis on the word amateur) Disney photographer. Another one of the ways that I extend the magic when returning from Disney trips is through my photo editing process. I love spending time going through all of my photos chronologically, figuring out which ones to edit, and figuring out which ones to have some serious fun with. Before I will even conceptualize a photo book, I will have edited all the photos from my trip. Yes, this takes an enormous amount of time. But I really, really like it.
To give you an idea of how long it takes me, I’m still editing photos from our 4th of July trip, and I haven’t started on our Labor Day Weekend trip yet. Keep in mind that my day job keeps me pretty busy, so I can go weeks at a time without editing any photos at all. If I really was in a hurry I could complete this much faster, but I’m okay with lingering over this step. It helps me extend the magic.
Step #2 – Choose a Photo Book Theme
I use Shutterfly exclusively for making my photo books. Other options exist, like Snapfish, but I personally like the selection of themes that Shutterfly offers, and by now I’m an expert at using their design tools, so I have no desire to switch to any other provider. When my photos are edited and I’m ready to jump into the photo book creation process, the first thing I do is select a photo book style. Shutterfly has many options to choose from, and this is always a step I take very seriously. (Very recently Shutterfly added some Disney styles, which is not something they’ve ever offered before, and I’m looking forward to being able to use those in an appropriate photo book.)
There are some specific questions I ask myself when picking a photo book style:
1. If I traveled during a holiday season, do I want to theme the entire book to that holiday?
2. Is there a theme that will guide me in my storytelling process?
Christmas, Independence Day, Halloween – I do have photo books that utilize holiday-specific themes, so there is nothing wrong with taking this approach. I will note that if I approach it in this manner I also like to have a strong story-telling device that focuses less on the holiday and more on a unique storytelling perspective, but I’ll address that a little bit more in the next step.
If the trip didn’t have strong influences from a holiday, I base my decision more on the “feel” of the theme. For example, if the trip had a chill/relaxing kind of vibe, I look for themes that exemplify that feeling (toned down colors, themed stickers that fit with the ambiance). If it was during the hottest time of year, I might focus on overly bright and saturated colors – anything that screams Florida fun in the sun.
I must admit that a large part of this step relies on my gut reaction. Shutterfly comes out with new themes often enough that when it’s time for me to make a book (which I do for every single trip we take, regardless of how long it was) I am sometimes pleasantly surprised by something new. For example, I just created our Memorial Day Weekend trip book, and while there was not a Star Wars theme to fit with Star Wars Weekends, there was a great comic book style that I used as inspiration for my storytelling method. Which leads me to…
Step #3 – Choose a Storytelling Method
This is my favorite part of creating a photo book. I love coming up with new ways and angles to tell the story of our vacations. Every time I create a new photo book, I use a new shtick. Over the years I’ve learned that the more ridiculous I let myself be, the more entertaining my photo books become. I used to be very prim and proper, because I wanted to make sure anyone who read the book would get a nice, tidy overview of our vacation. Now I fill the books with fun and silliness and (sometimes) inside jokes. Whimsy goes with everything my friends, and as long as Anthony and I love our stories, I don’t really care if other people think we’re nuts. I highly recommend this approach.

So how do I come up with new storytelling devices? A lot of times it happens organically. I jump into putting a book together and by the second page a storytelling device has emerged on its own. Once I can identify that I’m on to something, I take that one little idea and run with it, making it the dominant approach. Other times the storytelling device comes out of the book style I chose in step #2, like with the comic book example. Writing that photo book in a comic book style was a no-brainer. In rare instances, I have a storytelling method from the very beginning, like with my solo trip. Here are some examples of storytelling devices I’ve used in the past:
Disney Songs
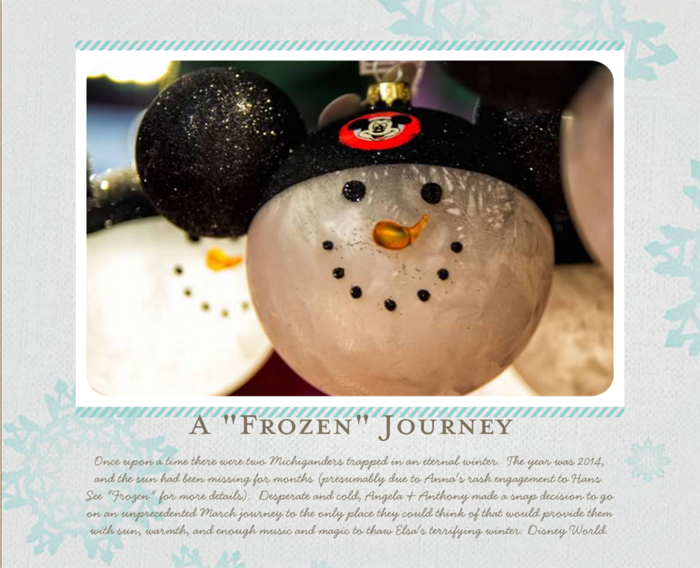
This theme is one that I used in our March 2014 photo book, titled, “A Frozen Journey.” That winter was BRUTAL and we live in Michigan. MICHIGAN. The trip itself was a last-minute desperate bid for sunshine, and on the cover of that particular photo book I framed the trip around us fleeing Elsa’s terrifying winter. However, the first page started the REAL theme of the book. Rewriting Disney lyrics to tell the story of our vacation.
The trick with this was to keep lyrics that would instantly cause the reader to realize what Disney song we were riffing, but making changes to personalize them. I’m going to share a bit of this to illustrate the point, and I will be eternally grateful if we could keep the good-natured mocking to a minimum… (Remember, whimsy goes with everything!)
We used such gems as, “Be our guest, be our guest, put your sunscreen to the test!” and “Let every creature go for broke and sing; let’s hear it in the herd and on the wing; it’s gonna be the Wilhelms’ finest fling; oh I just can’t wait for the Spring!” and my personal favorite is in the photo below.
Repeating Title Theme
This storytelling device is much simpler in execution, and it emerged naturally in my 2014 July photo book titled, “A Salute to all Nations, but Mostly America.” In that particular book, I saluted many things. Dragons (but mostly Figment), fireworks (but mostly Disney’s Celebrate America: A Fourth of July Concert in the Sky), and characters (but mostly just Olaf – don’t judge us on this; it was Frozen Summer Fun and I had an inordinate amount of Olaf-themed photos).
This theme can only be stretched so far without getting annoying, so even though this was the underlying thread of the book, I did put in a lot of other quips and descriptions. It is possible to have a photo book with a theme and still keep that theme low-key. This particular book is a great example of that.
A Comedy of Errors
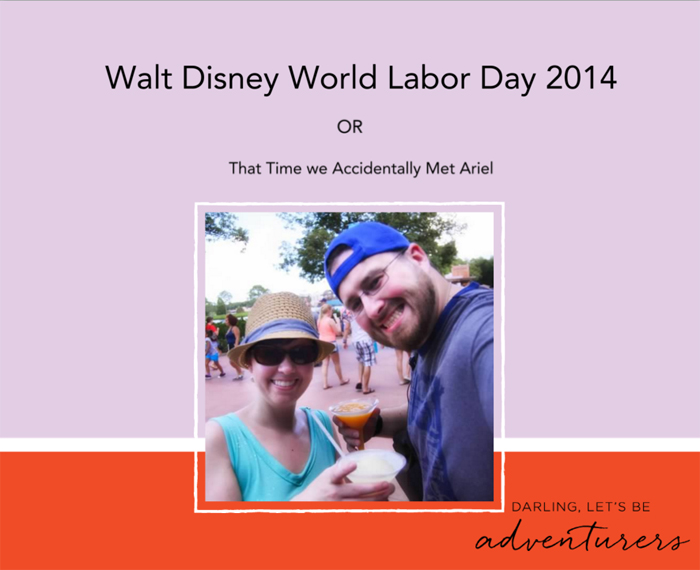
This theme was natural from the very beginning in our 2014 Labor Day photo book, titled, “Walt Disney World Labor Day 2014 or That Time We Accidentally Met Ariel.” Have you ever gone on a trip where everything possible went wrong? (When I say everything, I mean everything, with the pinnacle being Anthony losing his driver’s license in Magic Kingdom on the very first day…)
We wanted to capture this nothing-can-go-right feel, but we also wanted it to be clear that we had a great time. So we took the idea of chronicling everything that happened and gave it a humorous turn. This immediately started with the title, specifically the “or” portion of it. We really did accidentally meet Ariel on this trip, and choosing that for the title gave the book the right attitude from the beginning. The narrative of this book was a bit more than we usually put in, but we certainly managed to capture the comedy of errors aspect we wanted.
Photo Journal
I knew before I even went on my 2014 October solo trip I knew that I would have a specific angle for approaching this photo book. This was my first solo trip, and I had two goals for this vacation. The first idea came from a Touring Plans blog article about taking a pal to Disney World. I HIGHLY recommend reading this article, as I had a blast following the suggestion to take a small stuffed animal with me on my trip and photographing him (his name is Tron, called so by Anthony using the sentiment that “all animals in Disney World are animaTRONic) enjoying the parks. It was a great exercise for a solo trip in particular!
The second goal I had was an idea I got from yet another Touring Plans blog article, this one about a wearable character autograph project. This article was the catalyst for my Disney character signature quilt blocks, and I wanted to get character autographs on 16 prepared and themed quilt blocks. With these two goals as driving forces behind my trip, I knew from the beginning that this story would focus on them. That’s how I ended up with, “Tron’s Big Adventure or Angela Meets 24 Characters.”
This photo book is one of my very favorites, as half of it (at least) is basically a photo journal of Tron’s adventures. I was minimalistic on narrative in this one because the story is told by the photos, and this effect worked extremely well.
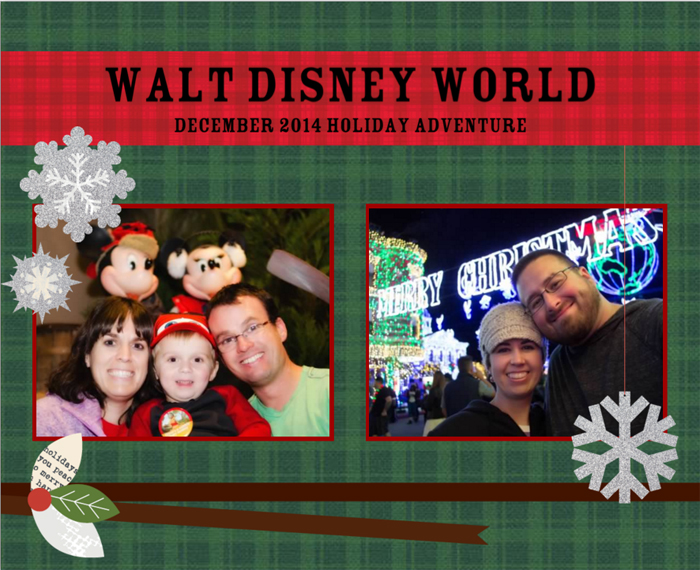
Day-by-Day Account
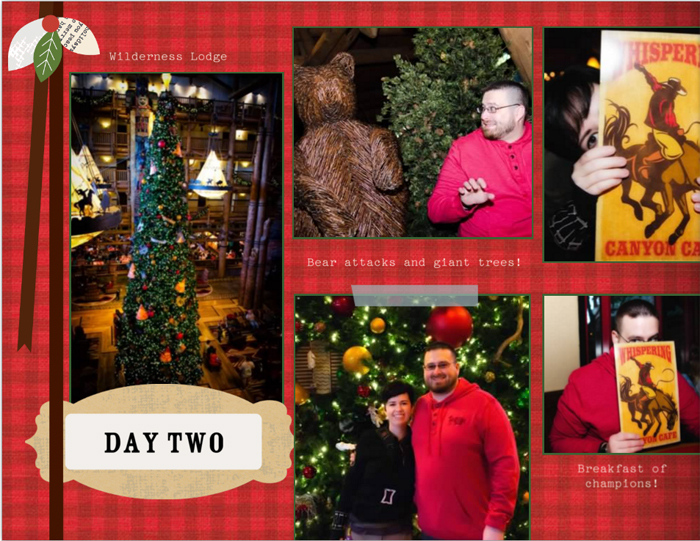
Sometimes you go on a trip that doesn’t lend itself to utilizing a highly stylized storytelling device. Last December we did a joint trip with my brother, his girlfriend, and her 4-year-old. Although my brother had traveled to Disney with us before, this was the first trip for the rest of the party. There is some serious magic to be had when taking a child to Disney World for the first time, and the last thing I wanted to do was distract from that by using some crazy shtick to tell our vacation story.
I still needed a way to frame the trip in the photo book, so I simply used Day 1, Day 2, Day 3, etc. each time we transitioned from day to day in the book. It was effective, and I was still able to give the book some personality without taking it too far.
Comic Book
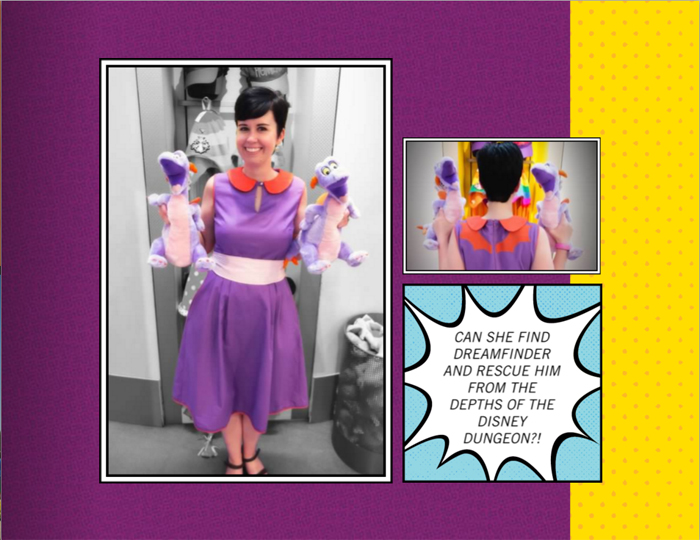
I’ve alluded to my newest photo book, and the only thing that makes me sad about it is that I’ll never be able to use this storytelling device again, unless they come out with an entirely different comic book style (I never use the same style twice). This was a case where the photo book theme dictated the storytelling device, and I couldn’t be happier with the result.
Every comic book needs a story line, and this one was built around Anthony and I searching Disney World and trying to find and free Dreamfinder from captivity. (I’m very sad to report that we failed in our attempts to rescue Dreamfinder.) This was a case of embracing a quirky approach, and it definitely worked!
Final Tips
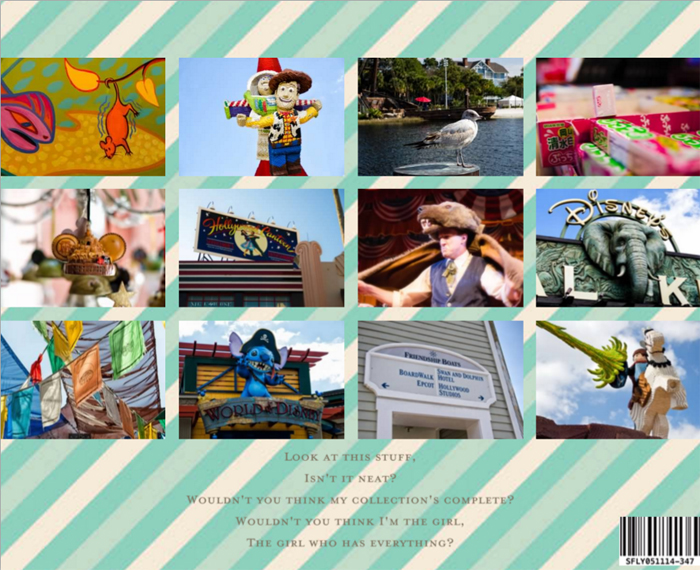
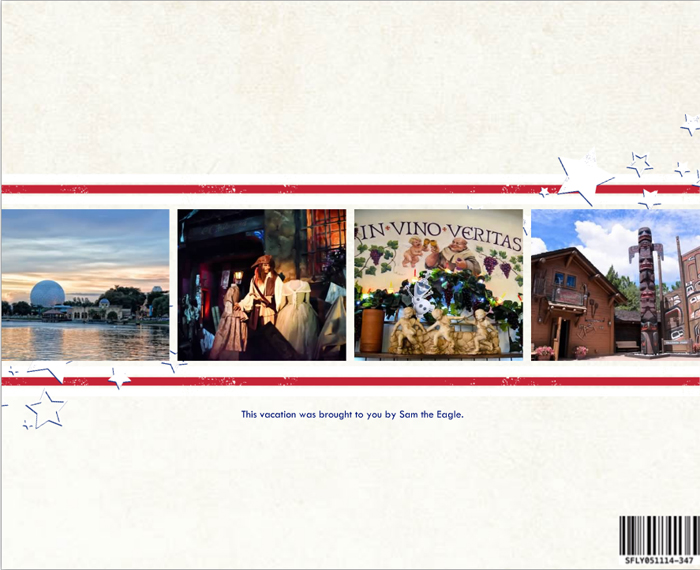
I would like to make a few final suggestions regarding photo book creations. First, do whatever you can to keep your photos in chronological order. Try to use a storytelling device that will let you do this – it makes reliving your trip easier when you read the book. I often end up with the last page or cover as a silly conglomeration of those leftover photos that didn’t get put in where they were supposed to.
Second, have fun while doing this! This is about extending the magic, and every piece of this process should be a tiny way for you to bask in the Disney magic. As much as I love my artistic shots of Disney landmarks, parades, and shows, I have an even greater affinity towards the silly photos that evoke an emotional response. Don’t shy away from goofy photos; oftentimes those are the ones that capture the true flavor of a vacation.

Third, vary the number of photos you put on each page. It is okay to create a page with just one photo and also have a page that has a huge collage. Try to scatter different numbers of photos evenly throughout the book; this keeps the look fresh. Also, if you have a story you want to tell, there is nothing wrong with devoting an entire page to text. Do what you need to do to capture the memories.
Lastly, if you haven’t made a photo book before, please remember to have some patience with the design interface in Shutterfly. It can be a little confusing when you don’t know the ropes, and although I’m a pro at using it now, I didn’t get there overnight. I always use the “Custom Path” option that lets me build and customize every aspect of the book to my liking. If getting knee deep into this process doesn’t appeal to you, Shutterfly has a “Simple Path” option. The downside to this is that there are fewer styles to choose from, but this appeals to some people. Lastly, Shutterfly rolled out a new option called “Make My Book” where a Shutterfly designer creates your book manually. The fee for this is $9.99. (I also wanted to point out that I specifically did not include a pricing range for photo books – there are so many different options with pricing dependent upon so many factors that there is no way I could truly ballpark an estimate for you. The least expensive option for an 8X8 book with no bells and whistles is $29.99 plus shipping and tax.)
Another thing to keep in mind is that Shutterfly has sales going on almost all the time. The standard sale I see the most often is 30% off photo books. If you’re not in a hurry and you can wait for your book, hold out for the next sale and see if you can score 40%. Occasionally it will go as low as 50%, so keep your eyes open for that one as well! Last January there was a great New Year sale going on with 50% off photo books, and I caught up on all of my backlogged trips and finished and ordered three books. And I saved so much money that it was ridiculous.
Is there anything you do to extend the magic of your Disney trips? Are you a fan of photo books as a method for reliving your trip? Please share in the comments!
You May Also Like...
-

One of the most popular special activities that people take advantage when visiting Walt Disney World is the Disney Early Morning…
-

Guests will be able to once again see the nighttime projection show, Disney Movie Magic beginning on March 13. Disney Movie…
-

If you know the perfect Disney parents, or see yourselves as such, you'll want to head to Magic Kingdom to pick…
-

Looking for a quick and easy souvenir for your Marvel-obsessed family member? How about putting them in the action with their…
I really enjoyed making a photo book to commemorate our Easter 2015 trip. I am from the UK so our visits are only every 3-5 years so I go photo crazy! This last trip I had nearly 1000 pictures to choose from (we had photopass and did Wild Africa trek). I ordered hard copies of all my photos to fill 3 albums, but I loved the whole process of choosing just a few to go in the photo book to give a flavour of our holiday to our friends and family.
I found that the best photos to really reflect the holiday were the ride photos, which generally made us all look ridiculous but also the photopass photos which show us interacting with the characters before our ‘posed shots’.
You’ve given me some great ideas for our next trip in 2018.
We took our most recent Disney World trip this August with our best friends and for Christmas, we are “surprising” each other with a book from our trip. We shared a Disney photo pass and after the trip we sent one another a jump drive with the photos each family had taken on our phones and cameras. My only disappointment is that I feel that the Disney photo book options are much more limited than they were the last time I made a book (3 years ago), so we may use Shutterfly this time.
Shutterfly has so many options that you almost have to be careful not to get too bogged down in them. I love it, though, and I’d much rather have that kind of creative liberty. You should give Shutterfly a shot – it’s so worth it! Another nice thing with Shutterfly is that you can save your project and come back to it another time. I rarely do a photo book in one sitting, and if I do I always wait a day and then come back to proof it with fresh eyes. I like not having to rush through it.
Thank you so much for this article! I’m always trying to ‘up the ante’ for each of my books, and these are some great ideas!
Another suggestion is to not get too wrapped up in the Shutterfly ‘theme’… if you’re not finding what you want, you can search for more (backgrounds, stickers, frames, layouts, etc). It took me a couple books to realize that all of Shutterfly is available to you for every book… that was a good day 🙂
I second that! I had an epiphany day like that, too, when the Shutterfly possibilities opened up…
Great article! I love making photo books, but for some reason never thought of adding “leftover” pictures to the back cover. Such a cute idea! We just took a trip in October and I’m currently in the process of collecting photos from the rest of the family. Once that’s done I plan to use the new Disney template from Shutterfly.
I’m really looking forward to testing out that new Disney template, too! I want to save it up for a really momentous book; maybe my brother’s Disney Springs wedding next August…
I am so going to do this from now on!! I had made books in the past but life happened and I just go so busy but this article has definitely made me want to do this again for our trip in May. Maybe go back through old pics and make more books! Thanks for this!
You’re very welcome! It can be so fun, reliving the memories!
I have used Shutterfly to make Christmas gift books too. The first time I did it, I didn’t realize I needed to save each page as I went in order to not accidently loose anything. Tough lesson learned that I wanted to share.
Oh no, that’s terrible! Thank you for sharing your tip, though. 🙂
I have made a photo book of every WDW trip I’ve taken my daughter on. It really does extend the trip and memories. My first 6 books I did on Shutterfly, which I love. This last trip though, we did so many special events and extra activities that had special credentials, menus, etc. that I used Mixbook. On Mixbook you can scan in all of those special momentos and use them as stickers or backgrounds which is really a great way to document those events. My only qualm was that I always do 8 x 8 books and Mixbook’s 8 x 8 is larger than Shutterfly’s which is great, but it is not exactly the same size as all of my other books which kind of bothers me.
That’s so cool! I’ve never heard of Mixbook before. Of course I don’t think I could handle it not being the same size as my Shutterfly books, lol! I’m a little bit obsessive about stuff like that. 🙂 I’m still going to have to look into it, though, because that scanning thing sounds awesome!
I now do a 12 x 12 Shutterfly book for every Disney trip. We park hop a lot so rather than a chronological book I like to do a theme book with pages that focus on our resort, a spread for a ride or two, and pages for each park. Each trip I highlight a ride or two with a lot of photos I have taken (though the Safari and Living with the Land always have large photo spreads). I also dedicate pages to parades and fireworks. I always try to wait for a Shutterfly deal.
That’s a great approach for the people who don’t find that chronological works well for them. It offers a cohesive way to organize everything without the restraints of keeping things “in order.” I like it!
I do all of this, pretty much exactly, lol. Every vacation/trip, no matter how long or short is made into a book. I even have ‘that page’ where pictures go that I just couldn’t find to put anywhere else. I also use shutterfly exclusively.
Somehow, I get free book coupons all the time so I rarely pay for a book (unless I go over the allotted amount of pages or choose one of the storytelling options).
I also make the kids autograph books like this (although these are the small, softcover ones whereas my regular books are always the 8×8 hardcover). I take the pics of them with characters, from the most recent trip, and then each character has their own page to sign. A lot of the characters get a huge kick out of it!
That’s an amazing idea for the autograph book! I absolutely love it!
I have so many digital pictures I never do anything with, and now that our APs have the photo pass downloads, I have some with us actually in them 😉
I like the idea of telling a story, I never really thought of it that way which is why I wasn’t all that interested in creating a book before. I think I might give this a shot though. And I like Laura’s idea of a Christmas gift, maybe I’ll do that.
Until I landed on the storytelling aspect I wasn’t too “into” the photo books either. Once I realized that half the amusement came from HOW I told the story, it opened up all kinds of options! Give it a try – you might get addicted to the process! 🙂
My husband and I went on our first Disney World trip in September of last year. I surprised him with a photo book of the trip for Christmas, and it was his favorite gift! And something I didn’t expect is how much fun it was to make it! We’re going on our second trip this December, and I’m already looking forward to designing the photo book when we get home. It’s such a great way to relive the memories, and provides a great way to share them with family and friends.
I love the process of making the books! It’s just such a great way to relive those special moments, and to give a little humorous flair to the less-than-special moments. 🙂 Have a great time in December! That’s when our next trip is, too!