
Track Your Eats! An EPCOT Festival App for Your Phone
If you’re visiting one of EPCOT’s Festivals, what’s your plan for the booths? To drop in for an afternoon you might read an article on the top stops, make a few notes, and go. For anything more than that, you might like a more organized approach.
In my opinion, the Food & Wine app from Small World Code is the best smartphone app you can choose to be your trusty sidekick; I’ve been using it for over five years and I absolutely love it to death. It can help you tackle any of EPCOT’s Festivals – use it for wishlists, budgeting, and tracking your progress. If you’re ready to move on from paper and pencil, keep reading and I’ll show you how!
We’re going to cover the following topics – tap any link below to jump directly to that section. For any image or gallery in this article, you can tap to expand and see it at a larger size. This write-up is based on the iOS version of the app, but the Android version is very similar. And to be crystal clear: the app is called Food & Wine, but you can also use it for Flower & Garden, Festival of the Holidays, and Festival of the Arts.
Getting Started
Making a Wishlist
Dish Details
The Map / Finding Your Way
Filters
Odds and Ends
Getting Started
Food & Wine is available for both iOS and Android. Use the links below to find it in your respective app store. Although it’s marked in the Apple store as having in-app purchases, it’s completely free to use and there are no in-app ads.
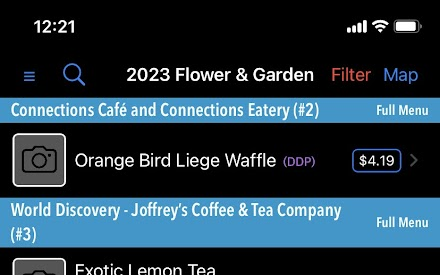
The app has 5 top-level displays: Menu, Search, Event, Filter, and Map. When you first open the app, you’ll find yourself on the Event page, with the name of the current event displayed on top.


You should know: there’s about 7 minutes’ worth of reading ahead, but the help (see the Menu page) is top notch. If you’ve never heard of this app and you’d like to see what it can do, keep reading for a detailed rundown. But if you’re software savvy you can take a quick tour through the help and get going. Come back later and skim for anything useful that you might have missed—this app has so many features that there’s probably something.
Making A Wishlist
So here you are on the Event page with a list of booths and dishes in front of you. Guess what? We can dive right in and get started with the exciting stuff, like making a Wishlist.
As you read down the list, swipe left on a dish you want to try and press the star to add the dish to your list. Swiping left again will show that the star is highlighted; if you want to “Unwish” the dish you can simply tap again. Booths are ordered and numbered according to the official Festival map.


You don’t actually need to swipe left again to confirm that you’ve Wished for the dish; the small blue star to the left of the name shows the dish status as Wished. When you swiped left (or looked at the screenshot), you probably noticed two other icons. These are actions that you’ll take while you’re at the Festival. The green checkmark is for Taste, and the red heart is for Favorite.
These status markings are progressive, so the dish status will only show one icon at a time.
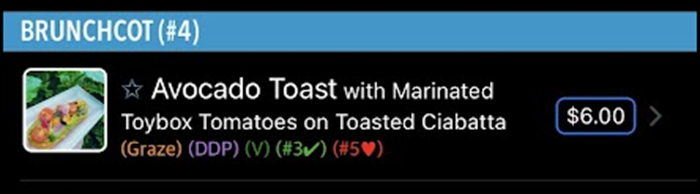
How will you know which dishes you should Wish for? Looking at the closeup of the dish listing, we can see a bit more information that might be useful. The price is there, and you can see whether the dish belongs to any special categories such as Plant-Based or Gluten-Friendly. You’ll also see any popularity rankings from other users who Wished for, Tasted, Favorited, or Rated it.
Was that fun? Don’t get carried away and keep going – I recommend you keep reading through the next few sections first. For instance, if you’d like to see more about the rating others have given the dish, tap on it to open up the Dish Details page.
Dish Details
The first thing to know is that there’s nothing on the Event Page that you can’t also see or do from this detail page. Dish Details is all about having even more information and features.
You can see star ratings from other users; an alternate way to make your Wishlist is to travel through the Dish Details pages. Toggle the Wish button at the bottom of the page, and then move on to the next dish using the navigation bar.


For budgeting, when you Wish for a dish, the cost of that dish is automatically added to your total. If you know you’re going to get more than one, tap the price at the top right to adjust the number so that your budget is correct. You’ll see that change reflected on the Event page as well, and if your phone is set to a non-US currency you’ll see the price in dollars and in your own local currency.
While you’re visiting the Festival, you can use this page to record as you go. Mark dishes as Tasted and Favorited, and add your own star rating. Add your own photos. And you can take personal notes – I like to look at my notes from other years when making my Wishlist. For dishes that return the next year, your notes and photos will carry over but your personal rating will not.
I prefer to make my Wishlist by swiping on the Event page. But when I’m visiting the Festival, I like to navigate through the Dish Details. My family will take a vote on the ratings, and it’s fun watching the booth stamp appear when you mark the first dish from that booth as Tasted.
Privacy
Before we move on, this is a good time to talk about what data is shared. Information on what you Wish for, Taste, or Favorite is always collected, as well as your star rating. You’ll decide whether photos that you take are shared or not, and your notes and budget information are always private. Everything is anonymized before it leaves your phone, so if you want your cousin to be able to follow automatically as you taste your way around, then this isn’t the app for you.
The Map / Finding Your Way
Good news! The map pretty much explains itself. The thing that you might wonder about is the color of the pins – orange, blue, green, and red.
These colors match what we’ve been using to track the status of the dish; blue for Wished, green for Tasted, red for Favorite. Since a pin can only be one color but booths have multiple dishes, the booth pin takes its color from the dish with the highest status. Orange pins show booths where you haven’t taken an action on any dish.
Even if you don’t use the map to find your way around, it can be a fun way to track your progress. In 2021, I went to the Food & Wine Festival with only my daughter. Every night we took a picture of the map and texted it back home so everyone could see how much we had left to do.
Filters
One thing that puts this app over the top for me is being able to filter the displays so I don’t see what I’m not interested in.
Start by tapping the Filter button at the top of the Event page to open up the Filter panel. Any of the options that you see can be toggled as “Showing”, “Hiding”, or “No Action”. Just tap the categories to change the setting.


If you’re Showing one thing and Hiding another, what will you see?
The first rule is that if you’re Showing two categories, the behavior depends on whether they’re in the same section. If they’re in different sections, you’ll see the dish if it’s in both categories. If they’re in the same section, you’ll see a dish if it’s in any of the categories. Hiding more than one category behaves the same way. In the first example above, Most Popular and Plant-based are both in the Food Options section, so I’ll see items that are Plant-based even if they aren’t highly rated.
The second rule is that Hiding wins over Showing. You can think of it as an instruction to “Show me all the things I selected, except the ones I said to Hide”. The example in the second panel above is one of the most useful filters when you’re going around the Festival. It will show you everything you’ve Wished for, except for the ones you’ve already Tasted. It’s a Still-To-Do list!
Do you feel like an expert? Click here to check what you’d see with the filters in the third panel.
Filter Magic
Once you’ve put a filter on, you’ll only see dishes that match what you’ve selected. The magic part is that these filters apply whether you’re viewing the Event page, or navigating back and forth in Dish Details!
If you’re making your Wishlist from the Dish Details pages and you don’t drink, you won’t have to page through all the alcohol to get to the next booth. Just turn on Hiding for alcoholic beverages and you’ll be good to go. Or, if you’re only interested in Festival Drinking Around the World, you can Hide all the Food!
Some of my favorite filters:
- Showing Wished and Hiding Tasted
This is a list of what you still have to do. - Showing Tasted and Unrated
This is a list of stuff where I used swipe at the Festival to mark it as Tasted, but we haven’t added ratings yet. - Hiding alcoholic beverages + anything
I’m not much of a drinker, so this helps me find the mocktails. - Showing Tasted, Hiding Favorites
Did I forget to Favorite something? This is an easy way to check.
Search and other “filter pauses”
The filters are super convenient. You know what’s not convenient? Having to take them off to look for a specific item or see a whole booth menu. But you don’t have to!
There are two ways to quickly see information that you may have filtered away. The first is to use the search function at the top of the Event page. If you switch to the Map or click into Dish Details, your results will be limited to those from your search instead of those from your filters. Going back to the Event page returns control to any filter settings you chose.
One of the most common times that your filters are “in the way” is when you want to see the menu for a whole booth. Tap where it says “Full Menu” to the right of any booth name; this opens the View Location page where you can see all the dishes from that booth.
You’ll only see this “Full Menu” option if you have a filter applied. How do you know? If the text where you tap to move to the Filter page is red, you have a filter on.
The Show Filtered Booths Setting
This app has only three settings, and “Show Filtered Booths” is the only one that I change back and forth. What does it do? It affects the display on the Event page and the Map if all the dishes in a booth are excluded by a filter. (Tap the hamburger on the top left of the Event page to access Settings.)
Page through the gallery below to see the difference this setting makes. The same filter (Showing Wished) is applied in each case; the difference is whether Show Filtered Booths is on or off.


Odds and Ends
I briefly mentioned above that the Settings can be accessed from the hamburger menu on the top left of the Event page. But there are other useful items on the Menu page. Let’s take a look!


Settings
I’ve already discussed the Show Filtered Booth settings, but there are two photo-related settings. If you tap the + on the Dish Details page to add a photo, you’ll have the option to take one directly in the app or to add one from your phone’s photo library.
The “Autosave to Photo Library” toggle controls whether the picture is saved to your library automatically when you take it in the app. If you don’t turn this setting on, you’ll be able to save them later. Tap the photo to go to the full-screen image, and use the Share function at the top right to save it to your library.
Within the app, your photos will have an orange border that lets you know they are yours. If you don’t turn on the “Share My Food Photos” setting, they’ll remain on your phone only and won’t be shared with other users.
Booth Stamps
I love the booth stamps, but I’m forever forgetting the paper Festival Passport and stickers in my room. The booth stamp on the Dish Details view fills in as soon as the first dish from a booth is marked as Tasted. You can see the entire gallery for a Festival by selecting Booth Stamp Gallery from the Menu page.
Budgeting
The Event Summary (accessed from from the Menu page) has some cool stats about the Festival. Including your budget. Your Wishes and Tasted dishes are used to automatically give estimates of how much you’ll spend and how much you’ve already spent.
Other Events
I’m pretty sure I already mentioned that I like to use my notes from past events when making my Wishlist. So you already know that you can see all the past events.


When you first open the app, if a new Festival menu is out you’ll be offered the option to import it. To see any events from the past, select “Show All Events” from the Menu page and select the event that you’d like. If you’re browsing a past event, when you come back to the Menu page you’ll see an option at the top to quickly switch back to the current event.
Have you used the Food & Wine app at EPCOT Festivals? What did you think? Let us know in the comments!
You May Also Like...
-

Hooray! My favorite festival has been announced for the Walt Disney World Resort! If you haven't experienced the EPCOT Festival of…
-

Disney has announced dates for its annual EPCOT International Flower & Garden Festival. This year’s event will take place from March…
-

Key Info: ⭐ Where to find it: The Brazil Global Marketplace is between the France and Morocco Pavilions in the World…
-

Key Info: ⭐ Where to find it: The Spain Global Marketplace is between the Germany and Italy Pavilions in the World…
Fantastic recommendation! We’ll use it the next time we’re there!
This is great! Wish I’d known about it last week, but ready for the next trip later this month. I am not seeing a way for Android users to see booth stamps–any insight on that?
Hi Billie, glad to hear it’s still in time for you if not just-in-time for your last trip. I reached out to the developer and he confirmed that the Booth Stamp Gallery is an iOS-only feature right now. I’ll update the article to reflect that but he did also say that it’s on the feature-request list to add it for Android even though there’s not currently a timeline.
Have a great trip!
Hi Billie – great news! In the newest update that was released a few days ago, the Booth Stamp Gallery was added to Android. Take another look and you should see it now!
Wow…we were at FotA in February and were wishing for something like this! Too bad I didn’t know about it. Oh well…I’m ready for next time. And if that isn’t for a few years, I can still dream and build wish lists!!
I really love that notes carry over from year to year. I don’t make it every year either, but I can mark up what was a “best” on somebody’s list and if the dish comes back the next year I’ll see that!