
Step-By-Step Guide: Make and Use a Touring Plan On the Web (Including Lightning Lane)
When I’m in the parks, I like to get to my touring plans in the Lines App. I can record wait times, check off steps, and reoptimize on the fly. But when I’m a few weeks out from my trip, I like to try out different options by making my plans in a web browser. It’s a little less clicking, a few extra features, and — let’s be honest — a bigger screen.
Here’s your how-to walkthrough for creating a personalized plan in a web browser, including instructions for making a plan when you’re going to be using Genie+ or Individual Lightning Lanes. First we’ll walk through making a plan that doesn’t include Lightning Lanes, and then I’ll discuss how to use the plan if you’d like to get Lightning Lane recommendations.
Just need help with one little thing? Click on any of the links below to go straight to that section. Only have your phone on you right now? Click here for the Lines App version of this tutorial.
- Creating a Custom Touring Plan (from scratch)
- Creating a Touring Plan From a Premium Plan
- Optimizing the Plan
- Modifying a Plan
- Making a Plan with Genie+
- Adding Lightning Lane Reservations to Your Plan
- Troubleshooting FAQ
As you go through, you can also click any image to enlarge it.
Creating a Custom Touring Plan
There are quite a few places on the website that have links to start a new personalized plan. If you found one already and clicked it, great! If not, start here: Disney World Personalized Plans. Click the big blue “Create a Plan” button, and you’re off!

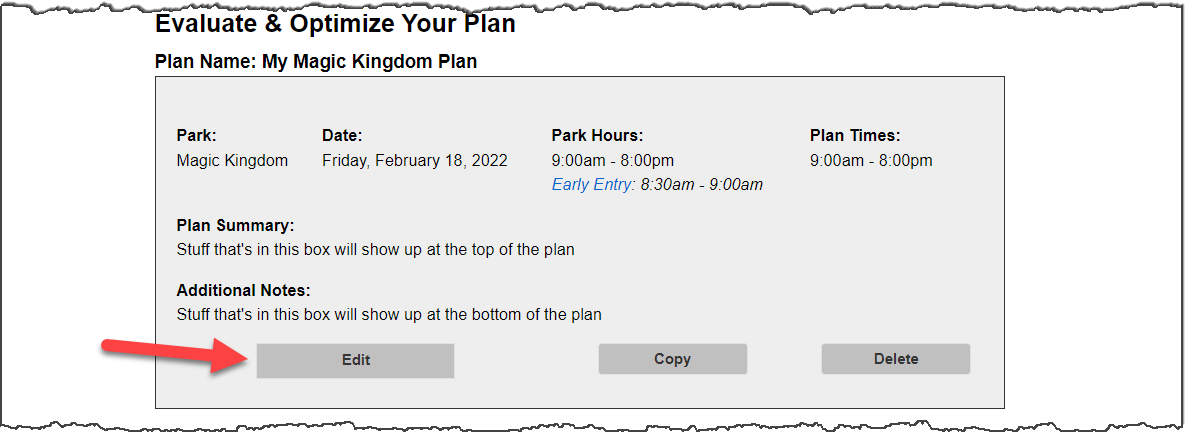
On the next page, you’ll enter the basic information. Choose a name for your plan (1), select the date (2), and the park (3). After choosing the date and the park, you’ll see the park hours appear along with the rest of the options. Use the radio button to indicate whether you’ll be using any early or late entry options that are available on the date you’ve chosen (4), change the start and end time if you choose (5), and optionally enter information for the top notes and bottom notes (6). Then click “Proceed To Attractions”. You can come back and change any of this information later, except for which park you’ve chosen.

On the next screen you’ll select attractions, including Shows, Parades, and Seasonal items. Click the plus sign to add an attraction to your plan. When you’re done making selections, click “Proceed To Meals & Breaks”

In the next screen you’ll add any meals or breaks you plan to take. Start by selecting a restaurant from the dropdown, and you’ll see the Location Info box pop onto the screen at the right. Select the time and your flexibility (how much “slosh” you’re willing to allow to your arrival time), as well as how long you plan to spend eating. Confirmation Number and any notes you might want to add are optional. The critical step is to click “Add To Plan” before selecting “Proceed to Evaluate & Optimize”.
You can add multiple meals or breaks to the plan at this step; you’ll see them appear at the bottom. And if you want to see what your plan looks like before deciding when you’d like to take your meals or breaks, you can simply pass through this step and add them in later.

After adding your meals & breaks you’ll be taken to a screen with your plan steps on it, but no timing information. Skip ahead to see how to Optimize or Evaluate your plan.
Creating a Touring Plan From a Premium Plan
Begin at Disney World Touring Plans, and select the plan that you want to use. Here, I’ve chosen the Magic Kingdom One-Day Touring Plan for Parents with Small Children. Click the button to “Copy This Plan!”.

After a short pause, you’ll see that the plan is copied. The plan name, date, and times are set automatically, and will usually not be what you had in mind. Use the edit button on the bottom left to adjust them to your liking, and to indicate whether you’ll be using Early Theme Park Entry and add any personal notes.

You may see a banner letting you know that action is required and the plan cannot currently be optimized or evaluated. This usually means that an attraction in the plan will be closed on the date you’ve copied the plan to. When you click for more information it should be clear what you need to do, but change the date before you do anything. Since this is often related to attractions that are closed for scheduled maintenance, changing the date may make the banner go away!
In the next section, you’ll see how to Optimize or Evaluate your plan.
Optimizing the Plan
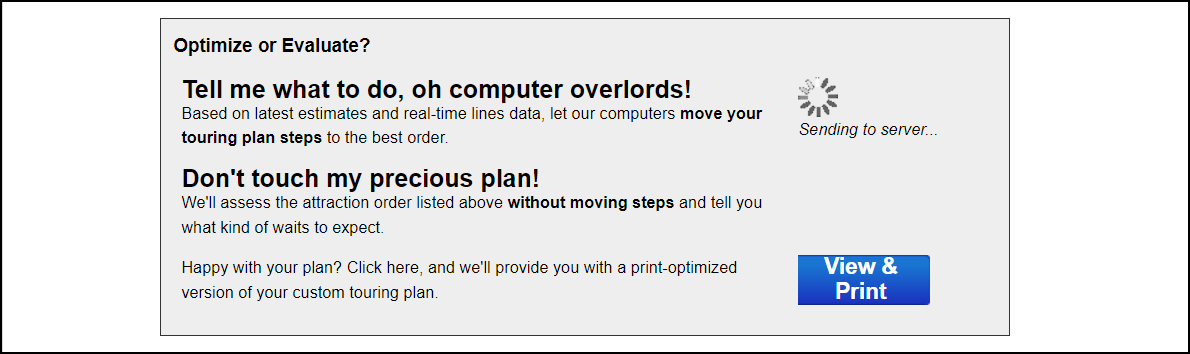
Once your plan is created you’ll see “cards” with each step, but no information about how long the steps will take — no wait times, no walk times, no ride times. To see how your day’s going to go, you’ll need to either optimize or evaluate the plan. What’s the difference? When you optimize, the software chooses the most efficient order. Evaluating lets you choose what order to put the steps in, and the app will just tell you how long it will take.

You’ll need to optimize or evaluate every time you make any changes to your plan, so it won’t take long to become familiar with the process. Before you optimize the first time, you’ll want to set your wait/walk and walking speed preferences using the sliders shown below.

Setting the wait/walk slider to “Minimize Waiting” may result in more criss-crossing the park. Setting it to “Minimize Walking” may mean slightly more time in lines or between attractions in order to keep your walking time down. The Walking Speed slider controls how much time the plan allows to get from attraction to attraction.
After you set the sliders, go to the bottom of the screen (just above the map). Click Optimize or Evaluate, whichever is your preference. You’ll see a spinner as the plan goes to the server, and it may take a few minutes for the calculations to come back.
When the optimizer is done you’ll see that the step times are filled in on each card. At the end of the steps you’ll be able to see the total time for each of In Line, Busy, Free, and Walking. These totals are one of the features that are only available in the web browser, and they are very useful if you want to try changing around the order of your steps. You’ll know instantly if you’ve made things a lot worse than what you got from the computer overlords!
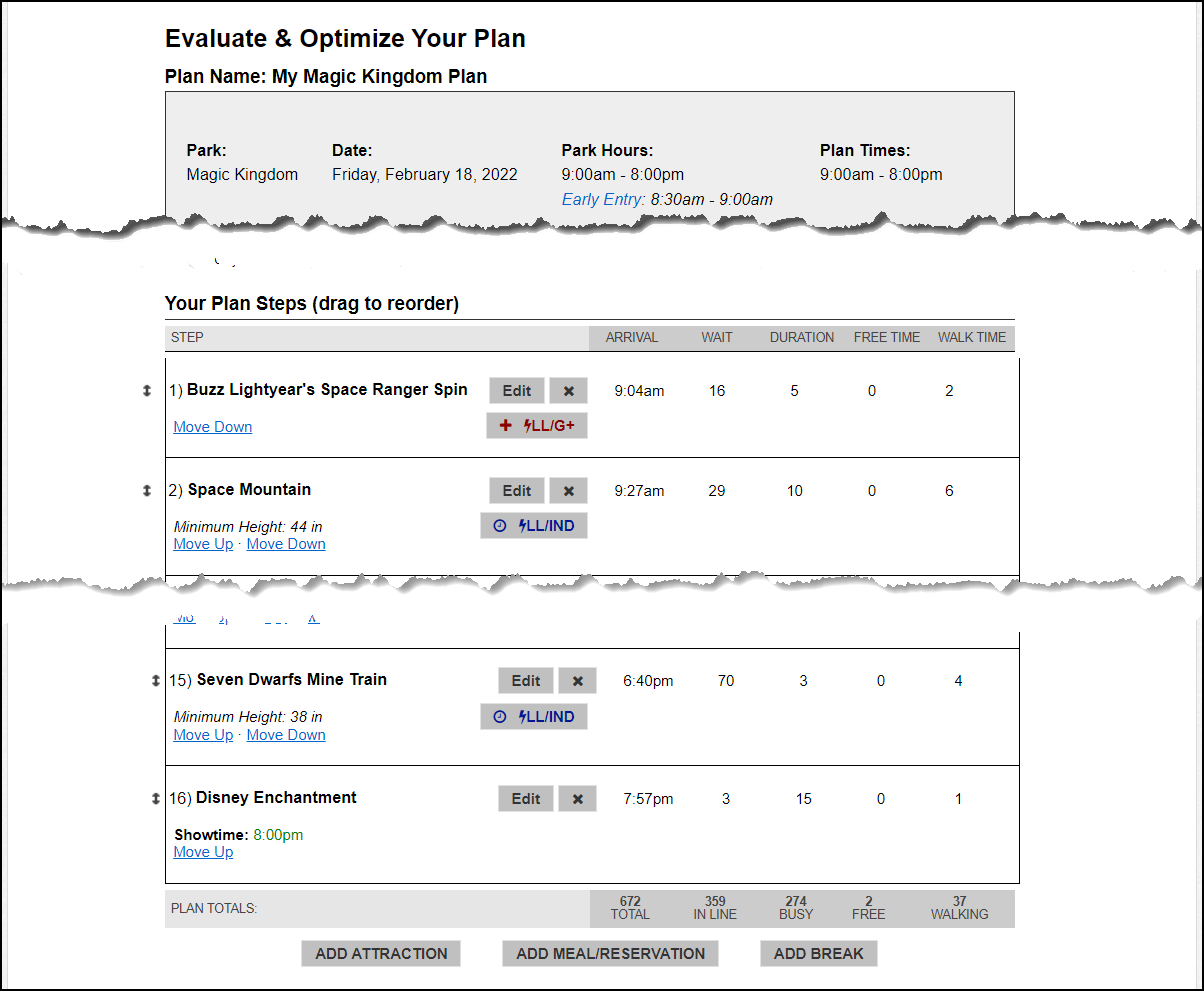
One thing to know when using Evaluate is that for any step such as a meal or Lightning Lane reservation that needs to be at a specific time, you may need to do a bit of tinkering with the step order to ensure that those events are in their “proper place” in the timeline. You can adjust the order of the steps either by using the “Move Up/Move Down” buttons on the bottom left of each card, or by simply grabbing the card with the mouse and dragging it to the correct location.
There are a couple more things to mention here: the Map and the history. These are the other features that are available only in the browser, and they are very useful.

Underneath the Evaluate/Optimize box, you’ll see a high-level map of the park with the order of your steps marked onto it. This is your chance to look and see how much criss-crossing you’re doing and if you want to try to make any adjustments.
All the way at the bottom, underneath the map, you can see the calculation history for the last several times you optimized or evaluated. Clicking “Activate Old Result” next to any of the plans will bring back the calculations for that older version and make it current. If you’re experimenting, it’s like an undo button — but it’s even better because you can undo 3 or 4 steps at one time if you choose.
Modifying a Plan
To adjust the order of the steps: grab the cards and drag them, or use the “Move Up / Move Down” options at the bottom left of each card.
To add an attraction, meal, or break: use the buttons at the bottom of the plan, right underneath the totals.

To add a note to a step, or edit the details of a break or meal reservation: use the Edit button on the card for the step.
To delete a step: click the ‘X’ next to the edit button on the card for the step.
To edit the arrival/departure time, plan notes, or other basic plan information: use the Edit button in the plan header at the top.
When you’re finished, press don’t forget that you’ll need to Optimize or Evaluate to see the effect of your changes!
Making a Plan With Genie+
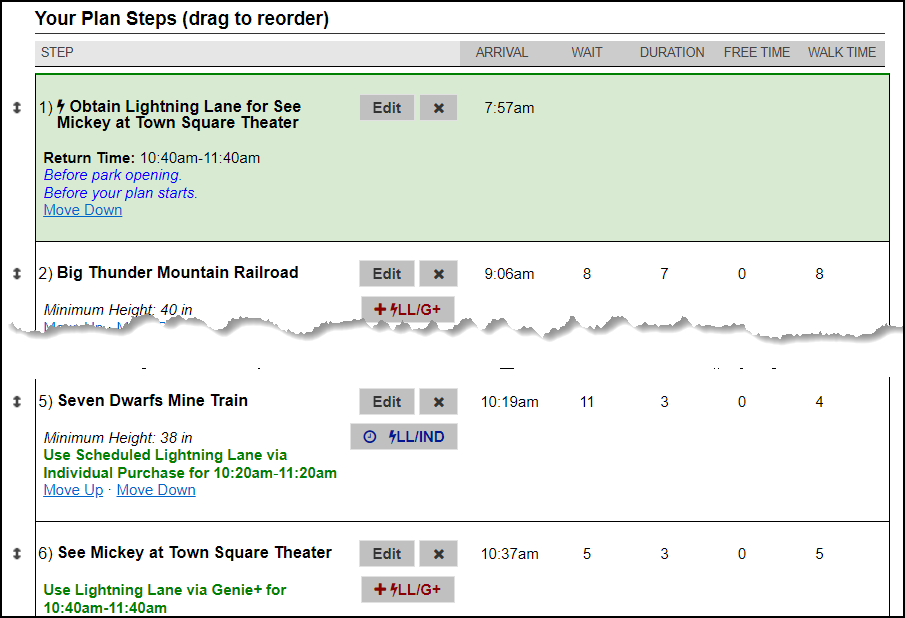
Begin at the top of your plan, just under the Basic Info section, and select yes in the yellow bar where you are asked if you’ll buy Lightning Lane access via Genie+. The Lightning Lane panel will unfold and allow you to select the earliest time that you’re willing to make a reservation.

When you optimize the plan, you’ll see that steps have been added instructing you when to get Lightning Lane reservations for specific rides. These steps include the estimated return time for getting a Lightning Lane reservation at that time. The corresponding attraction steps assume you’ll be using the Lightning Lane reservations you obtained.
One thing to know: many different Lightning Lane combinations will give you similar time savings over the course of the day. If you reoptimize the plan, you’re likely to see that the Lightning Lane recommendations have changed to a different set that will give you a similar amount of time both in the parks and waiting in line. If you really like the specific recommendations from a particular optimization, you may want to use Evaluate to retain them.
With Evaluate
If you don’t like the recommendations that the optimizer is making for LLs, you can try putting in your own. Clicking the +ILL/G+ button next to the ride name will add the Get LL step, and you can move it where you want it. Editing the step will allow you to specify when you’ll be getting it if it’s a pre-opening LL. If you do this, you’ll need to use Evaluate or the optimizer may override your step. But when you Evaluate, you’ll see the return time forecast for the Get Lightning Lane step, which can be used to order your plan appropriately.
This can be a good way to get a picture of how your day will go, but it’s easy for a forecast to diverge from reality once you’re in the parks. We don’t recommend using Evaluate with Genie+ when you’re actually in the parks unless you’re an experienced user.
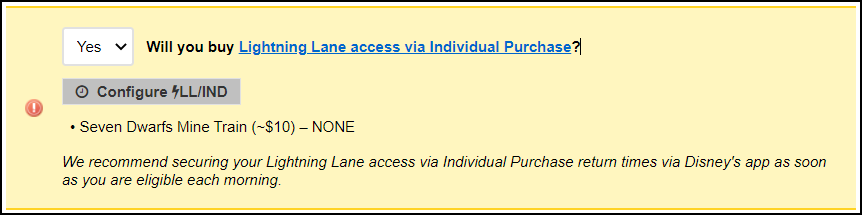
Adding Lightning Lane Reservations to Your Plan
For Individual Lightning Lane reservations, you’ll need to add these manually. If you’re planning DAS selections, you can add them as additional Lightning Lanes (this is slightly different from the app, where you can mark them as DAS.)
Similar to how the Lightning Lane section unfolded when you changed the dropdown from No to Yes, there are two additional sections that can be unfolded this way. The first shows a button to add Individual Lightning Lanes – underneath it will indicate which ILLs are available and our best guess as to what the price will be.
The second allows you to enter Lightning Lanes manually instead of using the optimizer; these times can be used to represent DAS selections. This box also shows an option to force the use of Lightning Lane times you’ve obtained – whether or not they’ll give you the best plan. This can be useful if, for instance, you need the LL to occur at a specific time because of plans you’re making with others who won’t be touring with you the whole time. But in general you’ll want to leave it set to No.

ILLs and Additional LLs are very similar, so I’m only going to show Additional LLs here. Tap the gray button marked “Configure Additional Return Times” and a pop-up will appear. Use the drop-downs to select the attraction and the start time of your LL window. If you have more than one time to enter, click the “Add Return Time” button (highlighted in the screenshot below), and a new row will appear that you can fill out. When you’ve entered all the LL’s you plan to get, click “Save”.

After clicking Save, you’ll immediately see your reservations in the window. Don’t forget that you’ll need to Optimize or Evaluate in order to see your reservations reflected in your plan steps.

If you’d like to edit the reservations you’ve made, or to add more, just click the same button again to return to the pop-up. If you’d like to add the corresponding step to make the LL reservation to your plan, find the attraction card and tap the LL/G+ button. It can be useful to add this step before Evaluating, to get an idea whether the expected LL return time matches up with the time that the plan predicts you’ll arrive at the attraction.

Warning: If you’re adding Lightning Lanes manually, remember that unless they’re a DAS Advance selection you don’t really have that reservation until you make it in MDE on the day of your visit. Also, putting it in your plan in advance doesn’t guarantee that Disney will give you the time you’re shooting for! Make sure and remember to clear out any “phantom” times before you actually start touring.
Troubleshooting FAQ
Hopefully you’ve found your way through everything, but here are answers to some frequently asked questions. If you don’t find your answer here, please submit a ticket and we’ll do everything we can to resolve your problem.
I know I added a meal/break in the “Add Meals & Breaks” step, but I don’t see it on my plan.
Most likely you didn’t click “Add To Plan” before clicking the button to proceed. If you fill out the screen and then simply click proceed without actually adding the meal (or break) to your plan, you won’t see it later. The good news is this is easy to fix — just select “Add Meal/Reservation” or “Add Break” at the bottom of your plan steps, and you can add in what’s missing.
I canceled a Lightning Lane, how do I remove the time from my plan
Go back to the LL button that you used to enter the reservation and open the pop-up. You’ll see a trash can to the right of each entry: use this to delete the reservation time.
I want to add a reservation, but I can’t find the experience.
A very few reserved experiences such as Bibbidi Bobbidi Boutique and Savi’s Workshop are directly supported in plans; when you click “Add Meal/Reservation” you’ll see these under “Non-dining experiences”. For all other experiences such as Dessert Parties, Tours, etc., you’ll need to represent your reservation in your plan by using a Break. You can give the Break the name of your experience, and if desired you can put the confirmation number in the notes for easy access.
I optimized my plan and there’s a huge break in the middle that I don’t really want
If you don’t want to add more attractions to your plan, the easiest way to address this is to change the end time of your plan. If your plan ends at 8 p.m. and the break is 2 hours long, changing the end time to 6 p.m. should close up the space so that you’re touring continuously.
I have a DAS reservation that doesn’t have an end time, how do I get the plan to see that?
DAS Advance Selections that are made prior to arriving in the parks have an end time, exactly like the Lightning Lane reservations. However, DAS reservations that are made while touring (either in the app or at the blue tent) do not have an end time. Unfortunately, Lines isn’t able to recognize that your DAS reservations don’t have an end time, but there is a workaround that should help many people.
Let’s say you have a same-day DAS reservation for Big Thunder Mountain at 2 p.m. If you’re fine doing the ride between 2 and 3 p.m., great! You don’t need to do anything. If, for any reason, you’d prefer to do Big Thunder Mountain between 4 and 5 p.m., then enter the reservation time for 4 p.m. You’ll know that in reality you can ride any time after 2, but the optimizer will put the attraction into your plan around the time that you want to experience it.
Still don’t see your answer? Check out the Personalized Plans section of our Help Center.

You May Also Like...
-

Using the Lines app with a Touring Plan can save you hours in the parks. Here's your how-to for creating one,…
-

On February 27, 2021, we did another side-by-side touring plan test. This time we were at Disney's Animal Kingdom. We did…
-

You can create a custom touring plan for just about anything. And so when I asked fellow Star Wars geek Guy…
-
It's finally here! We know you've been waiting so very patiently, and we're thrilled to announce that customized Touring Plans for…
The updated website looks great, but isn’t reflected here in this important post; would make this content easier to figure out.
Dang! The folks at TP are on it!
Thank you for the clarification of the color coding. I thought that may be the case, but could not find an answer anywhere and my mind would not let it go! So, thank you. My mind will shut up now!
I have been reading all morning on the TP site with little luck or resolution to several questions/problems. We have always relied on the computer overlords to plan our days in the parks, but after losing the greatest thing on Earth, Fast Pass, I am now trying to work with Genie+ inside of the TP planner. I understand they are not integrated, I am just having a hard time understanding why, although I have all of the right boxes checked before I start building the day and after all of the attractions are chosen, why it does not show me when to obtain the LL? It shows all of the available attractions, just not a time for me to book the pass? I understand that this is not a “tech support forum” but can you point me to maybe a video or your or others that is specific to building a plan with Genie+ at DL on the website? I think I have read almost everything of the TP site but have not moved to the videos, as there are many.
Hi Timothy, we don’t have any videos or other resources, but here’s a plan I made quickly that you should be able to see. Try recreating this as a walkthrough and you may be able to see where you’re going wrong. Make sure you have selected in the yellow areas that you will be using Genie+ and you’ll get your first Lightning Lane at about 8 AM. Although you may not get the same LL recommendation I got, you should get an “Obtain LL” step – you’ll have 7 before you optimize and 8 afterwards. To find the obtain LL step, just look for the one that’s “blank” across the times grid; it won’t show wait, walk, etc. times.
https://c.touringplans.com/plans/print?id=5046792
Is there any way you can edit the post to add the color coding of the LL recommendations? For instance, what it means when its, red, blue, black, an so on. I know, for me, that this would be a great addition to an already incredibly in-depth tutorial.
Thanks for all that you do!
Hi Timothy, the LL buttons shown in the post aren’t recommendations – they’re just tools to let you add steps that represent the process of getting the Lightning Lane. Blue is for Lightning Lanes that are part of ILL; red is for Lightning Lanes that you can reserve using Genie+.