
How to Use Lightning Lane Multi Pass at Disney World: Step by Step
Are you heading to Disney World? Got a little extra in your pocket to skip the line on a few attractions? Here’s what you need to know about how Lightning Lane works. We’ll cover how to buy and how to use Disney World’s Lightning Lane Passes — both the Single Pass that’s good for an individual attraction, and the Multi Pass that lets you access a bundle of Lightning Lanes in one package. We’ll also talk a tiny bit about Lightning Lane Premier Pass.
Just have a quick question and don’t want to page through the whole step-by-step walkthrough? Tap any of the links below to jump straight to that section. As you go, tap on any gallery to expand the images to a larger size.
- Disney World Lightning Lane Overview
- Buying Lightning Lane Passes
- Modifying your whole Multi Pass
- Modifying individual Multi Pass Advance Selections
- Modifying a Lightning Lane Single Pass
- Tips for using Multi Pass in the park
Disney World Lightning Lane Overview
Many Disney attractions have two lines: a traditional standby queue and a Lightning Lane. Guests can enter the standby queue when they get to the attraction and wait until their turn to ride. Or, guests may enter the Lightning Lane; since the number of people who can use the Lightning Lane at the same time is limited, this wait is shorter – typically less than 15 minutes.
Lightning Lanes are part of the Disney Genie day planner in the My Disney Experience app, where guests can view their return times along with dining reservations, Virtual Queue boarding groups, Disney hotel reservations, and other activities. Guests can use the Lightning Lane after purchasing Lightning Lane Passes.
There are multiple Lightning Lane Pass types. With Single Pass and Multi Pass, you’ll need to make ride reservations. Lightning Lane Premier Pass lets you ride at any time during the day, but it costs about 10 times as much. This article will mostly focus on Lightning Lane Multi Pass and Lightning Lane Single Pass, since no scheduling is needed for the Premier Pass.
Lightning Lane Booking Windows
Lightning Lane Passes can be reserved in advance of your day in the parks. All guests staying at a Disney Resort hotel, regardless of ticket type or need for park reservations, can begin booking at 7 a.m. Eastern, 7 days in advance of their arrival date. At that time you can make reservations for your entire stay up to 14 days. This 7-day advance booking window is also available to guests at the Swan, Dolphin, Swan Reserve, and Shades of Green.

Guests with date-based tickets can begin buying Lightning Lane Passes at 7 a.m. Eastern, 3 days in advance of their ticket start date, and can make reservations for the length of their ticket at that time. For guests with tickets that need a park reservation, you can book three days in advance of your reservation date and must book one day at a time.
No ride selection is needed when you buy Lightning Lane Premier Pass, but the same booking windows apply. Guests who are staying at a Disney Resort hotel, or the Swan, Dolphin, Swan Reserve, or Shades of Green — can purchase Lightning Lane Premier Pass beginning 7 days in advance of their trip. Other guests can begin purchasing 3 days in advance of their ticket start date or park reservation.
Note: Guests outside the U.S. and Canada were not able to purchase Lightning Lane before arriving in the U.S. prior to October, 2024. This has changed and they are now able to purchase in advance on the timetable above.
Single Pass vs. Multi Pass
Single Passes are reservations for an individual ride, whereas a Multi Pass allows you to reserve a Lightning Lane for any of the included attractions. Important Note! — for a specific attraction, the Lightning Lane will be offered only through Single Pass or Multi Pass, but not both. So for Avatar: Flight of Passage, you must buy a Single Pass. But to ride Kilimanjaro Safaris through the Lightning Lane, you must purchase a Multi Pass for Animal Kingdom.

There’s one last thing to know about advance booking for Lightning Lane Passes, which is that three of the four parks use a tiering system. When making your three Multi Pass advance reservations, you can only select one of the park’s designated “headliner” rides. But once you get into the parks and begin redeeming your Multi Passes, you’ll be able to choose any attraction that’s available. And that includes attractions in another park, if you have Park Hoppers!
For the most up-to-date list of which attractions are included in Single Pass and Multi Pass for each park, as well as tier information, see Disney’s lists for Magic Kingdom | EPCOT | Hollywood Studios | Animal Kingdom. And now, on to the walkthrough!
Buying Lightning Lane Passes
Before getting started, you’ll need a few things.
- You’ll need to be joined to everyone you want to buy for in Family & Friends on My Disney Experience.
- You’ll need to have the My Disney Experience app installed. (Apple | Android).
- You’ll need to have admission for the date you’re trying to book.
- And if your ticket needs one, you’ll need to have a park reservation for that date as well.
Annual Passholders will find that they can purchase without a park reservation, but won’t be able to reserve any Lightning Lane times earlier than 2 p.m. unless it is a Good-to-Go day. And as far as admission goes, upcharge event tickets like After Hours and Mickey’s Not So Scary Halloween Party will not enable you to buy Lightning Lane passes if you don’t have any other admission.
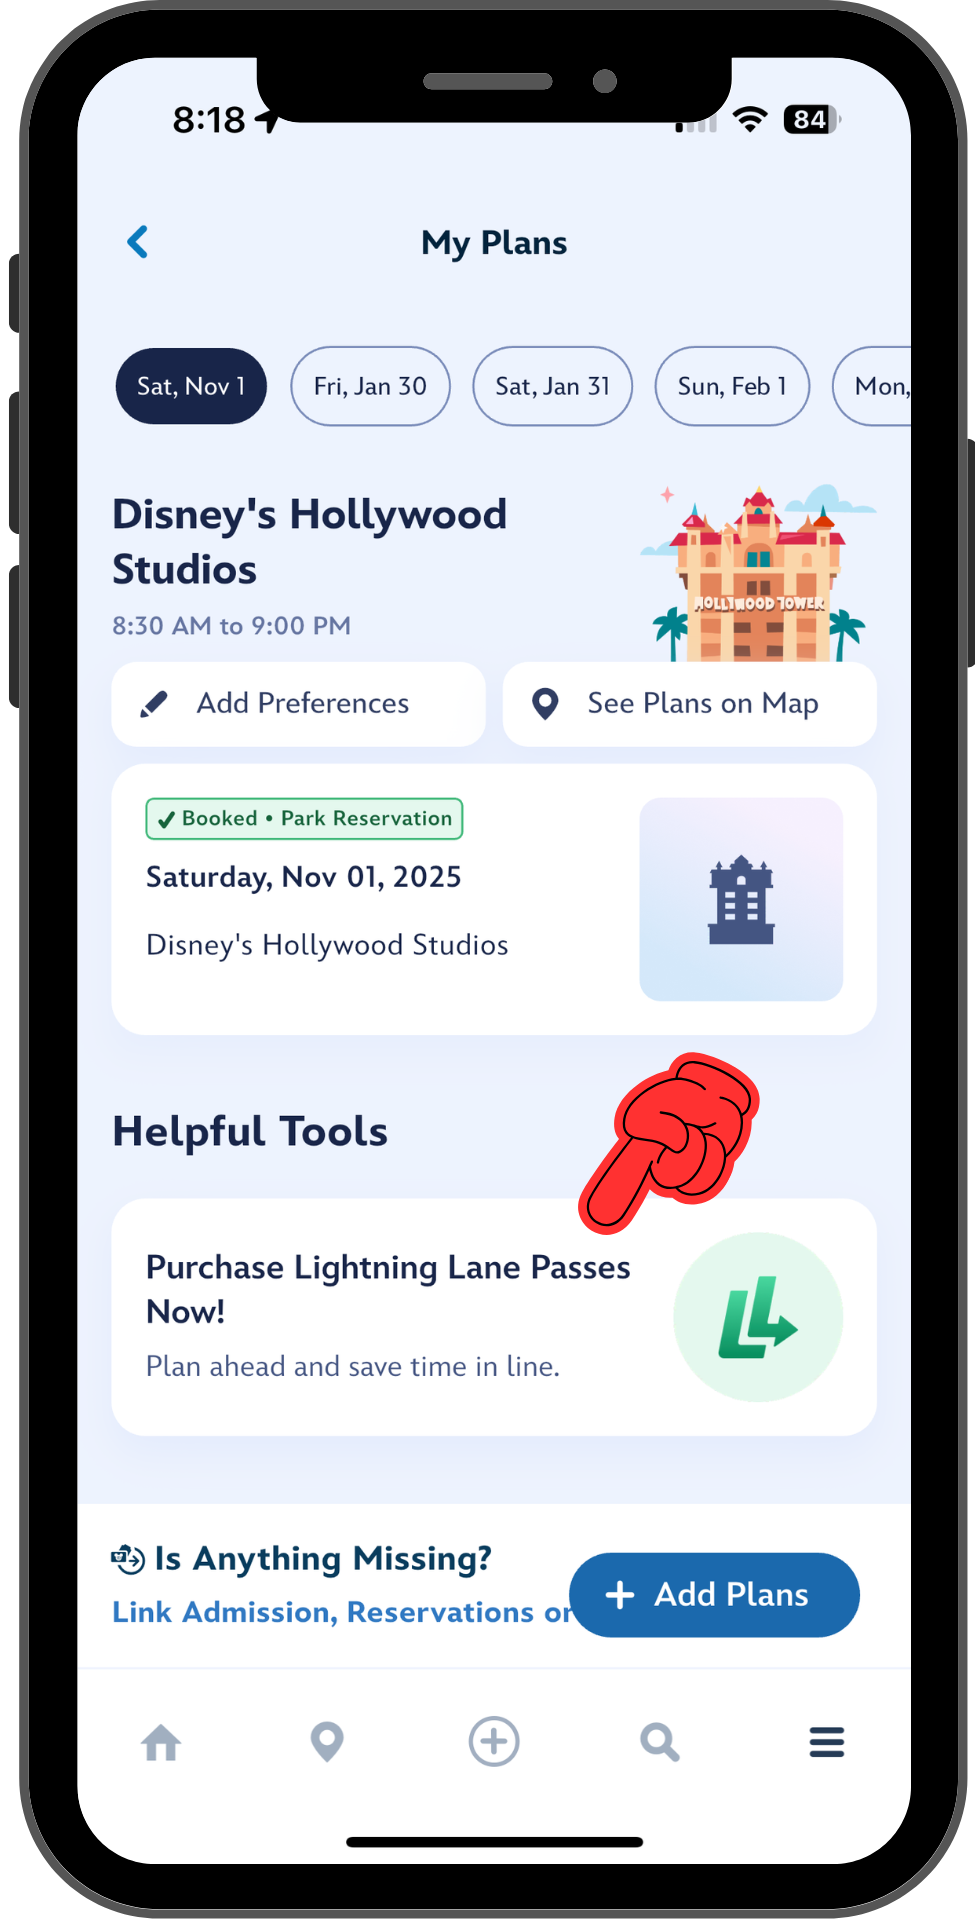
Once you’re set, you’ll see that you can begin purchasing Lightning Lane Passes from many places in My Disney Experience. (Disney is happy to take your money – they want to make sure you can find it.) Three common locations are a banner on the Home screen, a dedicated Lightning Lane Passes tile on the Tile Screen (tap the hamburger icon on the bottom to get here), or the My Plans screen.


You’ll first be asked to select the date, then the park; prices for both Multi Pass and Single Pass vary by date and Pass selection. You can only buy a Multi Pass for one park, but you can buy up to 2 Single Passes in the same transaction. While purchasing, you must include the same group of people for each Single Pass, Multi Pass, and Multi Pass advance selection. Once you’ve paid, you can modify the Multi Pass advance selections and change some of your group to different attractions or times. Lightning Lane Single Passes can also be modified.


After making your selections and scrolling to the bottom, press Continue and you’ll see the per-person price for your selections. Press Continue again, and you’ll be prompted to choose your party. If someone you plan to buy for isn’t eligible, you’ll see a message about why. It could say that they don’t have a ticket, that they don’t have a park reservation, or that their window isn’t open yet. Or, if you selected items from different parks, you might see a message that the guest isn’t able to visit multiple parks in the same day.
If you’re not eligible yourself, you might wonder why the system didn’t tell you sooner – and the answer is that you don’t need to include yourself in the party! You can buy for your teenage kids who are having a park day without you, or whatever, and the system doesn’t have any way to know who is eligible for what until it sees what you are trying to buy.
You’ll see the subtotal update at the bottom of the screen as you add and remove people. Once that’s done, pressing Continue will bring you to the screen where you’ll choose your Multi Pass attractions. (If you select a Multi Pass and a Single Pass that are in different parks, you’ll be asked which park you plan to visit first on the way to this screen.) As you choose attractions, other options will “gray out” to indicate how many selections you have left – you don’t need to reserve all three attractions in advance, but you do need to pick at least one.


After pressing Continue, you’ll see suggested times for your Multi Pass return windows. These are easy to change by tapping “Modify Time” at the bottom of the attraction card and selecting a new time. Your selections will be held for 5 minutes as you tinker and adjust; there’s a timer visible at the top of the screen.


The system will automatically choose the earliest times that it can find. It prefers to suggest non-overlapping windows if possible, though you may see return windows with a very significant overlap (we have seen up to 40 minutes). But when you try to modify, the system is reluctant to show you times that have more than a 15-minute overlap.
Once you’re set for this date, scroll to the bottom to check out and complete your purchase. You can pay with your stored payment method in MDE, a new credit or debit card, or one or more Disney Gift Cards. Once you’re done, you’ll immediately be able to purchase for a different day. You’ll also be able to see the Passes you’ve booked on your My Plans screen in Genie, and under the Lightning Lane Passes tile on the Tile screen.


Modifying Your Whole Multi Pass
Lightning Lane Passes are non-refundable, but if you change your plans you can adjust the date or the park. Head to the Lightning Lane Passes tile on the Tile screen, and tap the card marked Lightning Lane Multi Pass. Select “Modify Lightning Lane Multi Pass” from the pop-up, and then follow the prompts. You’ll be able to modify the pass for some or all of your party.
The workflow will be almost the same as when you originally purchased; if the new date or time has an additional cost then you’ll need to pay the difference. (If it’s cheaper, Disney will not give your money back.) If you choose the same park and date, then you’ll be able to modify all of your pre-selects at one time.


You can adjust the date and park up until park opening of the date that you made your Multi Pass for. After the park has opened on that day, our testing has shown variable results on being able to modify your entire pass. We will update as we have more information.
Modifying Individual Multi Pass Advance Selections
Whether you’re modifying a single pre-selected Multi Pass in advance of your visit, or changing one that you’ve made while you’re on the go in the parks, there is an easier way. Instead of tapping the card for the whole Multi Pass, tap the card for the attraction instead. Choose “Modify Selection” from the pop up, and you’ll see the option to change either the time or the attraction.


When making your changes, you can modify the pre-selected Multi Pass for all or some of your party. You can also enter this workflow from the attraction Multi Pass card on the My Plans screen, and once you are in the parks and using your Multi Passes. Depending on where you’re coming from, you might be prompted about changes to the party, or you may have to find the option and select it. But otherwise, the process is pretty similar.
You might also notice a little warning that the arrival window has changed under the selected time. Just as when you first bought the Multi Pass, your selections will be held for 5 minutes. But, this message is alerting you that the time you saw on that first Modify Experience screen above is no longer available.
When you’re done, scrolling to the bottom confirms which Multi Pass you will be changing out for your new selection. You are not done until you press the Continue button here and see the confirmation screen with your new booking.


Modifying a Lightning Lane Single Pass
The workflow for modifying a Lightning Lane Single Pass is similar to modifying for a whole Multi Pass, shown above. But, there are a few things to note. First, you’ll only be able to modify if there is availability (Duh!). Second, like with changing your Multi Pass date or park, you’ll need to pay the difference if your new selection costs more. And, just like with Multi Pass, if your new selection is cheaper you do not get a refund.
Tips For Using Multi Pass In the Park
⭐ You can make a new Tier 1 selection as soon as you’ve tapped into your first Lightning Lane of the day. If everyone isn’t going to be riding the same thing, make sure the selections aren’t too far apart in time. Otherwise you’ll be blocked from making a new Tier 1 selection – or one in a different park – until everyone has tapped in somewhere.
⭐ Keep an eye on what’s available throughout the day. Disney sometimes refills new slots for attractions or times that were “sold out”.
⭐ To avoid disappointment, make sure you see the confirmation screen or view the reservation in the My Plans screen whenever you modify a Lightning Lane selection. The workflows are a tiny bit different depending on how you start them, and it’s easy to accidentally edit in the middle.
⭐ You can’t ride an attraction through the Lightning Lane twice in one day. However, you can modify a Multi Pass to another attraction – say, switching Living with the Land to Spaceship Earth – and then rebook Living with the Land as a new Multi Pass later on.
⭐ Letting a Multi Pass expire counts as riding it! You can enter the Lightning Lane for a little while after your pass has technically expired (usually 15 minutes), but if you know you’re not going to make a reservation window, modify your Pass to something else before it expires so that you can get another Multi Pass for that attraction later.
Have you used Lightning Lane Multi Pass in the parks? What are your favorite tips? Let us know in the comments!
(Originally published July 26, 2024. Last updated November 1, 2025.)
You May Also Like...
-

Beginning July 24, guests at Disney World will have a whole new way to access the Lightning Lane — including the…
-

A Lightning Lane is an alternate line to enter an attraction at Disney World or Disneyland. It will generally have a…
I haven’t seen this questions answered.
If we buy multi lane pass for Animal kingdom Dinosaur ride and we don’t reserve the other 2 selections. As soon as we use the Dinosaur ML pass, can I then book 3 Epcot tier 1’s immediately as long as they are available?
Hi David, yes you can. As long as you have *tapped in* (not just let your reservation expire), the restriction on making reservations at other parks and having more than one Tier 1 reservation is lifted.
Hi Jennifer,
this is so helpful. We are staying off property but considering (I know, crazy, bear with me) adding an on-resort room as we have an infant and would like a nearby space during our two park days. Specifically, our stay in Monday to Saturday, but we are only doing WDW parks Tuesday and Wednesday. I’m wondering if I booked a stay checking in Tuesday and checking out Wednesday, would I be able to access the LL window 7-days in advance of the Tuesday check-in for *both* park days on Tuesday and Wednesday? Or would it only let me know use the 7-day window for check-in day? Trying to strategize whether the add’l room is worth it or not and the added bonus of 7-day LL is tempting. Thanks!
Hi CJ, I have good news for you. Disney is clear that any benefits you get from a stay apply to every day of your visit inclusive of check-in and check-out days. You see this other places too, where guests at a Deluxe resort can attend Extended Evening Hours even if they fall on a check-out day (and therefore happen after the guest has already checked out of their room.)
So, you should be good to go on the extended window for both check-in and check-out day.
Also, I have three kids and I would never call anyone crazy for any choice they make to make life with kids a bit easier. Sometimes, ya do what ya gotta do! From experience: visiting the front desk when you arrive at the resort (instead of just relying on the arrival time you put in when you do online check-in) is more likely to get you into a room before the official check-in time of 4 pm. Nothing is guaranteed, but if I was hoping for a mid-afternoon space for a nap, I’d visit in person if I didn’t get a room notification from the app by then. It’s a little out of date, but you might also enjoy this article if you’re trying to find a quiet place in the parks.
https://touringplans.com/blog/the-art-of-the-walt-disney-world-nap/
Have a great trip!
Is it worth it to get a multipass if you have a DAS pass in your group? If so which parks would be the best to get one for? We are headed to DW 2/15-2/22 and crowds look like they are going to be pretty heavy. Or is it better to just get LL single passes? Thanks!
The short answer – maybe, it depends on how you tour and what you’re trying to do. There’s a long rundown of the specific differences between DAS and LLMP in our DAS FAQ here: https://touringplans.com/blog/everything-you-need-to-know-about-disneys-disability-access-service-das/. That should help you understand why you might (or might not) get value from the LLMP if you also have DAS.
Hi. We will be in Disney in February. I want to be sure I understand something. I plan to get LLMP for most or all of our park days. Can I also get a single pass for my entire party for a day that I also purchased a multi pass since you get different rides with depending which pass you have? Thank you for this very informative article. I was getting a little anxious about having to learn a 3rd queue system, but this helped so much.
Hi Danielle, I’m glad you find this helpful! Yes, you can get up to two different Single Passes on the same day that you get LLMP. (If you’re not in the Magic Kingdom, you’ll need Park Hoppers to make the two LLSPs work.) You don’t have to have the same party on the LLMP and the LLSPs unless you want to do them in a single purchase. Have a great trip!
Hello! We will be traveling to Magic Kingdom on December 4th. My mother-in-law was kind enough to buy 17 tickets for her kids and grandkids to all go on the same day. She did not buy lightning Lane passes, and we would like to get them for our family of four. Is there a way we can control our own purchase and our own scheduling through the app, even though all of the regular tickets are under her account? If she adds us through friends and family, can We sign in with her login so we can have access and control our own day through the lightning Lanes? I am confused if she has to be in charge of everything, and if so that’s going to be absolutely terrible! Thank you so much for your help!
Hello! We are heading to Magic Kingdom for the first time next week (Dec. 4). My mother-in-law bought tickets to Magic Kingdom for all of her kids and grandkids … Around 17 people in total. She did not buy lightning lane passes, and we would like to buy them for our individual family of four. Is there a way that we can access her account through the Disney app so that we can reserve our own slots throughout the day, or does she have to control everything through her phone because she bought the initial tickets? I’m very confused about this. If we have access to her login, can different families log into the same account from different phones? Thank you so much for your help!
One question regarding updating a full multi-pass: if you click to modify as shown in the screenshots, but don’t prefer the updated selections/options can you close out and keep your original selections? (Or do the original selections get released when you start the process to modify?) Thank you!
Yes, you can always investigate and then back out up until you select a new time and then tap Continue. You may even be able to still back out until you’ve edited your party and tapped the second continue button, but I’m less confident about that. Anyway, you can check to see what’s there without fear of losing what you have booked.
Hi, you said the party for LLMP & LLSP has to be the same when booking but what if we’re booking for MK and our youngest doesn’t need a LLSP for tron?
Hi Teresa, in that case you’ll need to do the LLSP as one transaction and the LLMP as a separate transaction.
Ok thank you. Which should be the priority to do first? LLMP or LLSP if we can’t do it in same transaction ?
Thanks, if having to book separately what should be the priority? LLMP or LLSP?
It will depend which LLMP and which LLSP, and how far in advance you are trying to do it. In general it doesn’t matter, you will be able to get both. It’s not like with Genie+ where everything was gone in seconds for some rides.
This is probably the best and easiest lightning lane explanation I’ve read. So, Thank you!
You’re welcome. I’m so glad it was helpful!
Hi, this question was touched upon in another comment, but I’m looking for further clarification if possible. Our group of 6 will be staying onsite, so we will be ready to begin booking at 7am, 7 days prior to our first park visit. We will be going to the parks for 4 consecutive days, Monday – Thursday. When the booking window opens, can we have 1 person in our party work on the passes for Monday and Tuesday, while another person in the party is assigned to work on the passes for Wednesday and Thursday? Like this, we feel it would be more efficient in making our choices as quickly as possible.
Another question, I’ve often seen in YouTube videos where the presenter has been able to find earlier ride times by refreshing the app throughout the day. Nearly always, this is a party of just 1 person. Is this why they are having more success in doing so? With our group of 6, are we going to find it a lot more difficult to find new availability open up? I’m not sure if perhaps Disney might release chunks of inventory at staggered times throughout the day, rather than just depending on other guests cancelations and modifications.
Hi Chris, you have two questions, I have two answers, one short and one long.
1 – Yes, you can have two people work in parallel to each book two of the four days. Just make sure you don’t have both people trying to book the same day.
2 – We do know that for a number of rides Disney “refills” inventory a few times throughout the day. Sometimes those times are predictable, and a little online research might tell you to check at very specific times for individual rides that you’re interested in. But also, the refresh game does work, there is a fair amount of churn just from other people canceling and modifying.
We don’t have any data to say whether it’s easier to snag spots when you only have one person, and since the controlled experiment is quite difficult to set up (especially since it can’t be done for free!) we’re unlikely to get it. But, I can offer you some anecdotal experience. I have three kids and in the Fastpass+ era (where refreshing was very similar) I was reasonably successful with it for groups of anywhere from 5 to 8. Past performance is no guarantee of your success, but it’s also true that it’s a credible hypothesis that Disney returns “times” and not “times for groups of n people”. If you look at the workflow, you’ll see that you don’t get asked whose pass you’re modifying until after you’ve made your new selection — so when doing the search, MDE doesn’t know whether you’re looking to change everyone or just one person. It could be that you’d see something different if you only had one in your party, but I think it’s more likely that Disney assumes party sizes will come out in the wash and is just returning times.
Have a great trip!
Thank you so much for your answers, they were really helpful. I did think of one other question though (sorry!). From our group of 6, two of the people are in the UK. I’ve read about the restrictions on purchasing LL outside of the USA/Canada, as well as the potential workarounds. But in our case, as long as all 6 people are connected on MDE, then if I am the one that will book the LL reservations for the entire party (and I’m in Florida), the fact that two of the people are in the UK shouldn’t matter, right? Just trying to be as prepared as possible, and make sure I haven’t overlooked any potential obstacles come 7am on booking day!
Correct. It only matters that the phone being used to set up the LLMP / LLSP is located in the USA/Canada.
Here’s an issue that I’d love to see if anyone else has encountered. I just made our Lightning Lane reservations for our upcoming trip. I booked Tiana as our Tier 1 LL reservation, and it shows up under “My Day” with the assigned return window. When I click on that reservation for further details, it still shows the reservation, but there is red text at the top that says “Use Virtual Queue Only”. So, do I have an LL reservation for Tiana or not? If I go into the app as if I want to modify my LL selections, it will allow me to make another Tier 1 reservation, and Tiana is shown as “not available”. That’s different that my Tier 2 reservations, which show as “already booked”. I don’t want to make another Tier 1 reservation if it’s going to kick me out of a Tiana spot, but I don’t want to let me Tier 1 reservation go to waste if they decided in the last 12 hours that they’re going to run Tiana as Virtual Queue only and are just doing a really bad job of communicating that in the app! Any thoughts would be appreciated!
Hi Glenda, I suggest that you contact Disney. It does sound like the right hand (booking engine) doesn’t know what the left hand (reservation list) is doing in your MDE app. Better to get it straightened out in advance.
Have a great trip!
Worth reading indeed. Thanks for sharing.
Day of after you use one and go to book another, will the system give you the next available time or can you choose a later time if it’s available? Do you have to book first and then modify or will it show you options on the screen?
Hi Tara, it will show you the next available time but you can choose a later time before you complete the booking. If you look at the screens for modifying a single Lightning Lane, the workflow is very similar except that you won’t see the “choose a different time for this attraction” option – just a list of Lightning Lanes that you can select. So if you look at those screens, you’ll see that the tile for Living with the Land shows “Earliest available time” when it’s in the list. But, when you select the tile, then it picks a time but you can modify it right away before finalizing everything. It’s very fast and easy.
Hi Jennifer! If I am planning to park hop and don’t like either options for my Tier 2 selections can they be cancelled or modified to a different park after I scan into my first ride? If I have Remy at 9:45am and Figment at 12:35 can I change Figment to a ride at MK or do you have to use all three passes in your starting park?
Hi Leah, after you scan in to your first ride all restrictions are off (well, aside from availability). So yes, you can modify/cancel your additional EPCOT Multi Passes as you suggest and change them for the Magic Kingdom.
Hi Jennifer! I have a question regarding this tip from your post: “You can make a new Tier 1 selection as soon as you’ve tapped into your first Lightning Lane of the day.” Am I able to book a Tier 1 LLMP if the first ride I scan into during the day is a Tier 2 ride? For example, if my first pre-booked ride of the day is The Barnstormer, am I able to then book a Tier 1 ride after that, so that I always have 3 total rides in my all account? Thank you!
Hi Dana, you’ve got it! If your first three rides are Barnstormer at 9 am, Peter Pan’s Flight at 9:45 am, and its a small world at 10:30 am, then you can book Big Thunder Mountain after tapping in for Barnstormer. You *must* tap in – prior to that, you won’t be able to hold more than one Tier 1 (or book in another park).
Have a great trip!
Thank you, Jennifer. This is where Disney’s verbiage gets confusing as far as Annual Passes go. Depending on how you interpret it, it appears to read that having a resort stay takes precedence over Annual Passholders’ three-day Lightning Lane booking rule, thus allowing Passholders to book 7 days in advance. If that’s the case, if I am staying on site from September 1 to September 7, I should be able to book all seven days of my resort stay on August 25, then on September 1 I should be able to book Lighning Lanes for September 8, on September 2 I should be able to book Lightning Lanes for September 9, on September 3 I should be able to book Lightning Lanes for September 10, etc. Could you please clarify that, Jennifer?
Hi Steven, we have not had an opportunity to test it but based on every other form of booking privilege we have seen from Disney we don’t think your interpretation is correct. When Disney writes that having a resort stay takes precedence over the 3-day booking rule, they are only applying that to the ability to book the days of your resort stay in advance. On days that you don’t have a resort stay booked the 3-day rule will be in effect. Note that although we have not tested it, your checkout day is typically included in your resort stay and we would expect it to be covered when your window opens on August 25.
Let’s say I want to be in the parks every day for a full 14 days, starting on September 1 and running through September 14, and I have a resort reservation from September 1 through September 7. I believe on August 25 I could book 7 days worth of lightning lanes for September 1 through September 7 (since September 7 is my final day at the resort). However, on September 1, could I book a lightning lane for September 8? And on September 2, could I book a lightning lane for September 9? in other words, could I continue to book lightning lanes on a daily basis from September 1 through September 7 for seven days ahead even though I will no longer be staying at the resort September 8 onward?
Hi Steven, the answer depends on your ticket type.
If you have a 14-day date-based ticket, then you can book from 9/1 through 9/7 beginning 8/25 based on your hotel stay. (It is actually probably through 9/8, but we haven’t had a chance to test and confirm yet.) BUT, from August 29, the window that is based on your ticket start date opens, and you can book through the end of your ticket on September 14.
If you have an Annual Pass, then beginning on September 5, you can book for September 8, and then each day individually from there on.
If you have a mix of date-based tickets (say a 10-day and a 4-day), and the 10-day is first, then it’s not 100% clear what will happen. With just the 10-day ticket, you could begin booking on August 29 and you would be able to book on any day through September 14. But, you would only be able to book a total of 10 days, because that’s all you have on your ticket. When you add the 4-day ticket into the mix, we don’t know if it will still let you access the whole window of your 10-day ticket even if the admission-eligibility is coming from your 4-day ticket.
Hey Jennifer! Where can I see TouringPlans recommendations on which rides to use Lightning Lane on and which ones to do standby? Thanks! 🙂
Hi Brendan, we do have a couple of posts on strategy and availability that were published before the release and are based on FastPass+ and Genie+ data. But so far, we’re not seeing a lot of stability around availability in the new system and it for sure doesn’t match what we guessed it would be very well. That is: there will be three key drivers here – 1) what do you want to ride, 2) how much time will you save 3) how likely are you to be able to get it same-day. Only you can answer the first, the answer to the third right now is “we don’t know, it doesn’t look like anything we’ve seen in the past”. So your best data is on our Lightning Lane page that shows the relative amounts of time saved https://touringplans.com/walt-disney-world/lightning-lane.
It’s clear to us that Disney is still tinkering with how they release capacity and what is available in advance vs. same day, so we don’t have anything good to write up right now. As we publish more articles and have updated data, we’ll crosslink them there, so if you bookmark this page and check it again in a few weeks it may have some more useful information about that.
Need some help with strategy and timing when purchasing tickets. Does the 3 day offsite hotel advanced purchase of Lightning Lane and booking of 3 attractions follow when you will actually visit a park or the ticket expiration window if you’re purchasing a date based ticket? The question is do you want to have the first date in your ticket window be as early as possible while still covering the dates you actually need available for your park visit dates to allow you to book Lightning Lane earlier than you could otherwise?
Hi Dustin, great question. According to Disney, you may begin booking three days from your start date, for any day in your ticket’s expiration window, exactly as shown in the graphic in the article. We have not yet had the opportunity to confirm this, but we have no reason to believe otherwise. We have also not tested whether you can buy Multi Pass for more days than you have on your ticket as long as they are within the window – that is, can you buy for all 4 days that your 2-day ticket is valid. But, Disney seems to have done a really nice job preventing people from accidentally doing things that don’t make sense, so we suspect when we do test it will turn out that the answer is you can only buy for 2 of the days in your 4-day window.
Hello and thank you for this article! I had a question re: this statement- “You can make a new Tier 1 selection as soon as you’ve tapped into your first Lightning Lane of the day. If everyone isn’t going to be riding the same thing, make sure the selections aren’t too far apart in time. Otherwise you’ll be blocked from making a new Tier 1 selection – or one in a different park – until everyone has tapped in somewhere.”
I have a member of the party who likely isn’t going to want to ride many of the Tier 1 attractions in MK with the exception of *maybe* Jungle Cruise. However, the rest of the party is likely going to want to do either Space or Big Thunder as their Tier 1 selection. I understand everyone needs to be booked for the same rides initially, but does everyone need to be tapped in somewhere for us to make a new Tier 1 selection? I guess I’m looking for some clarification on how a party member who may not ride certain rides affects the rest of the group’s reservations. Thank you again!
Hi Susan – I’m so glad you asked this question, because I didn’t want to bog down the article with a lengthy example but I knew someone would be in exactly your position. Let’s say your whole group has booked Buzz Lightyear at 9 am and Space Mountain at 10 am. When everyone taps into Buzz, you’ll all be able to make new reservations – any tier, any park.
But if you have everyone booked for Space at 9 am and Buzz at 10 am and your teenager “T” is passing on Space Mountain, that’s when you’ll see the problem. At 9 am when the rest of your party taps in, they’ll all be able to make a new reservation and T won’t. If you’re trying to reserve something that T doesn’t care about this might not matter – but if you’re trying to make the most of same-day availability for your entire group, it could. Canceling T’s Multi Pass for Space Mountain helps with this problem if you want to book another Tier 1, but not if you want to book in another park.
There are two solutions. The first is to make sure that you book Buzz first; then there’s no problem. The second is to modify T’s 9 am Multi Pass for Space Mountain to something else that they’re happy to ride at 9 am. That could be Jungle Cruise (another Tier 1), or something that T is happy to ride twice and the rest of the party doesn’t plan to get a Multi Pass for. (Because T won’t be able to get a second Multi Pass later to ride with the rest of the group.) A third option is for T to tap into Space Mountain with the rest of the group and use the chicken exit, but that’s probably the least interesting option for T.
Thank you for this detailed reply! Another question if that’s ok- on the day the booking window opens, can more than one person in the party be making reservations? So for example Person A is booking for Day 1 at Magic Kingdom, Person B is booking for Day 2 at Animal Kingdom, and so on, rather than just one person making reservations for day 1 at MK, processing the transaction, and then doing the same for day 2 at AK?
We have not tested this, but – we know that in the Genie+ era you can have one person do a VQ and one person do ILL or G+, or have one person do G+ while another person does ILL. I think this should work fine – just make sure that both people are putting everyone in the party b/c we haven’t yet tested if people who buy LLMP for the same park, same day, different transactions can “plan together” when they make future LLMP picks or adjustments. We do know (*have* tested) that if person 1 buys LLMP and person 2 is in their party, then person 2 can access / modify the selections, which is as you would hope.
Hi Jennifer – this ties into a situation that we may encounter in September. One of our party may need to work a couple of days during our Disney World visit, in which case he would stay behind at the hotel for the first part of the day and join us later in the park. Since we don’t know yet which days and what hours he may be working, I want to include him on our advance Multi Pass and Single Pass bookings. Do you think this will create an issue for the rest of us getting additional bookings if he doesn’t ride/isn’t in the park for the first or second booking of the day? And would it create a problem for him to get additional bookings if he joins us later in the day? I guess we can always cancel his booking the morning of the conflict, right?
Hi Glenda, my family has done this too – the pandemic has opened some remote working opportunities that have let us visit during weeks when one of us can’t take vacation. My husband calls it “being on PTO in the evenings”. Anyway – none of you will be able to hold more than 3 at a time, no matter how you’re using them. (There may be a little funkiness if rides go down, but we’ll assume everyone always has 3.) So if everyone else rides, and you cancel one of his, then everyone has a free one to rebook as a group … as long as the set of three doesn’t include two Tier 1 LLMPs or one that’s in another park. That’s where you’ll be able to book and he won’t.
If you’re not park hopping, then making a Tier 1 as your first stop of the day will give you one “turnover” before there’s a problem, because you’ll be canceling his Tier 1 and that frees up the slot. But if your next ride isn’t a Tier 1, then after that you’ll be limited to Tier 2 if you want to book as a group. You can decide that maybe he’ll just miss out on one of the ones you’ve booked. Or, if there’s any way you can get a “burner” for him right after park opening that he can tap into and head back, that would make the whole problem go away. It does depend on where you’re staying and what your timeline is like for that to work, but in my family we’ve run over to the park right at opening, tapped in and then left. It does feel a little silly, but it let us join the VQ at 1 PM so that we’d get a Boarding Group for the evening.
Good luck and have a great vacation!
What if you have a morning dining reservation- it seems that it is not letting me get times early because of that. Does that sound correct?
Hi Katie – I’m just going to preface this by saying that we have seen different behaviors literally *every single day* as we’re testing this, so it’s clear that Disney is still making changes. But, what we have seen, and others have also reported, is that it will not let you overlap with a dining reservation during the purchase process (unclear if it will allow smaller overlaps like 5-10 minutes), but that you are able to modify the time afterward to create the overlap. But again – right now, it’s a “past performance is no guarantee of future success” situation.
Good luck, and have a great trip!
I’m concerned about the 5 minute rule…..that you have only 5 minutes to complete your selections and pay. If I already know what attractions I want to book, is there time to do 3 or 4 days of LLMP and LLS? Or should I do one day and a time and then pay in order not to run out of time?
Hi JoAnn, you can book both Lightning Lane Multi Pass and Single Pass in the same transaction, but not for more than one day at a time. It’s actually super-fast to make the selections, especially since the times suggested are often the earliest available.