Step-By-Step Guide: Make and Use a Touring Plan in the Lines App (Including Lightning Lane)
Using the Lines app with a Touring Plan can save you hours in the parks. Here’s your how-to for creating one, including instructions for adding in your Lightning Lane reservations if you’re using Genie+ or you’ve purchased an Individual Lightning Lane. Click on any link below to go straight to that section. Click any image in this page to enlarge it. Working on a full-size computer? Click here for the browser-based tutorial.
- Creating a Custom Touring Plan (from scratch)
- Optimizing the Plan
- Adding Dining or Breaks to your Plan
- Modifying a Plan
- Making A Plan With Genie+
- Adding Lightning Lane Reservations to Your Plan
- Creating a Touring Plan From a Premium Plan
- Using the Plan In The Parks
- Timing Your Wait
- Troubleshooting FAQ
Creating a Custom Touring Plan
Start by scrolling down on the home screen and clicking “Create a Plan”. Enter a name for the plan, and adjust the balance for Walking Speed and Walking vs. Waiting. Then select the park that you want to visit. There is also an option here to select whether you will use Genie+, but for now we are going to make a plan without it.
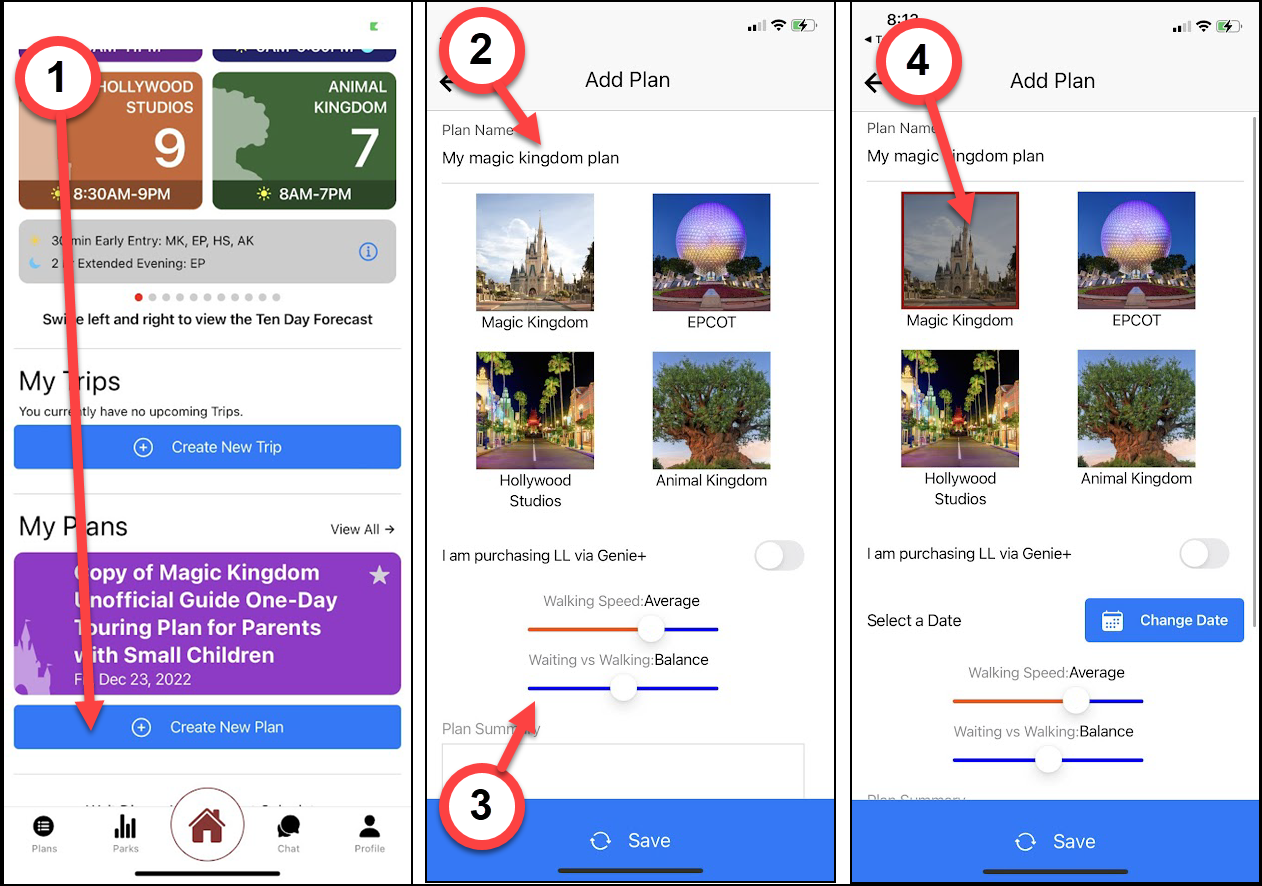
Next, select “Change Date” and enter the date that you want to visit the park. The screen will change to let you enter what time you plan to begin and end your day. You can click the button to use times based on the park’s opening and closing hours, or enter a specific time by clicking the pencil next to Start time and End time.
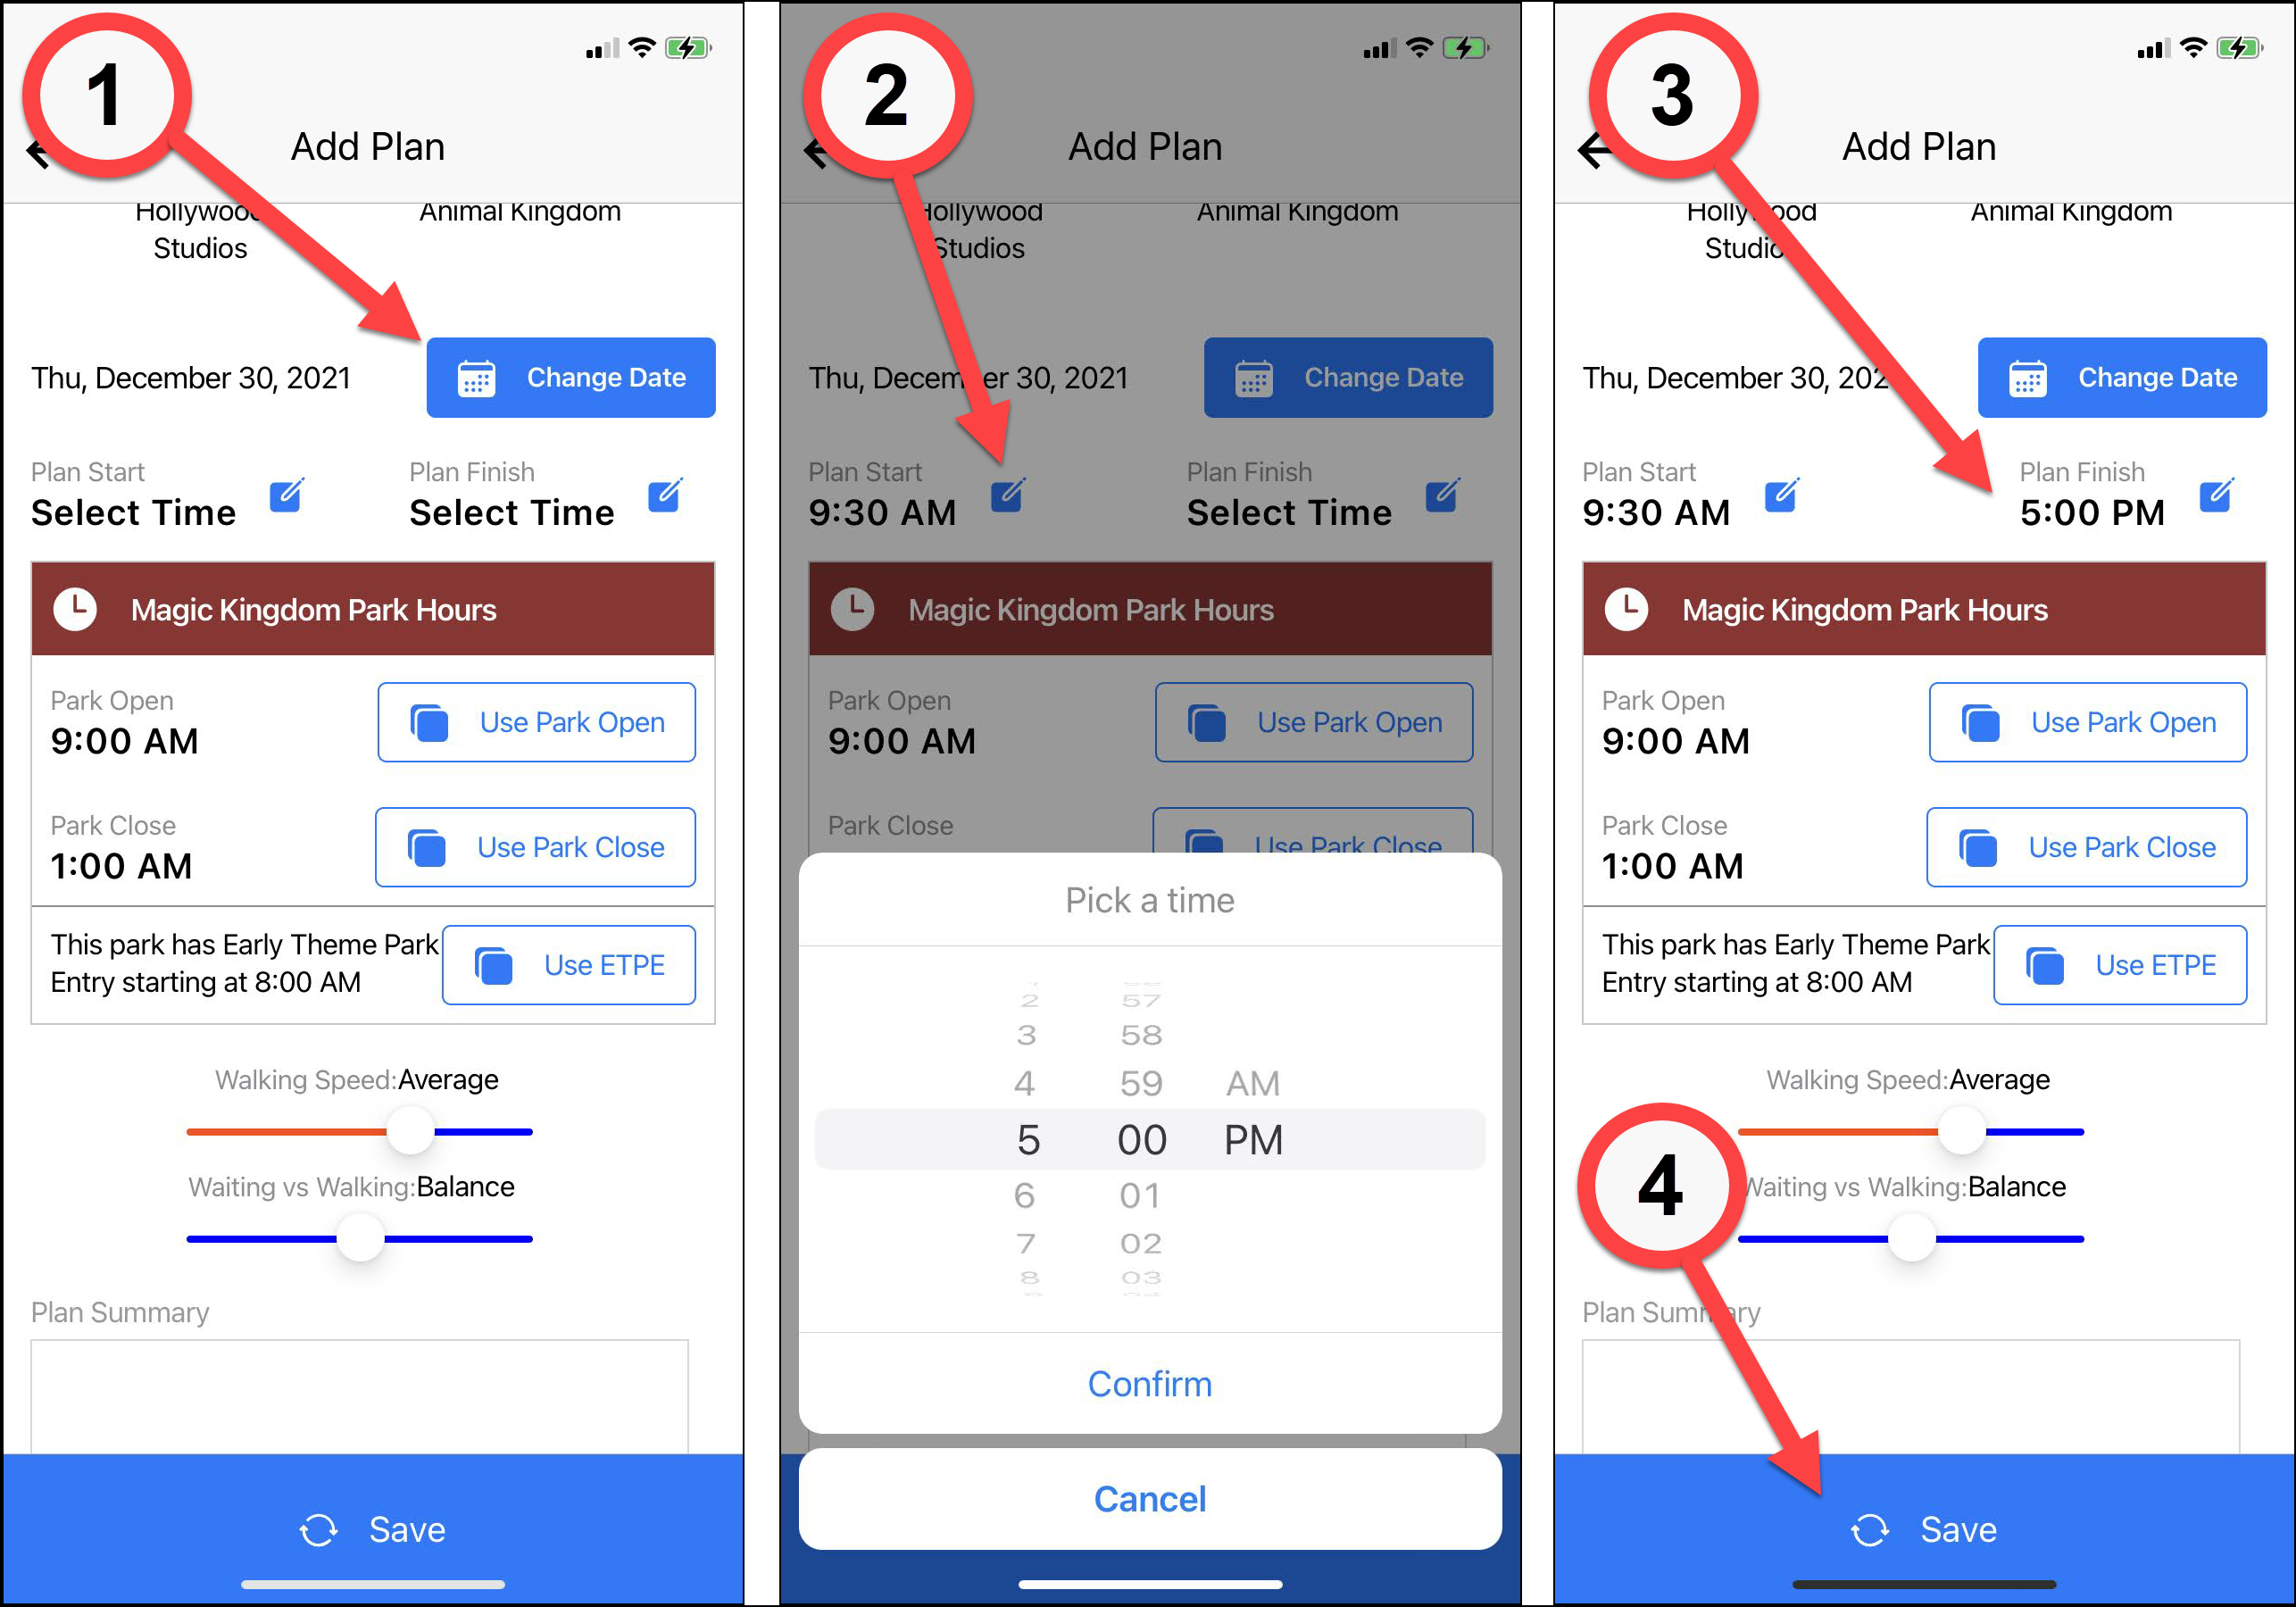
After entering the times your plan is ready to save. If you click save and nothing happens, go back and make sure that you’ve entered a name for the plan and selected both a Start and an End time — omitting one of these is the most common reason that plans will not save.
You’ll automatically be brought to the next screen where you’ll select the attractions you want to add to your plan. Scroll down the screen and press the plus sign to add your choices. Attractions are organized into some basic categories, so make sure to scroll all the way to the bottom to find everything you want.

After selecting all your attractions and clicking Save you’ll be taken to a screen with your plan on it. Next we’ll see how to Optimize or Evaluate the plan.
Optimizing the Plan
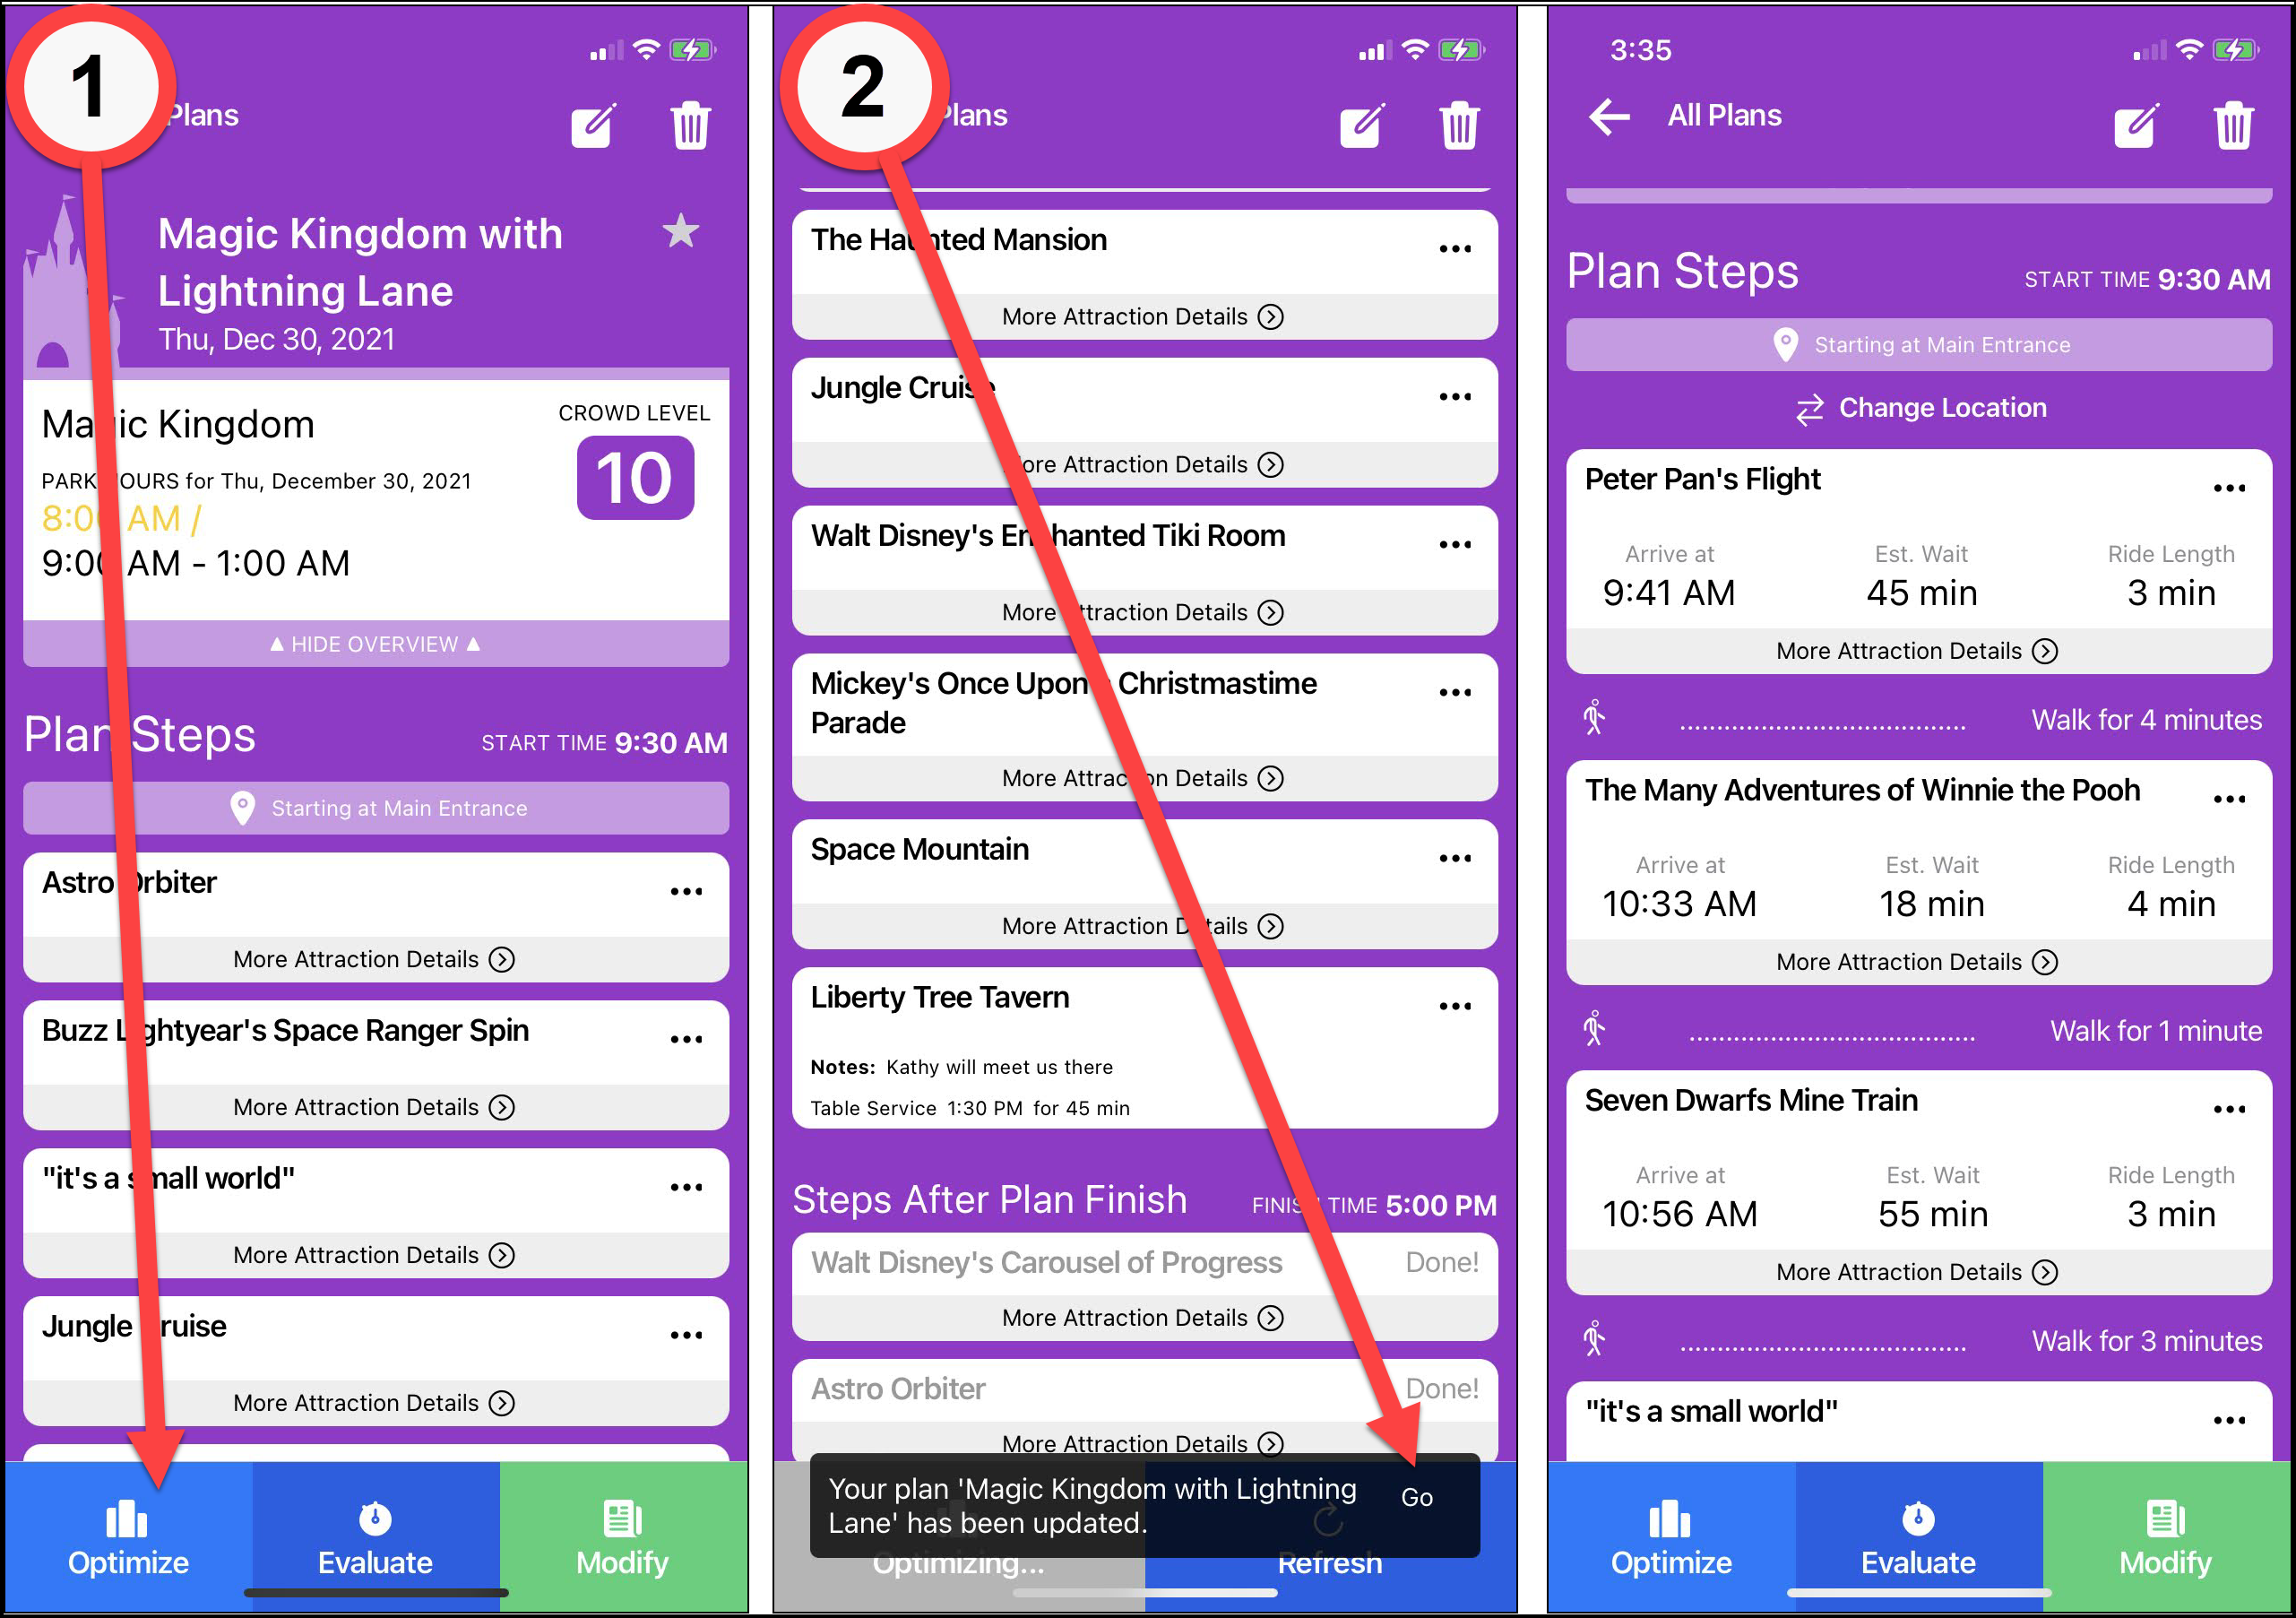
Once your plan is created you’ll see “cards” with each step, but no information about how long the steps will take — no wait times, no walk times, no ride times. In order to see how your day’s going to go, you’ll need to either optimize or evaluate the plan. What’s the difference? When you optimize, the software chooses the most efficient order. Evaluating lets you choose what order to put the steps in, and the app will just tell you how long it will take.
You’ll need to optimize or evaluate every time you make any changes to your plan, so it won’t take long to become familiar with the process.
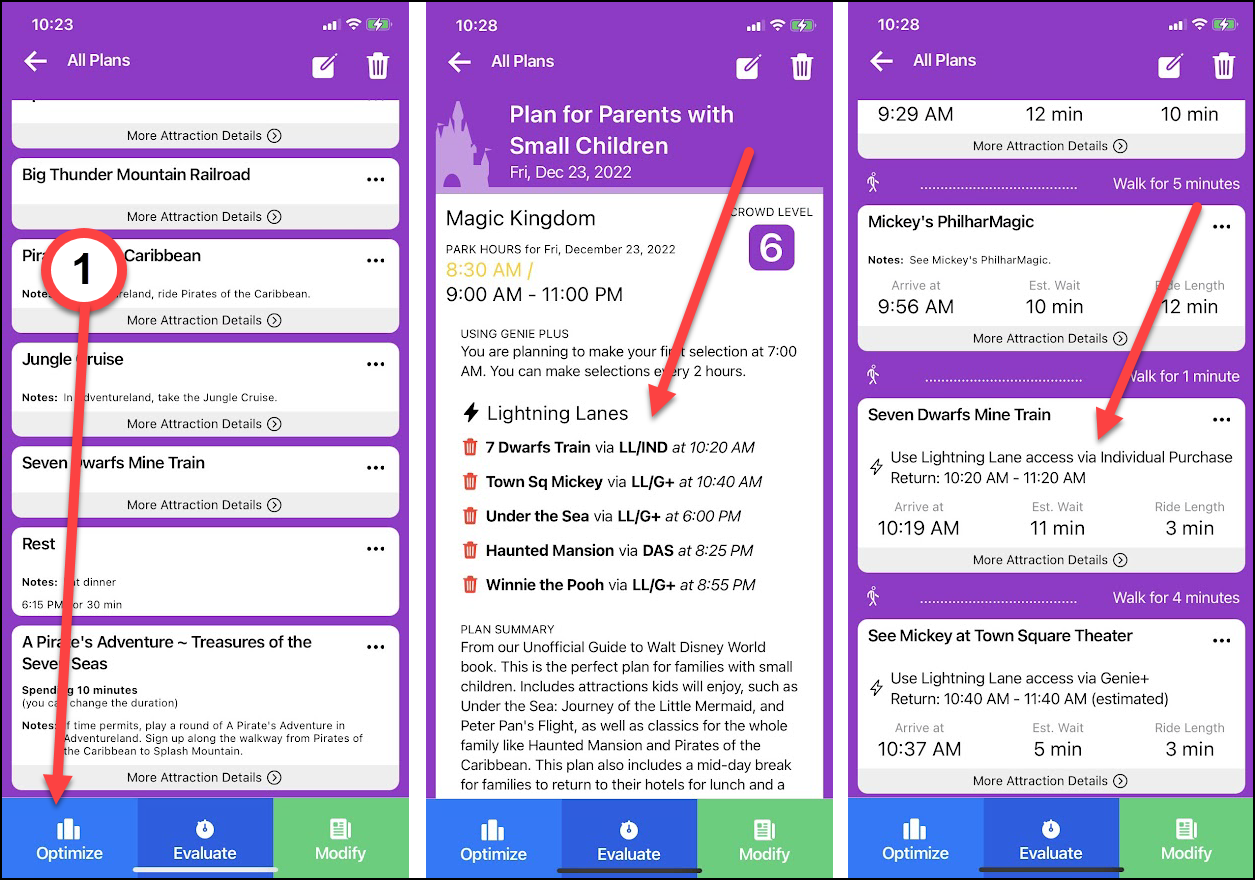
To Optimize
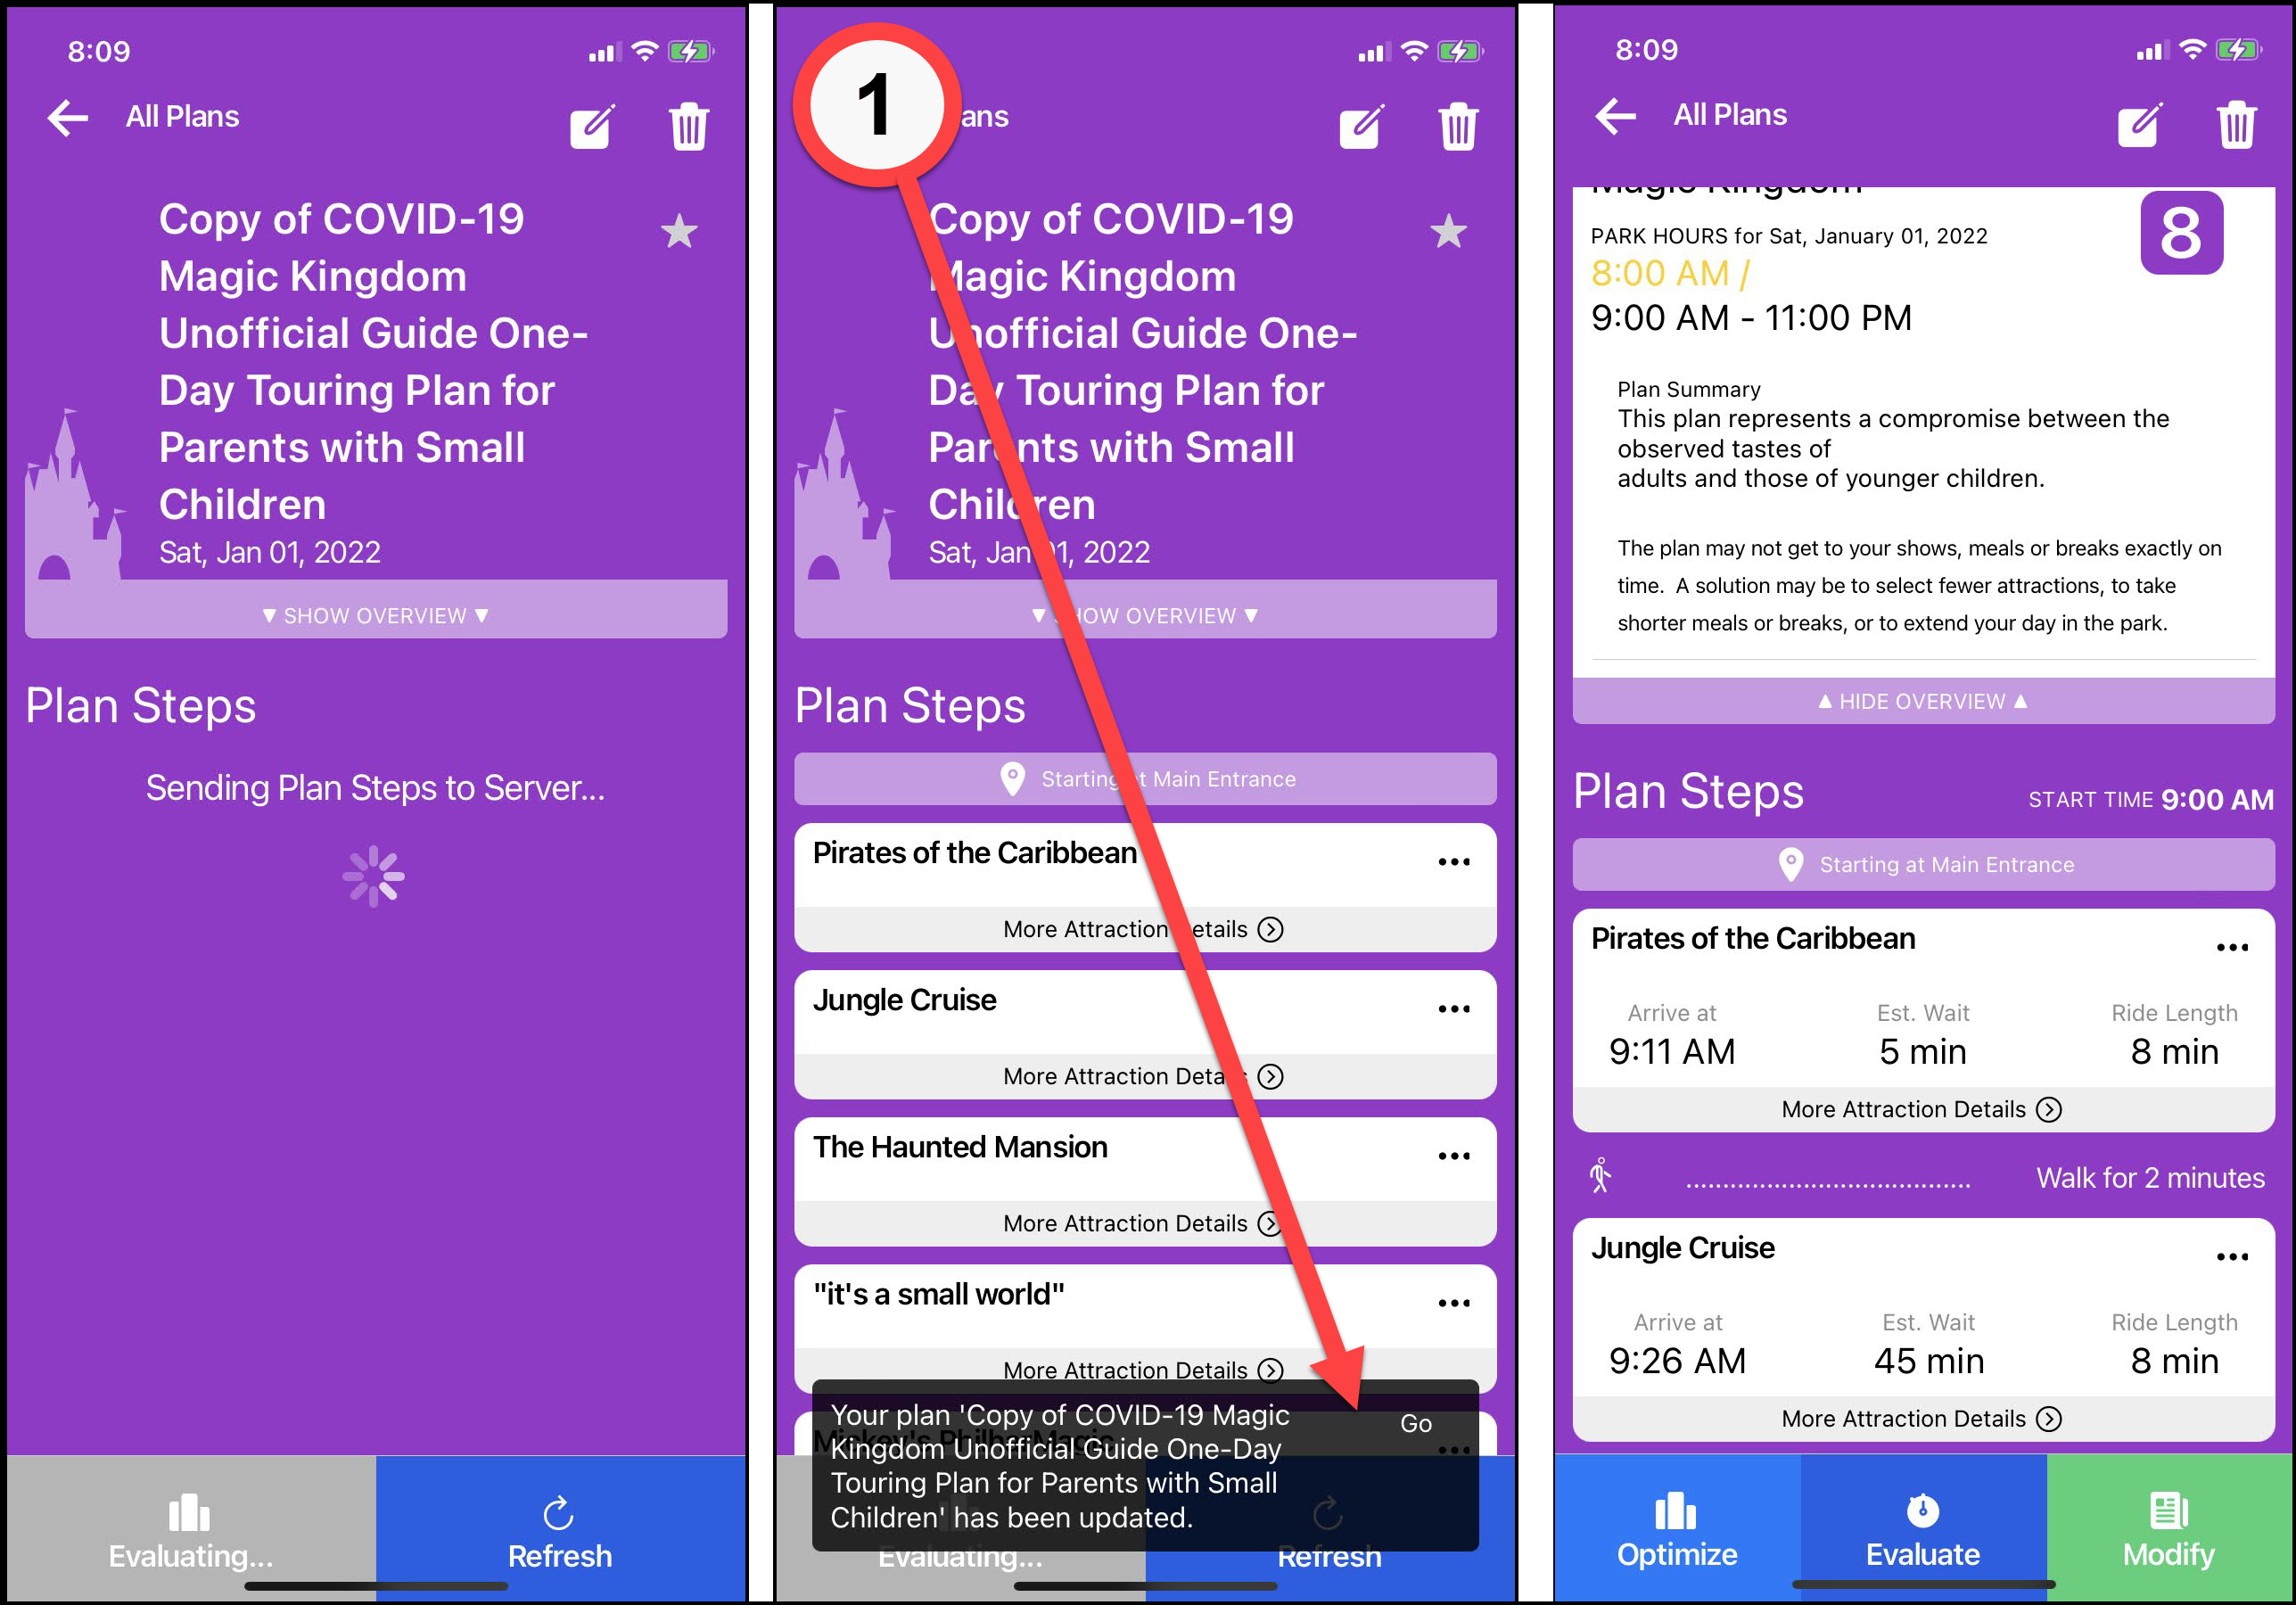
Click optimize on the bottom menu. The bottom menu band will change from Optimize/Evaluate/Modify to Optimizing/Refresh; when it’s done you’ll see a notice that your plan has been updated. Tap the notice to dismiss it, and if the screen doesn’t update immediately then click the Refresh button. Now you’ll see that the cards on your plan have all the times filled in, and the order has been adjusted to minimize your wait time.
To Evaluate
Here we have a new plan and we want to put the steps in a specific order and just have the optimizer tell us how long it will take. Start by tapping Evaluate on the bottom menu. The screen will change to show your plan steps in order. Tap on any step that you want to adjust, and use the Up/Down buttons at the bottom to switch them around. Then click Done.
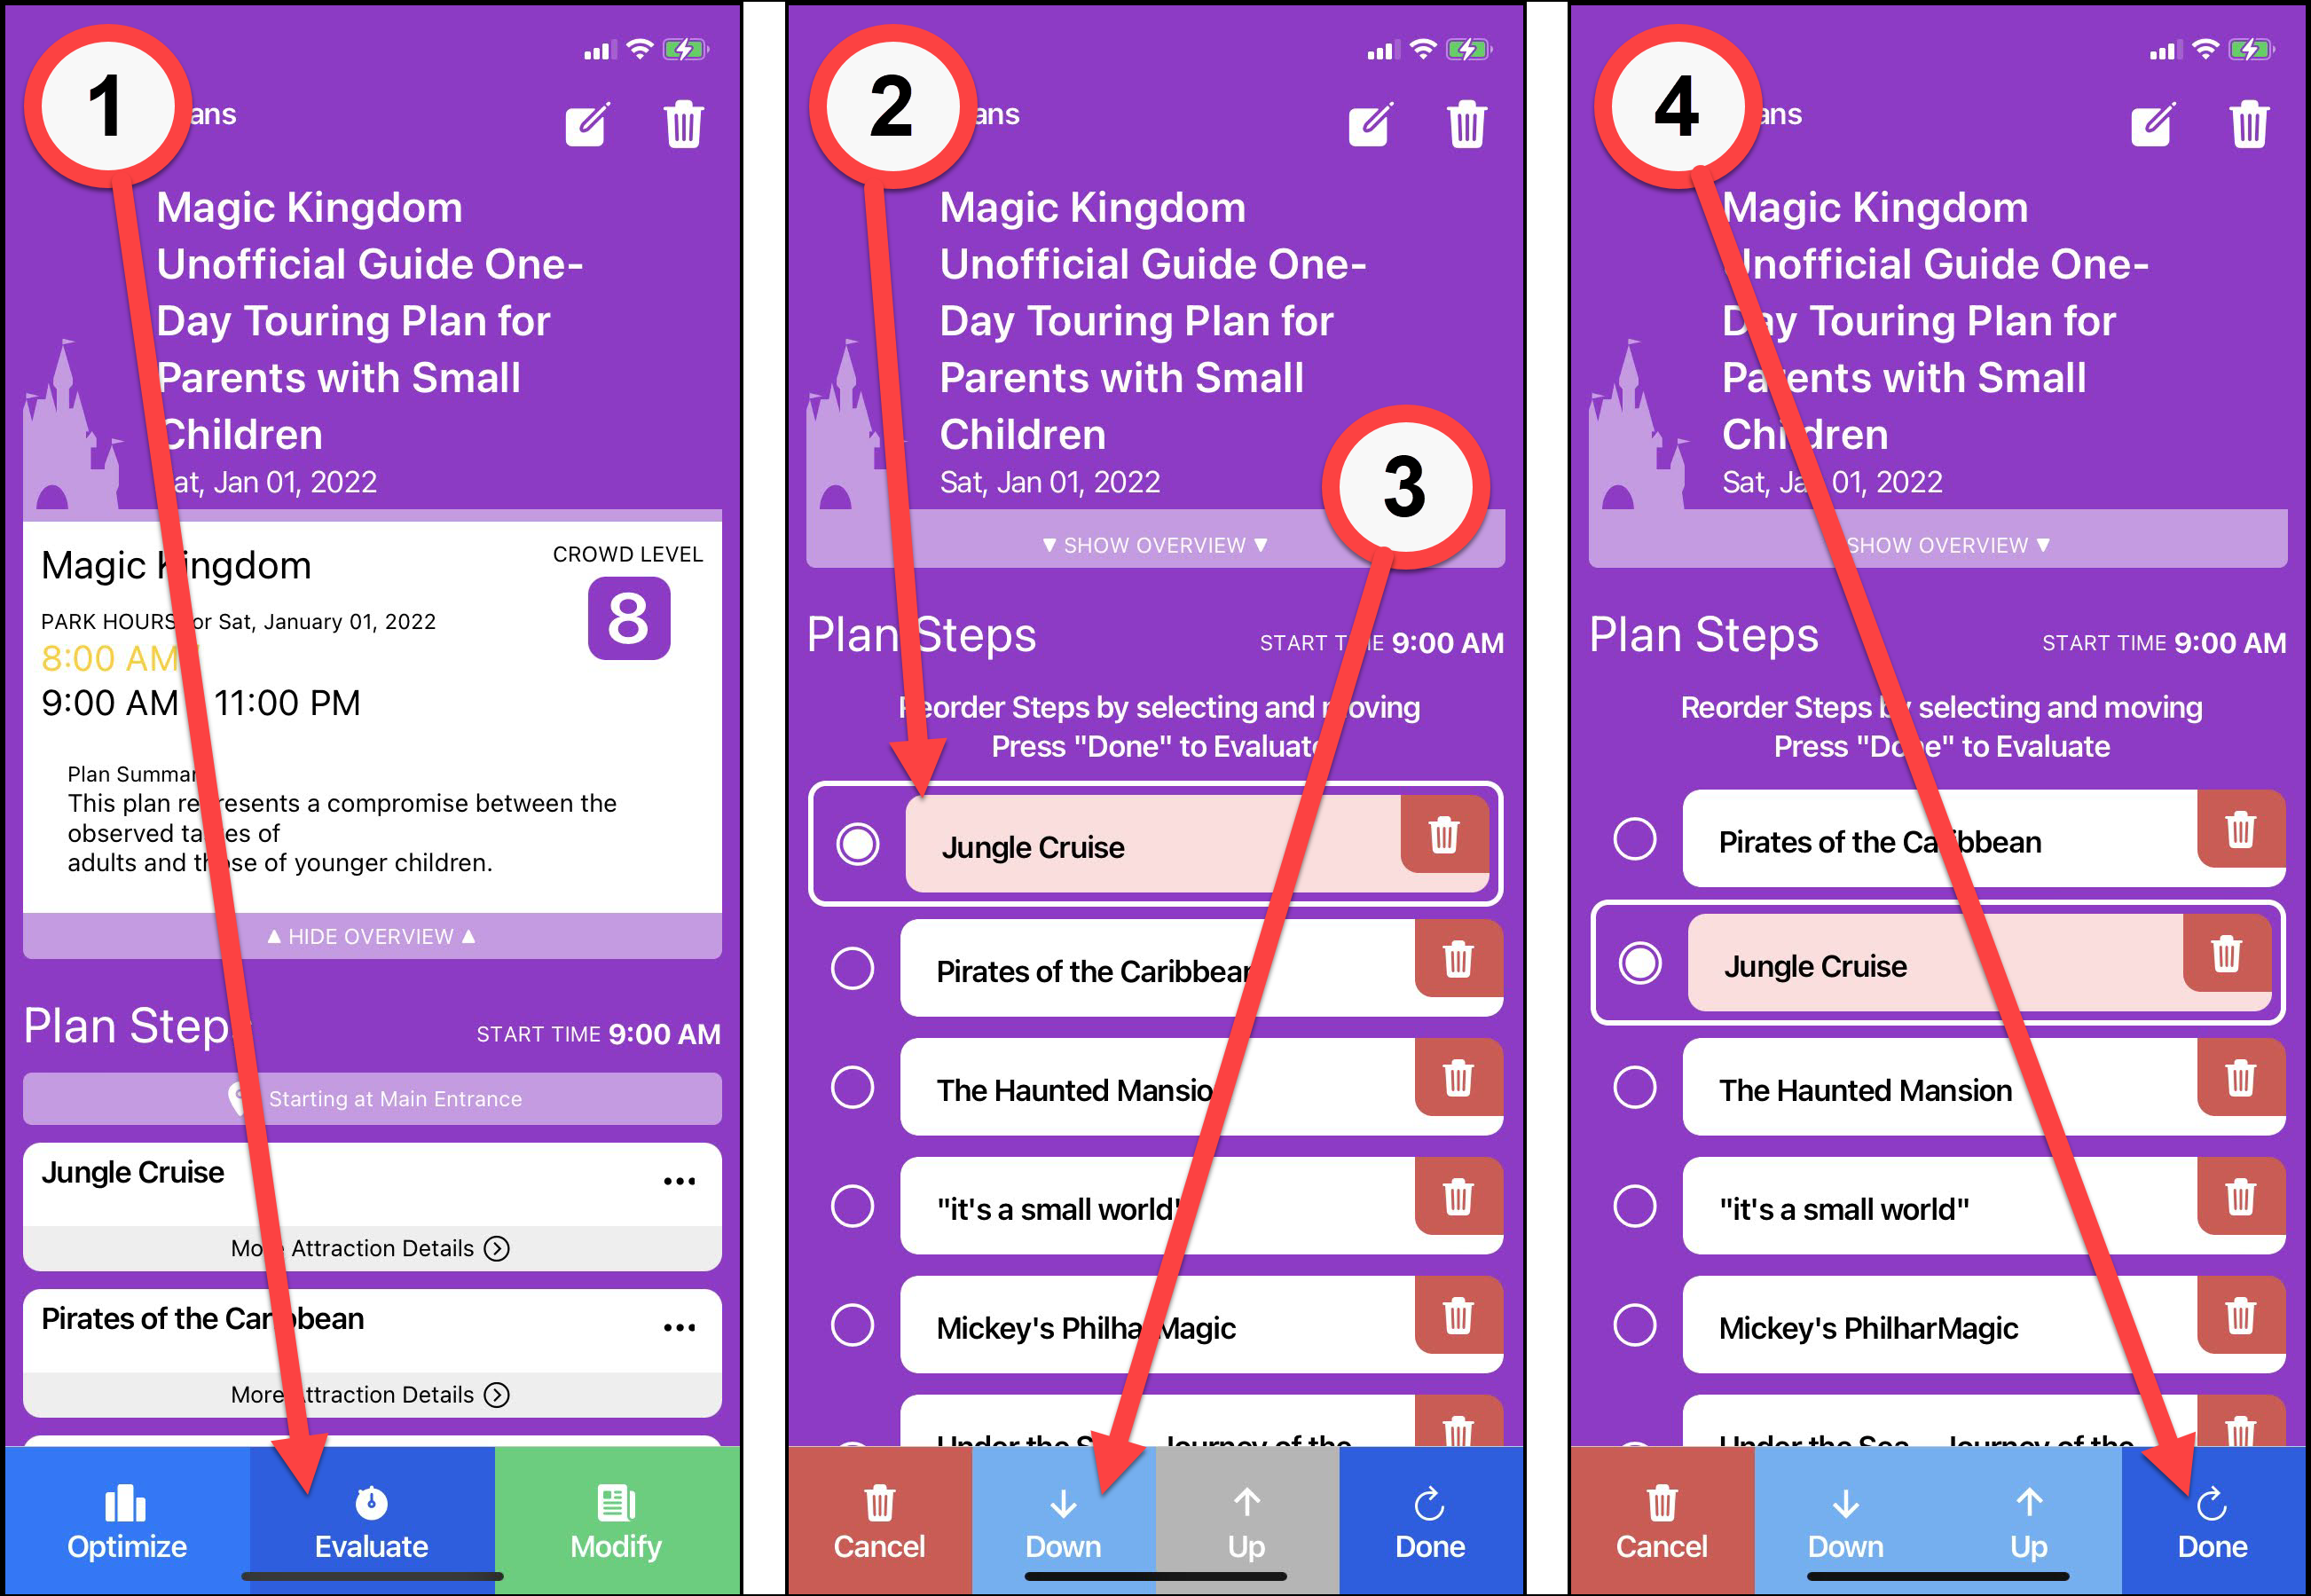
The screen will show a spinner as the plan goes to the optimizer, and then it may switch to show the plan steps but will still say Evaluating at the bottom. When the notification appears that your plan has been updated, you’re done! The screen should update as soon as you click away the notification, but if it doesn’t then click Refresh to show the updated cards.
One thing to be aware of when using Evaluate is that when adding any step such as a meal or Lightning Lane reservation that needs to be at a specific time, it might not actually come out at the right time the first time you Evaluate the plan. You may need to do a bit of tinkering with the step order to ensure that those events are in their “proper place” in the timeline. It’s not uncommon to need to Evaluate twice to achieve this.
Adding Dining or Breaks to Your Plan
The process for adding a break is almost exactly the same as adding dining, so we’re only going to walk through adding a restaurant.
Begin by clicking Modify at the bottom of the plan, which will open up the Attraction selection screen. At the top of the screen, tap on Meals and you’ll see the screen switch to a list of restaurants. Find the one you want and click the plus sign at the right.

The card for the restaurant will expand and show options for you to enter the details of your meal. Fill in the time, how long you’ll spend eating, and how much “slosh” you’re willing to allow around your arrival time, then click Save. The card will collapse on the chooser screen and it won’t look like you’ve made an entry — don’t worry, it’s there. Click Save on the bottom and you’ll see the new card with the meal on your plan. Don’t forget that you’ll need to reoptimize (or evaluate).
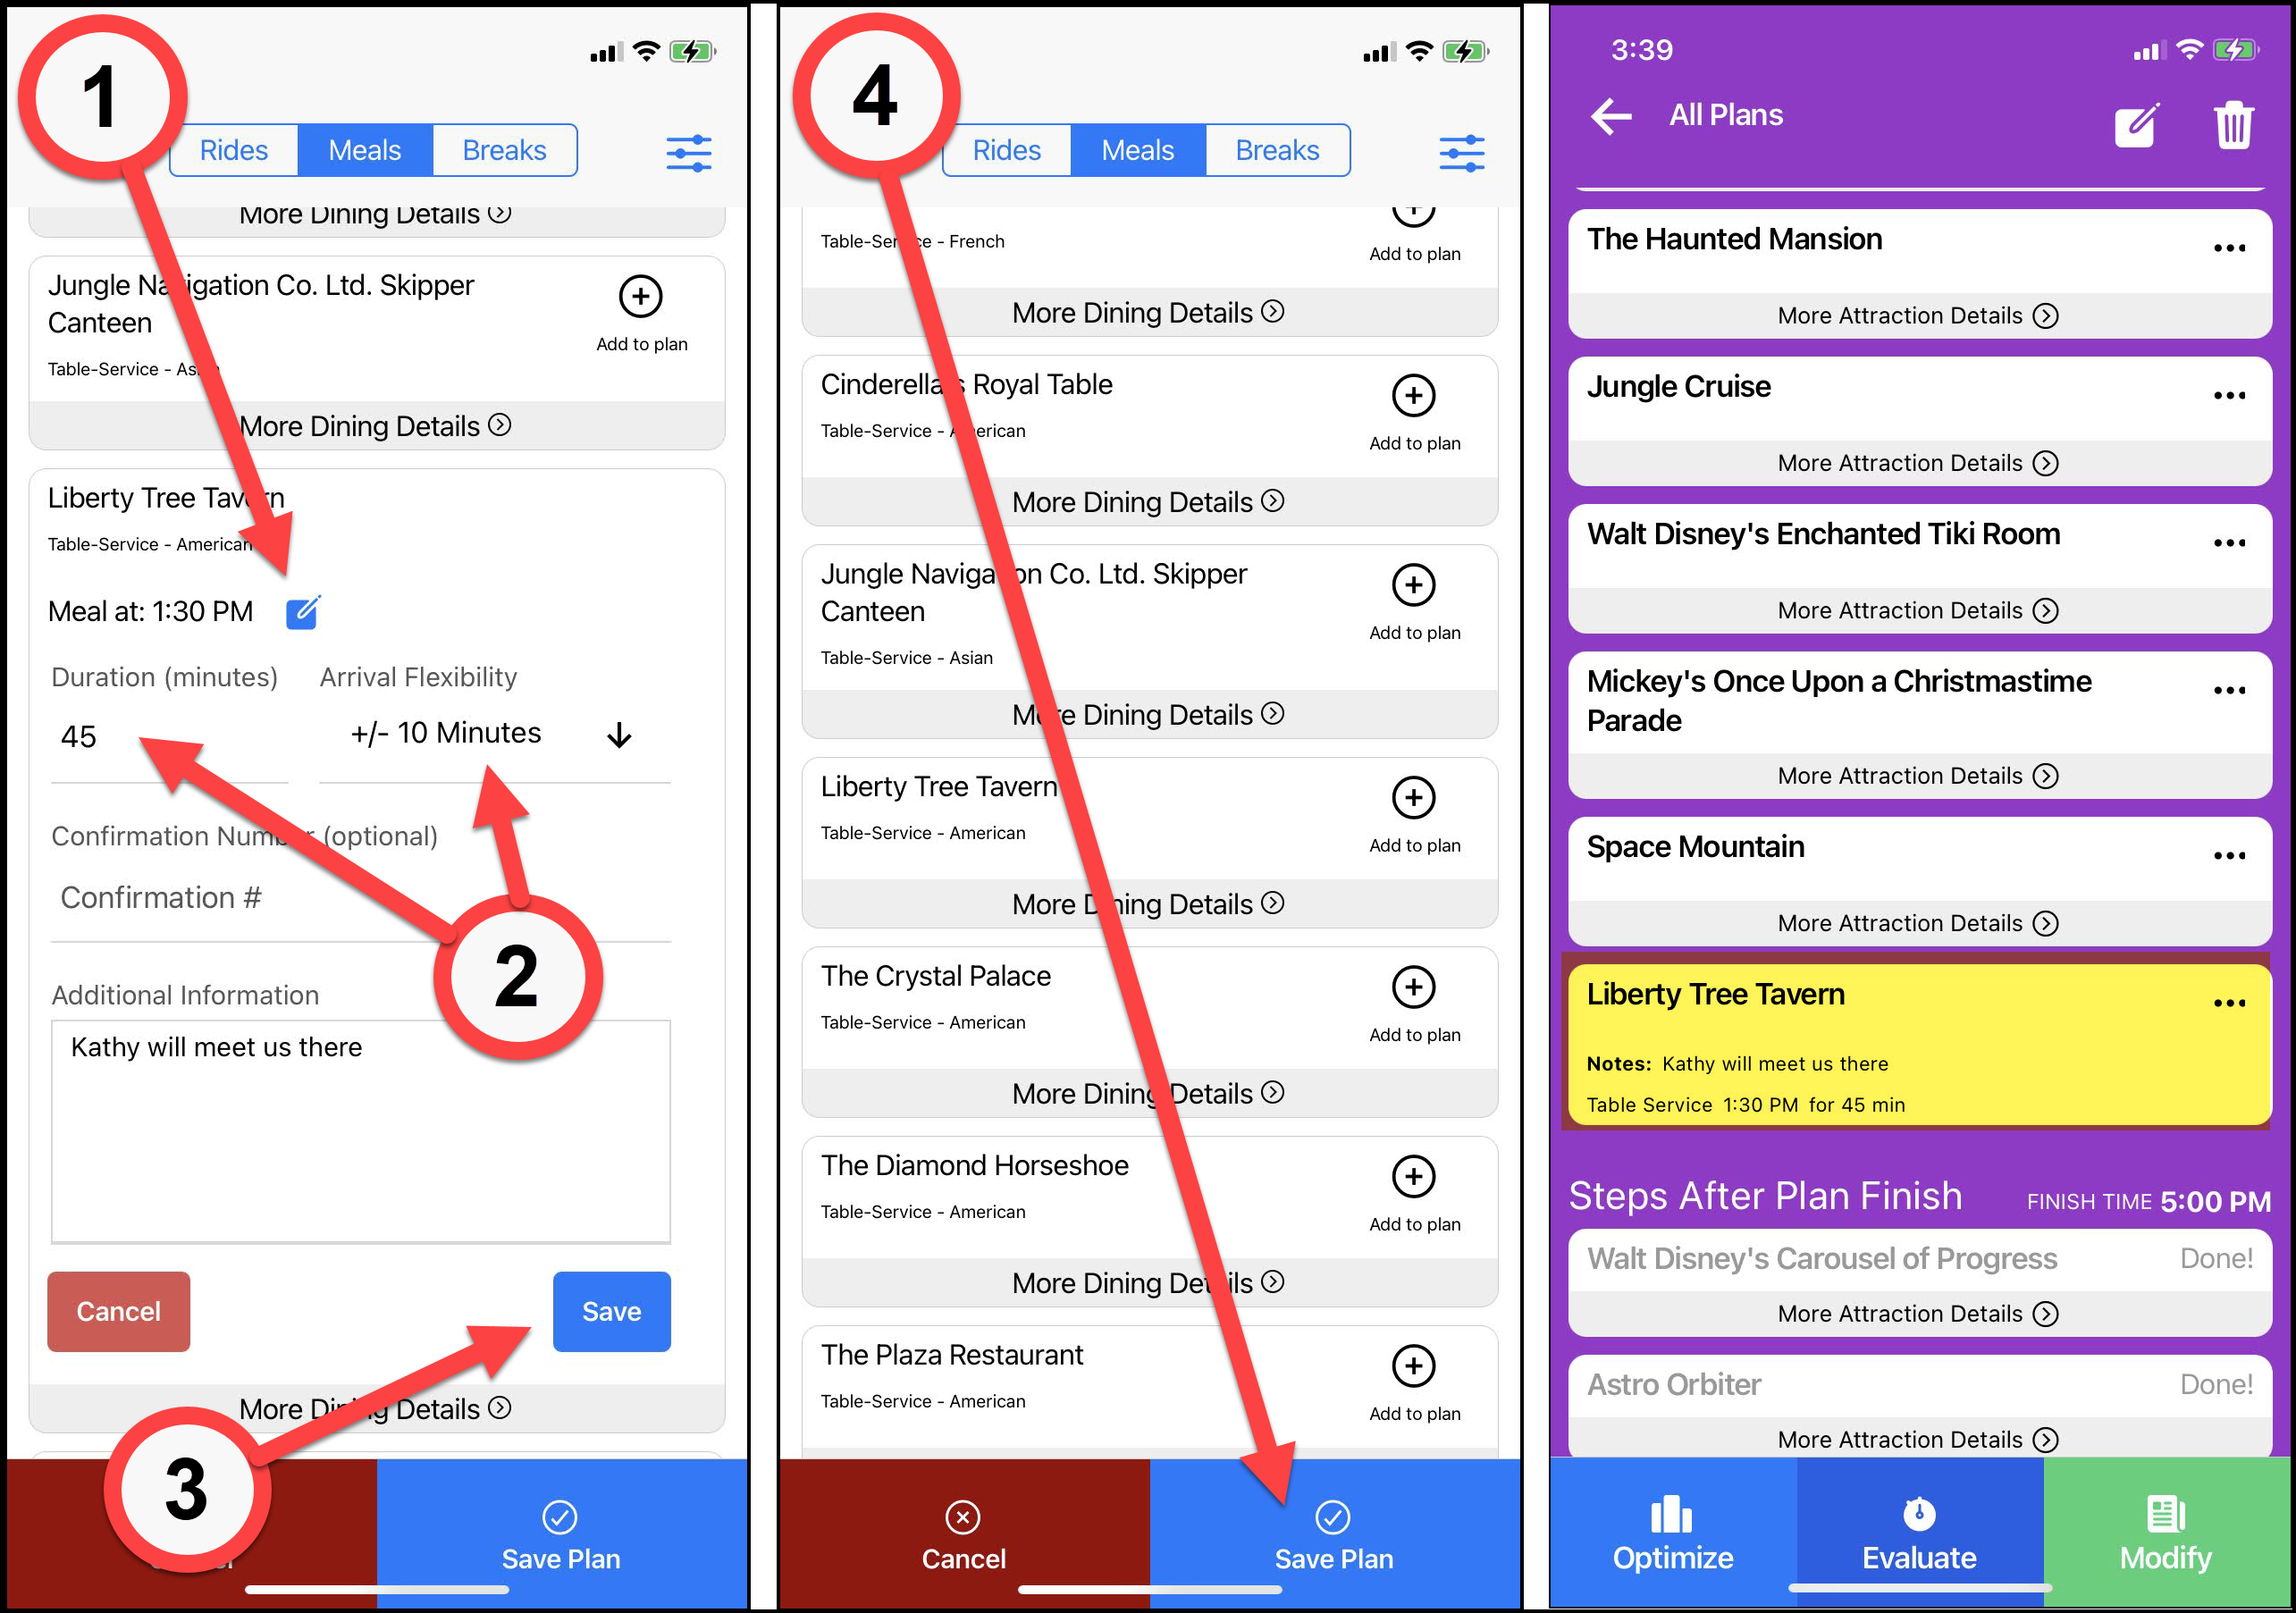
Pro tip: If you prefer, you can add your meals & breaks during plan creation in the same step where you choose the attractions.
Modifying a Plan
Clicking Modify will take you back to the Attraction selection screen. Adjust the numbers next to experiences in the same way you did when you first made your selections or, as we saw above, switch to Meals or Breaks to add those to your plan. When you’re finished, press Save and don’t forget that you’ll need to reoptimize (or evaluate)!
Making A Plan With Genie+
To use a plan with Genie+ and have the optimizer make Lightning Lane recommendations for you, you’ll need to toggle the “I am purchasing LL via Genie+” switch and select the earliest time that you’re willing to make a reservation. (I didn’t show the time selection here because I’m hoping by now you’re familiar with that wheel. 🙂 ) I’ve shown the toggle here when editing an existing plan, but you can also select it when you’re first creating the plan.

After you’ve finished optimizing, you’ll see two things. First, in the top overview section will be a list of Lightning Lanes that the optimizer thinks you’ll be using in the plan. Second, in the steps of the plan, you’ll see that individual steps have been added directing you when you make the Lightning Lane reservations.
One thing to know: many roads lead to Rome and many different Lightning Lane combinations will give you similar time savings over the course of the day. If you reoptimize the plan, you’re likely to see that the Lightning Lane recommendations have changed to a different set that will give you a similar amount of time both in the parks and waiting in line. This is intentional, and helps to keep Lines from sending everybody to the same place at the same time. If you’re totally in love with a set of Lightning Lanes that were recommended, you may wish to Evaluate instead.
For Advanced Users
If you can’t get a combination that you find pleasing, you can use the “Add LL” selection on the meatball menu dropdown on the attraction card. This will add the step to get a Lightning Lane for the attraction you’d like. You can only use this with Evaluate because Optimize will overwrite it. But adding the step allows you to see the forecast return time when you Evaluate the plan, and you can then order your steps appropriately. We don’t recommend using Genie+ and Evaluate together unless you are experienced in constructing your own plans using Evaluate.
Adding (Individual) Lightning Lane Reservations to Your Plan
There are three situations where you might want to add a Lightning Lane to your plan that wasn’t recommended by the optimizer.
- When it’s an Individual Lightning Lane
- If you decided to go off the trail and grab a really sweet return time that you just happened to see
- When it’s a DAS return time.
The process for all three cases is very similar. Start by pressing the meatball menu (the three dots) on the card for the attraction that you want to add the reservation to. Then select the option for Lightning Lane Return Time (or DAS) and a pop-up will appear. Select the time and click Save.
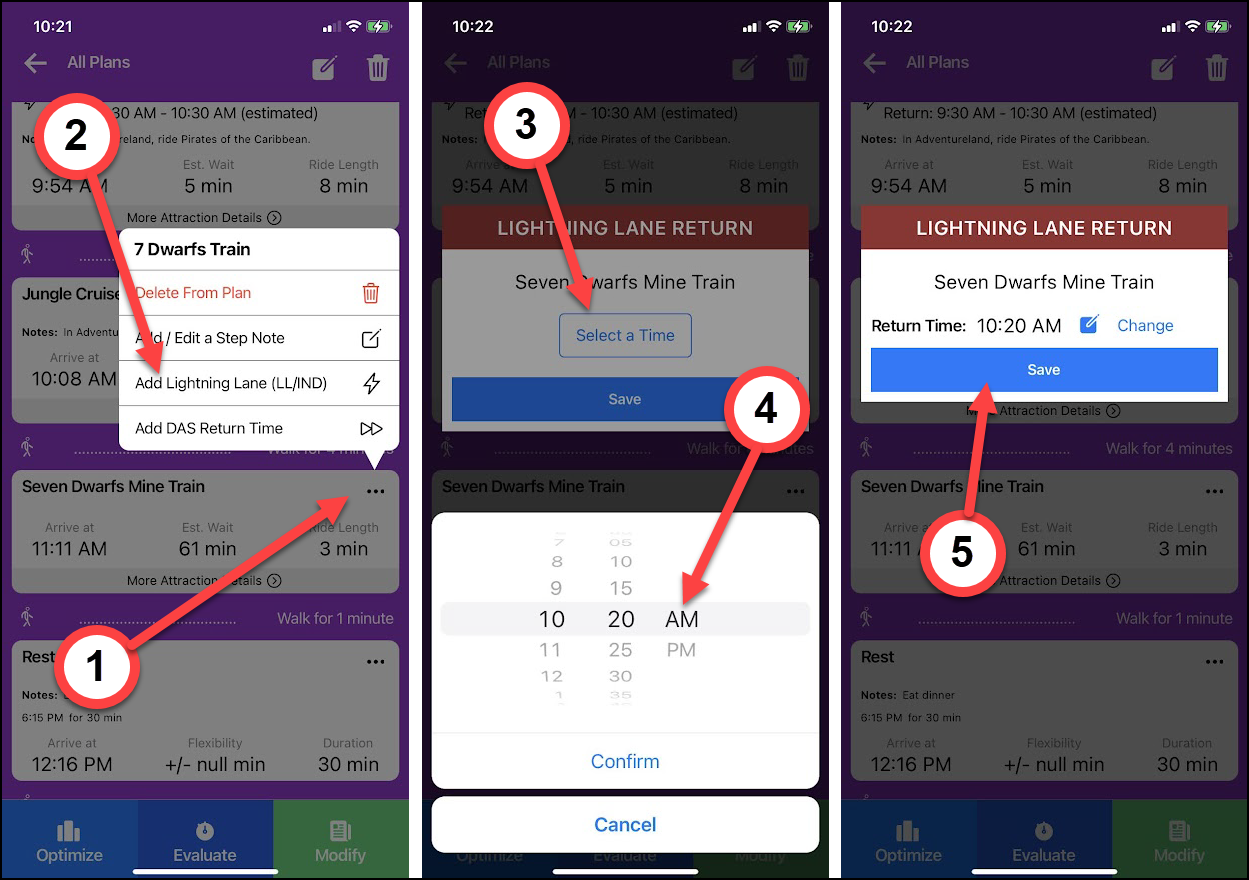
After clicking Save, you should see that the times on all the cards are cleared, and you’ll need to reoptimize (or evaluate). After the optimization is finished you’ll see the new reservation appear in a special section at the top of the plan, and you’ll see the reservation noted on the attraction card.
If you need to delete the reservation, just click the trash can next to the reservation in the top section. This will only remove the reservation from the attraction, it will not remove the attraction from your plan.
If you’re selecting a DAS return time, you should be aware that the optimizer will assume you plan to return within the hour, just as though the reservation was a regular Lightning Lane. If you have a 1 p.m. return time but you don’t plan to use the DAS selection until 3 p.m., you should just enter the time as 3 p.m. when you’re asked about the return window. The reason to use the DAS option for these reservations is to avoid having the DAS selection block your eligibility to make Lightning Lane reservations if you are using DAS and Genie+ together.
Warning: Some people like to add Genie+ Lightning Lane reservations of their choosing to explore “what-if” scenarios. Just remember, unless it’s a DAS Advance selection you don’t really have that reservation until you make it in MDE on the day of your visit. Also, putting it in your plan in advance doesn’t guarantee that Disney will give you the time you’re shooting for! Make sure and remember to clear out any “phantom” times before you actually start touring.
Creating a Touring Plan From a Premium Plan
From the Home Screen (or anywhere in the app), click on Plans on the bottom menu. When the Plans screen opens, click on the hamburger icon in the upper right corner. A menu tray will slide out from the left — select the park you want from the Premium Plans section, then select the plan you want.

Click the option to “Copy As New Plan” that appears at the bottom of the screen. The plan will use the current date as a default and will have a default Start Time and End Time as well. Adjust these if you want, and then click Save. Your plan will then be ready to optimize, just as we saw with the Custom Plan.

Using the Plan In The Parks
One of the advantages of using the Lines app with a touring plan is that we’re constantly updating our predictions throughout the day — but to take advantage of these updates you’ll want to reoptimize your plan every so often. In order for this to work you’ll want to mark off any steps you’ve completed so that the software doesn’t try to send you there a second time.
Tap the meatball menu on the top right of the card and select the option marked Step Complete. The step will immediately move to the bottom of the plan, but you’ll still have to reoptimize or evaluate to get the updated times. Note that the “Step Complete” option and other choices such as timing waits that wouldn’t make sense to do in advance will not appear on this menu unless it is the same day that your plan is set for.
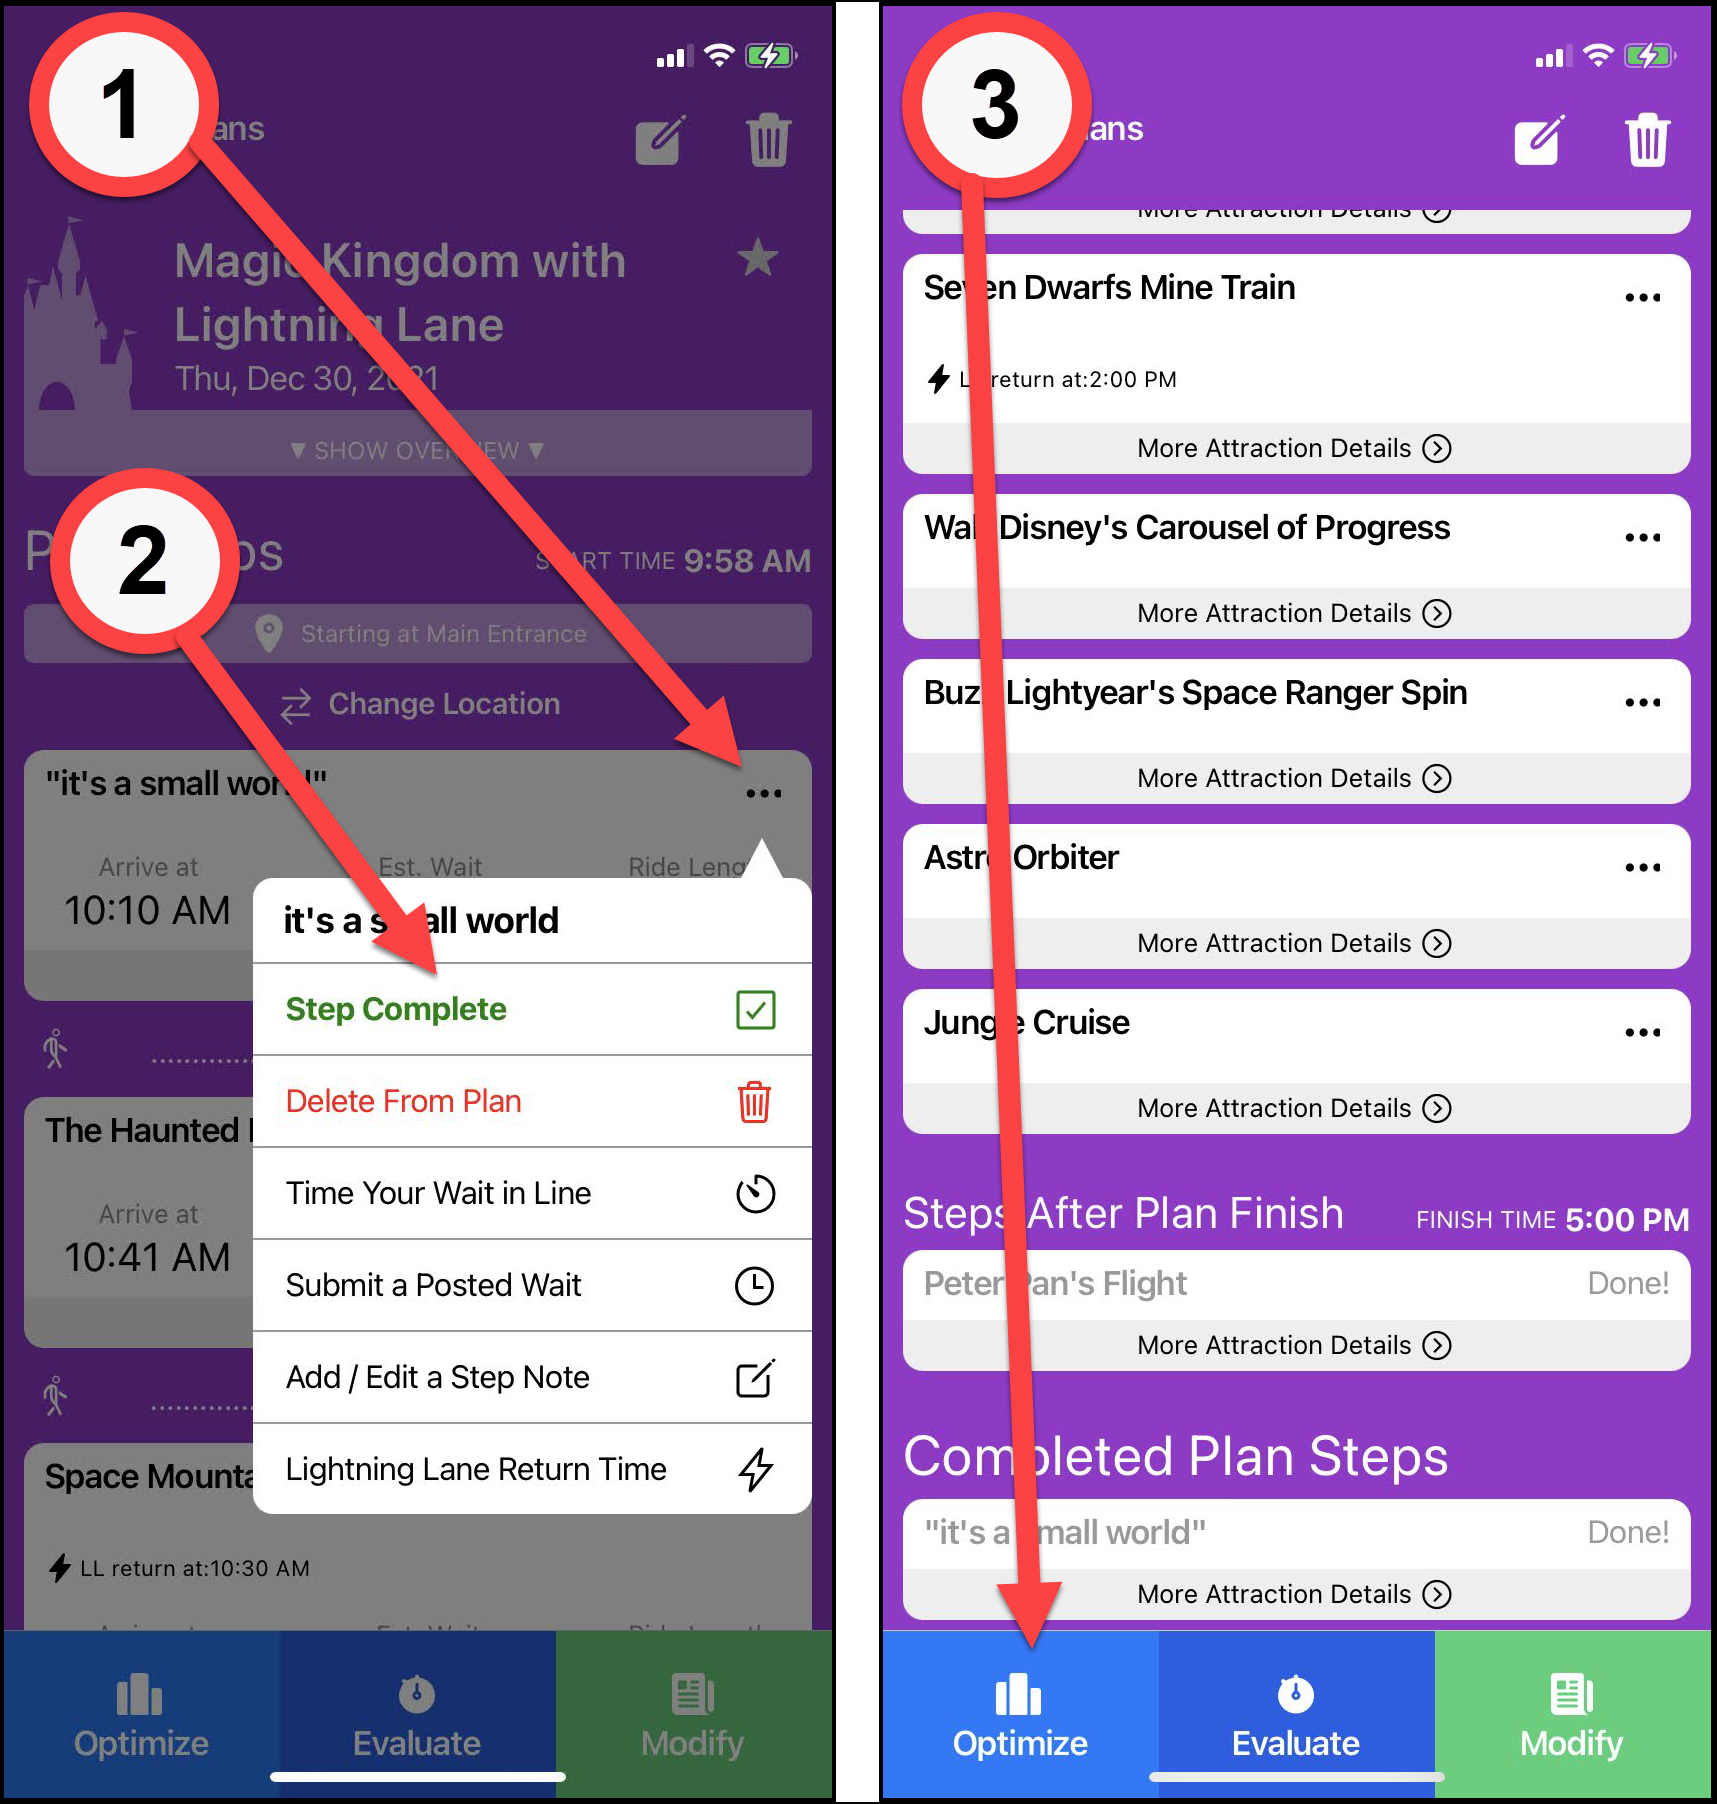
If you’re using the plan with Genie+, you’ll need to enter the return times you’ve gotten. Prior to your touring day, you’ll only see a step with an instruction to get a Lightning Lane reservation. When you’re eligible to actually make those reservations, you’ll see a button on the step to enter the return time. After entering the time and reoptimizing the plan, the “get a reservation” step will disappear and you’ll see the reservation on the attraction card.

If you’re someone who prefers Evaluate, keep in mind that as your day progresses the predicted availability of Lightning Lanes may not match up with what’s in your plan. If you see this becoming an issue, you might find it’s better to simply optimize and pick up current availability and recommendations.
Timing Your Wait
Timed waits (we call them actuals) are a key part of our ability to make updated predictions throughout the day. If you’d like to time your wait, then we’d love to have your time.
Start on the meatball menu in the upper right of the attraction card and select the option to Time Your Wait in Line. A pop-up will open, and you’ll click to select which queue you’ll be waiting in; you’ll only see the options that are available for the attraction you’re timing.
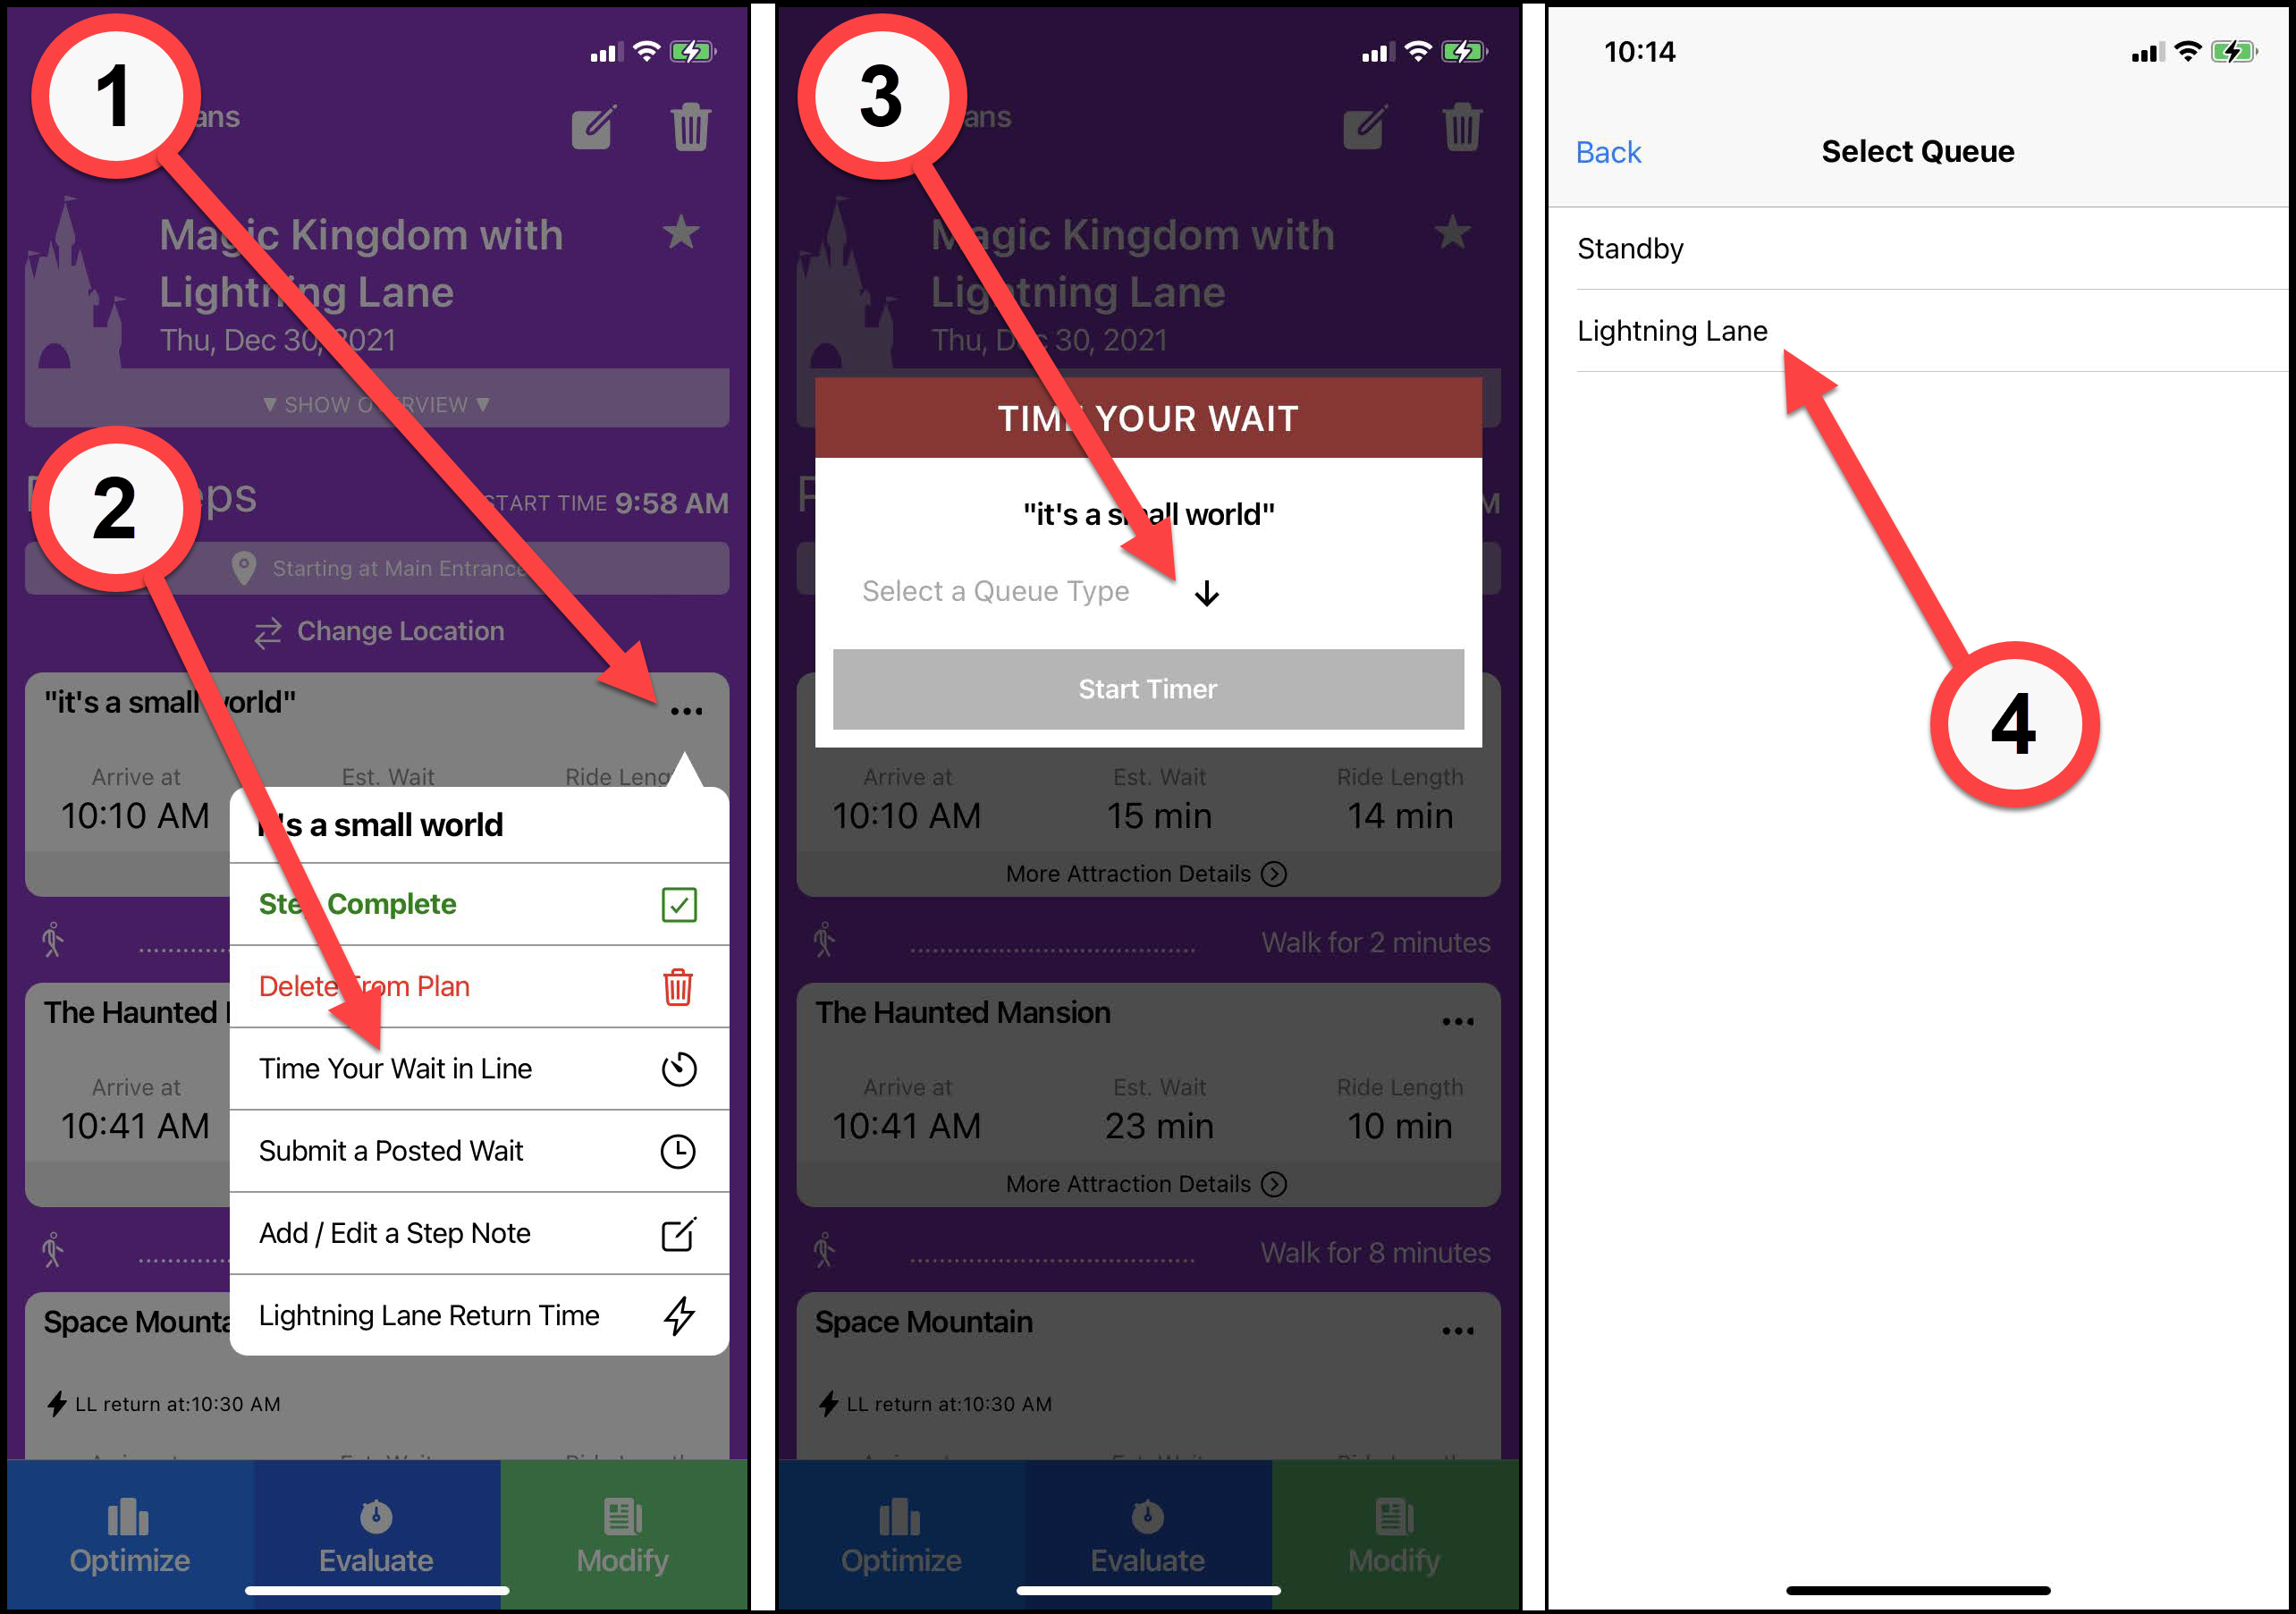
After you select the queue type, the “Time Your Wait” popup will reappear with the queue you selected, and the Start Timer button will turn blue. Tap to start the timer, and make a note of the instructions about when to stop it. When you’re ready to submit your time press the Submit Wait button, or if you need to cancel it without submitting for some reason, press Cancel. The timer will continue to run until you stop it even if you close the app.

Some rides, such as Pirates of the Caribbean, Soarin’, and others have very poor cell signal in their queues. You may have a smoother experience submitting wait times if you’re connected to the Park WiFi.
Troubleshooting FAQ
Hopefully you’ve found your way through everything, but here are answers to some frequently asked questions. If you don’t find your answer here, please submit a ticket and we’ll do everything we can to resolve your problem.
I’m on the “Add Plan” screen and my plan won’t save
Check to make sure you’ve entered all four of the following:
- Plan Name
- Plan Date
- Plan Start Time
- Plan End Time
I marked a step complete by mistake and I can’t undo it
Click to Modify your plan and find the attraction you accidentally marked complete. Tap the plus to increase the number from 1 to 2 and then save the plan. You’ll see a new step with the attraction in the main section of your plan and it will be optimized with the rest of your active steps. We’re working on making this easier for you.
I want to add a Lightning Lane, but the attraction is in “Steps After Plan Finish” and I can’t edit it
The best way to handle this is to use Evaluate to move the attraction up several steps and then add the Lightning Lane to it. After you’ve added the LL reservation, you’ll reoptimize. We’re working on making this easier for you.
I canceled a Lightning Lane, how do I remove the time from my plan
All your Lightning Lane reservations will appear at the top of your plan. Press the trash can next to the one you want to delete.
I want to add a reservation, but I can’t find the experience in the app
A very few reserved experiences such as Bibbidi Bobbidi Boutique and Savi’s Workshop are directly supported in plans. In the app, these can be found in the attraction list under the Scheduled Experiences section. For all other experiences such as Dessert Parties, Tours, etc., you’ll need to represent your reservation in your plan by using a Break. You can give the Break the name of your experience, and if desired you can put the confirmation number in the notes for easy access.
I optimized my plan and there’s a huge break in the middle that I don’t really want
If you don’t want to add more attractions to your plan, the easiest way to address this is to change the end time of your plan. If your plan ends at 8 p.m. and the break is 2 hours long, changing the end time to 6 p.m. should close up the space so that you’re touring continuously.
I have a DAS reservation that doesn’t have an end time, how do I get the plan to see that?
DAS Advance Selections that are made prior to arriving in the parks have an end time, exactly like the Lightning Lane reservations. However, DAS reservations that are made while touring (either in the app or at the blue tent) do not have an end time. Unfortunately, Lines isn’t able to recognize that your DAS reservations don’t have an end time, but there is a workaround that should help many people.
Let’s say you have a same-day DAS reservation for Big Thunder Mountain at 2 p.m. If you’re fine doing the ride between 2 and 3 p.m., great! You don’t need to do anything. If, for any reason, you’d prefer to do Big Thunder Mountain between 4 and 5 p.m., then simply enter the reservation time for 4 p.m. You’ll know that in reality you can ride any time after 2, but the optimizer will put the attraction into your plan around the time that you want to experience it.
Still don’t see your answer? Check out the Personalized Plans section of our Help Center.

You May Also Like...
-

On February 27, 2021, we did another side-by-side touring plan test. This time we were at Disney's Animal Kingdom. We did…
-

You can create a custom touring plan for just about anything. And so when I asked fellow Star Wars geek Guy…
-

It has been three weeks since the Disney Genie has been let out of its bottle. We have been collecting data…
-

When I'm in the parks, I like to get to my touring plans in the Lines App. I can record wait…
Optimizing vs Evaluating: I don’t want to bounce back and forth across the parks so selected Minimize Walking as well as Average Walking Speed. However, when I select Optimize, I still see a lot of ping-ponging. I expected that selecting Minimize Walking would cut out back tracking.
When I’m creating a plan, I usually put things in the order I think will work best for us and Evaluate. Once we’re in the park, will Optimize really minimize walking or does the projected wait time trump everything else?
Hi Gail, the Minimize Walking setting does produce a different order than other settings. But you’re not the first to note that there’s still more ping-ponging than you expected with “minimize” chosen; it’s hard to find a balance that meets everyone’s expectations and also still provides time savings over “go through the park in a big circle”. It’s not really accurate to say that projected wait time trumps everything else. But I think the answer you’re looking for is that the setting does not behave differently in the park than it does when making plans in advance.
Thanks! That’s good to know. Maybe you should add a setting for “I just want to do the park in a big circle” LOL
Just a tip (from personal experience) – I usually set my walking speed to Relaxed. It has an extra (but tiny) effect on minimize walking, because it boosts the “total time to do this as the next attraction” when the optimizer runs. And if you walk at a regular-ish speed, it tends to build in a small pool of slack minutes to be used for bathroom breaks without getting off schedule.
I see that the article language has not updated from Genie+ to LL-Multi-Pass or LL-Premier-Pass. Are the steps outlined in the article still pretty much the same?
I have several plans prepped for my family’s upcoming trip by using the website version and am hoping to update with LL selections later.
Hi Gail, yes, you should find that the behavior is similar. We do need to update this article but we’ve been making a lot of small changes in the app and it seemed best to wait until we were somewhere near the end of the line rather than updating constantly. We do have one more coming at the end of the month and will update then. Thanks for the reminder!
Does optimizing only work while in the park? I am trying to plan upcoming days and I am not understanding this app. Why does it have me going to Disney movie magic after Fantasmic at Hollywood? I thought Fantasmic was the last show of the night? Also it has to many wasted time slots. I made walking relaxed and minimized walking.
Hi Carrie, you should be able to optimize a plan before you arrive at the park, although some options like marking an attraction completed will only be available on the day of your plan. Depending on the day of your visit, it’s possible that there are two showings of Fantasmic.
I also love to set a relaxed walking speed, which I use to build in bathroom breaks. 😉 But if you find there are a lot of gaps in your schedule then there are three options. The first is to leave them as is and use the time for shopping or taking in the atmosphere. But you can also add in more attractions, or if you feel like your day is full enough you can adjust your start and end times to close up the gaps. If you’re planning to arrive right at park opening or stay for an evening show, you can add a large break in the middle of the day and head back to your hotel (select “leaving the park” when you add it in your plan), and that will also close up the gaps.
Why does it sometimes say to get a LL later than 7:00am? My plan says to obtain a Spaceship Earth LL at 7:25am. Wouldn’t it be better to get it right at 7?
The most likely reason that you would see this is that if you get the LL right at 7 a.m., it will expire before the plan “wants” you to use it. By waiting until a little later to get the LL, it will fall in the time window where the optimizer thinks it makes the most sense.
That said, if you are comfortable with Genie+ and don’t mind waking up at 7 am, the most foolproof method is to get the LL then, and modify it closer to 7:25 if the time you get at 7 am is too early. But that level of nuance isn’t really compatible with the kind of steps you get in a touring plan, and can be stressful for people who’ve never used the system before. Even people who have may feel that they’d prefer to take the risk of the time being a little later than they planned vs. having to get it, and then go back and modify it.
Hi! Is it possible to pin an attraction to a certain time or spot in the order? For example, at Animal Kingdom I want to start with Kilimanjaro Safari no matter what. Can I create a plan that starts with that and then optimizes the rest of the attractions for the day?
Hi Randy, sorry but no. Two ways to handle this:
1 – Make the plan, then move KS to first and evaluate. This works well if you’re not arriving first thing in the morning because the switch won’t usually affect the overall time too much for the rest of your attractions. It’s not great for rope drop and it doesn’t work if you want your designated spot in the middle (for instance, if some in your party are arriving to the parks later on).
2 – Follow step 1 to figure out the estimated time for KS. Then replace KS with a break of the same length at that time, and now you can optimize the rest.
That’s a great idea. Thank you!
Is there any way to see the map view from the browser within the app with all the numbers of where you’re planning to go?
Hi Kelsey, no, sorry. The map view is browser only.
Hello, I am struggling to figure out how to add Individual Lightning Lanes in the App. When I click on the meatball for Guardians or Avatar Flight of Passage, it doesn’t give me the option to add them to the plans as an ILL. I’m sure I’m missing something. Let me know! Thanks!
Hi Brett, it looks like this is a bug that may have been introduced in a recent update. In my own testing, I was (as you) unable to add an ILL unless I had also selected that I was planning to use Genie+. I’ve brought this to the attention of our devs, but in the meantime I tested a workaround, which is to turn on the “I will use Genie+”, add the ILL, then turn off the “I will use Genie+”. I found that the ILL I added was retained and used by the plan.
Are there instructions to add lightening lanes to a personalized plan using my desktop? These tips are definitely not working for me, and I’m wondering if it’s because the app works significantly differently?
Hi Michelle, yes, the app does work quite differently. Click the link at the end of the first paragraph that says “browser-based tutorial” and you should be all set.
I’m sorry – I don’t know how I missed that during my first read through!
You were eager to dive in and get to the good stuff. It happens to all of us. 🙂
Once I’m in the park, if I mark a few steps completed and then reoptimize, how does the app know where I’m currently located? Does it assume I’m at the most recently completed step?
Hi Fiona, Yes, it will assume you are near the most recently completed step. If you’ve wandered quite a distance (say your most recently completed Step was Spaceship Earth and you are now in World Showcase), you can change the location to point to a specific land. Look right near the top under the plan details and you should see the button to “Change Location”. But similar to typing in a city name in Google Maps, it will take your location as “somewhere in the middle of the specified land”, so this is only likely to provide an improvement if you really are in a different land – if you haven’t gone far, then your last completed attraction will be a more accurate pin in the map.
Thank you!
Hello –
I was looking at the “Using the Plan In The Parks” to refresh my memory on how I mark a step as complete. While the instructions are most helpful, please note that the “Step complete” option will NOT show up until the day(s) of your visit.
Please add this note (and mention any other options in that menu that do not appear until the day(s) of your visit) the next time that you update the “Using the Plan In The Parks” section of this BLOG.
Thanks!
Thanks Kevin. It was noted in another section, but as you point out, people may not read straight through and it’s better to mention it wherever it may be relevant. I’ve updated here to reflect that. I’m guessing you were looking at this because you have an upcoming trip, hope it’s a good one!
I am trying the the app on my Android this morning and it is literally unusable with these changes. I love the *idea* of it giving me an estimated lightning lane return time, but unfortunately it’s not working in execution. The app randomly decides when I should book my return time, and when I try to tell it I have already booked the attraction it simply doesn’t accept my changes. The only workaround I can find is just to manually enter my times as DAS times. Incredibly frustrating as I lost an hour of sleep this morning doing what *used* to take me less than ten minutes. I’m a software engineer, too…so if it is this complex for me I fear the experience for the average user.
Just wanted to give feedback so hopefully this can be fixed…
Hi Maggie, thanks for your feedback. As you note, hearing where users are having issues is an essential component of getting them fixed. 🙂 I’ll pass it along to the team.
Thanks for this update! Will really help me on my upcoming trip! Two questions/suggestions:
1. One thing I’ve noticed playing with the app is that in a 12 hour day when in theory I should be able to use at least 6 lightning lane, it often only suggests 2 or 3. Why might that be? I assume it’s because LLs either won’t be available or won’t actually save any time. Is that correct? Maybe you could add that explanation in the app?
2. Personally I’d prefer to use a lightning lane to shorten any wait > 60 min even if it’s not the mathematically ideal use of LLs. So it would be nice if I could tell the app either to prioritize avoiding the longest individual waits vs. overall time saved, or just to say “i definitely want to use a LL for Tower of Terror” and have it stick when I optimize even if I don’t have a return time yet.
Hi Fiona, thanks for the feedback!
You’re correct that sometimes LLs may not save time: the classic example would be if you can get a LL now to ride something that’s across the park and save 10 minutes in line, vs. a plan that has you arriving more naturally later on when the line is 8 minutes shorter anyway. If you look at the discussion on the Animal Kingdom day in this article, you’ll see an example of this kind of unintuitive result where skipping an LL might get you out of the park faster. https://touringplans.com/blog/genie-simple-strategy-example-day-at-each-park/
That said, it would be wrong of me not to acknowledge that we’re still fine-tuning to find the best balance between how aggressively users want to see plans using LLs and overall plan performance – exactly what you highlighted with your suggestion about wanting to use LLs even if it might not be the “perfectly mathematical” recommendation. I’ll pass your feedback along to the team, and thanks so much for taking the time to give it.